-
Welcome back Guest! Did you know you can mentor other members here at H-M? If not, please check out our Relaunch of Hobby Machinist Mentoring Program!
You are using an out of date browser. It may not display this or other websites correctly.
You should upgrade or use an alternative browser.
You should upgrade or use an alternative browser.
Chuck to Rotary Table Options
- Thread starter negativentropy
- Start date
- Joined
- Apr 12, 2011
- Messages
- 3,478
Randy we have a 4 jaw chuck that I need to mount to the rotary table and I like your idea. I will have to look at ours closer and consider very closely going your way.
Ed
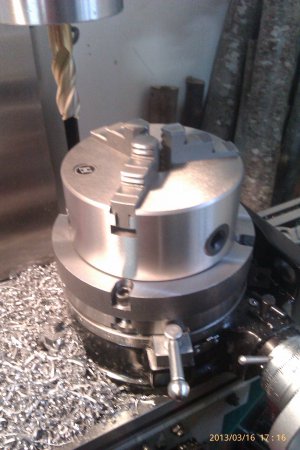
Thanks Ed, I am mounting an 8 inch chuck to an 8 inch indexer. As you can see things got a little tight, but work. I too need to get a 4 jaw chuck and do the same. If I recall correctly I started out with a 1.125 think x 8.00 x 8.00 aluminum. The 8.00 x 8.00 was slightly over size as ordered. Good luck.
- Joined
- Feb 20, 2013
- Messages
- 32
I am confused as to how you'd mount the chuck directly to the indexer, I mean I how'd you tighten the studs?:think1:
Here is what I did, an adapter plate.
Yeah in hind sight I would probably do it your way. I like that it allows you to move the t-nuts further in on the RT - whereas on mine they are right on the very edge and needed modification.
- Joined
- Feb 20, 2013
- Messages
- 32
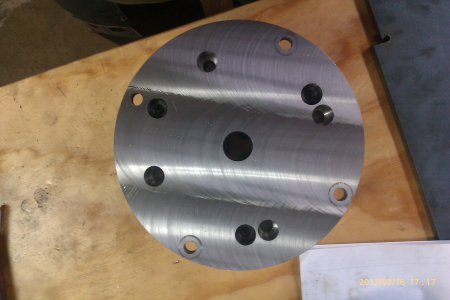
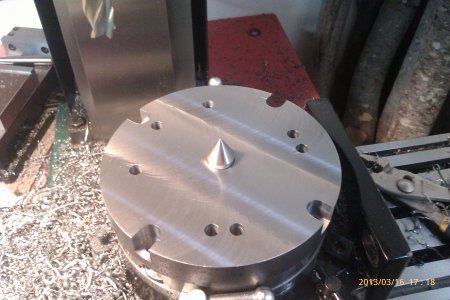
So I went back to the local machine shop and they had a left over 6" disc of free machining steel. I decided to give this another try adding some of the things you guys have done and being more precise this time.
First I turned down a MT2 (which fits in my RT) so that it has a non-tapered section. This was the hardest part, I think I rubbed the material off more than actually cutting it... Anyway, this allows me to quickly locate the adapter and chuck to center. Decided against the set-in-with-spanner-access style, as it would have left to little space for a 3 hole circle and 4 hole circle on the same adapter. The down side is I had to make custom T-nuts to clear the RT clampdowns. Never worked with free machining steel - wow, cuts super easy! Anyway, pictures:


First I turned down a MT2 (which fits in my RT) so that it has a non-tapered section. This was the hardest part, I think I rubbed the material off more than actually cutting it... Anyway, this allows me to quickly locate the adapter and chuck to center. Decided against the set-in-with-spanner-access style, as it would have left to little space for a 3 hole circle and 4 hole circle on the same adapter. The down side is I had to make custom T-nuts to clear the RT clampdowns. Never worked with free machining steel - wow, cuts super easy! Anyway, pictures:


if youre table has a morse taper center you can do as i did on my 6" table. i used the center morse taper by making a long taper with a large flange above it to bolt to the table, above the flange is the threaded portion 2- 1/4" that my chuck is. this adapter was to many different diameters to be practical to make out of one solid peice, although it could be done. i used 3 separate peices, 4140 for the taper section, 2233 for the flange and 12l15 for the threaded "spindle nose" . all these peices were press fit together with some very tight tolerances so they would not come apart. had to get a 20 ton press to press em as my 2 ton just wouldnt do it. i dont have any pictures at the moment but i will take some. doing it this way allows me to not have to indicate my chuck in once i get it off the lathe to the RT. i just indicate the part in the 4 jaw on the lathe, do the turning then i will move the whole chuck over to the rotary and do the milling, no indicating needed
- Joined
- Mar 3, 2020
- Messages
- 195
I have a 6" four-jaw chuck with through-bolts from the front. I had been planning to make a 7" adapter plate, to which the chuck bolts (from the front of the chuck), and then using four through-holes in the outside flange of the adapter plate, secure to the rotary table with T-nuts. After more thought, it seems that I could forgo an adapter plate; instead use just a round directly for alignment, and use the through bolts in the chuck to secure via T-nuts. The benefit that is forgone in this approach is the relative ease of lining up T-nuts that are 1/4" or so from the outside of the adapter.... the chuck bolts are 1-1/2" or so inside the OD of the chuck, so more difficult to align the T-nuts. Am I missing anything otherwise?
- Joined
- Apr 16, 2019
- Messages
- 745
I don’t see why you would need the adapter plate either , if aligning the tee slot nuts seem an issue, maybe a pencil type magnet would help or make your own nuts that are long . I’ve see store bought ones but might not have your t slot size. Edit: I think some people use a chuck that they could take right off their lathe and put on the rotary table adapter

