Brass Annealing Temperature... Anyone?

HotChips

Maker of wine, roasted coffee and metal chips
Registered
Joined
Feb 17, 2016
Messages
16
Hi All,

I'm making an automatic brass annealer for my reformed brass. But I am having a terrible time trying to nail down the proper temperature to heat the necks to. Every thread I look at online seems to espouse a different temp as the absolutely correct temperature to use. I have found everything from 475 - 750 degrees F. 750 seems to be the most commonly recommended temp!

Anyone have any insight on this??

Many thanks -- Pat
 
I know one manufacturer of annealers says about 700-750. The difference between those temps is only seconds under the flame. All I can tell you is get a laser thermometer and experiment.
 
Annealing is a process that is very hard to control for hobbyists. It is difficult for us to measure temperatures accurately, we have little knowledge of hardness of the brass before and after our heat treatment.

It is relatively easy to make a machine that provides consistent exposure to a heat source so that however much annealing (if any) is actually being done, is done equally to each case.

The temperature to use is influenced by the time of exposure. Higher temps means less time. More time means less temperature. A certain level has to be reached for annealing to happen, 450 deg F is not enough for our purposes but it is relatively easy to instantly ruin cartridge brass by overheating it. I agree with what derf wrote above.

The 'annealing' I have done was based on the color of the brass. The brass was clean and shiny to start with, but not resized. It was heated to barely starting to glow a maroon (dull red) color. Then held for 5 seconds at that temperature (whatever it was). Brass had to be still shine a bit after the process. This gives me the results I want. I know that the brass has been 'deadened' some based on its dimensions after resizing.

I do not like Tempilac because it is a threshold indicator that does not show by how much you exceed the threshold. That being said, if you have many cases to anneal, a range of different Tempilac bottles can help in setting up an annealing machine to determine if you are in the operable range.

Experimenting is key to getting your process right for you based on how your brass acts.
Bear in mind that annealing has an effect on what is referred to as neck tension. Not just from a change in springiness of the brass but also because it can burn off any carbon in the necks. Even if the necks are clean to start with, annealing will change the surface inside the neck. There is a good case to be made for a 'light' annealing after every firing OR only rarely.
 
Last edited:
This is an article that made a lot of sense to me. Sorry to the author, I don't remember the source.
 

Attachments

  • CCF19032016.pdf
    1.1 MB · Views: 31
Last edited:
This is an article that made a lot of sense to me. Sorry to the author, I don't remember the author.

Hi Tozguy,

Thanks a lot for the info. It was very helpful. I got my annealer running this morning and tried some 308 brass. I got it adjusted so the coloration on the brass I am doing looks like the coloration on military brass. I sized the brass after annealing and it "felt" OK. I tried using my laser temp gun on the brass while and right after the heating cycle but could not get consistent readings. I've got three temps (450, 650 & 750) of Tempilstiks ordered; should be here on Tuesday. I'll see what the temps look like when they get in.

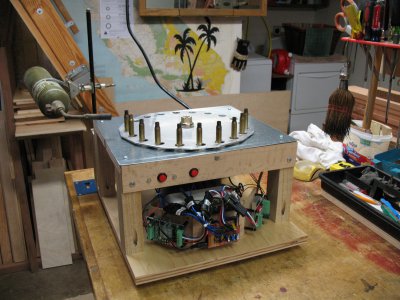
My annealer uses a turntable and when the brass moves into the torch flame there is a turning platter under it to spin the brass for even heating. After the heating step it moves one more step to "soak" and then on the next step it drops out into a water bath to quench. It's staying in the flame for about 6 seconds and in a darkened room the neck gets fairly red. The necks are still shiny after completing the process.

Thanks again for your help ... Pat
 
Sounds good. Pics would be great. What happens during the soak time? The quench is not necessary for brass in the usual sense (as it is for heat treating carbon steel).
 
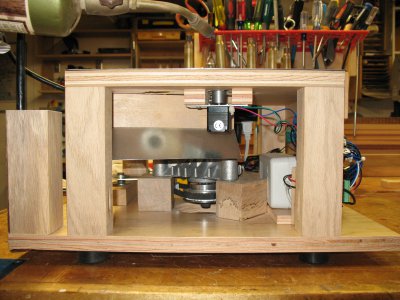
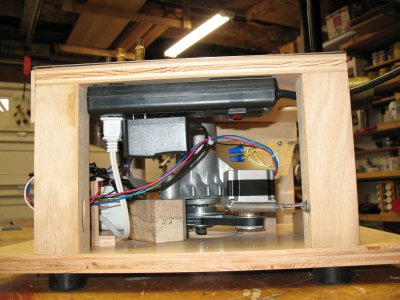
Here are some pictures of the annealer I'm working on. The first view shows the rotor on the top of the annealer. It also shows the Arduino (a little programmable controller -- in the middle) and the two driver boards for the stepper motors. The second view shows the stepper that spins the brass while it is in the flame and the slide where the brass drops out into a bucket of water. The third view shows the stepper which turns the rotor on top. It turns one step at a time and then pauses for an adjustable length of time holding the brass in the flame. It also shows the lawn mower spindle that supports the rotor. If anyone is interested in the Arduino code that operates the thing, I'd be happy to post it.

Annealer1.JPG Annealer2.JPG Annealer3.JPG

In some of the reading I have done it said that the shell should be left at temperature (soaked) for a short time before quenching. Some threads have said that its best to quench the brass instead of letting it cool naturally. It's supposed to "lock" the shell in a better crystalline state than it would migrate to while cooling naturally. I have no firsthand knowledge of either of these two ideas?
 
If the brass has been held at just the right temperature to anneal in say 5-6 seconds, then once removed from the flame it will cool out of the annealing temperature zone rather quickly without a quench. It will be too hot to handle with your fingers but annealing will be over and done. The brass will not go back to a harder state on its own. Cold water quenching of the brass has no scientific basis that indicates it is any better than slower air cooling.

If the concern is to protect the base of the cartridge from over heating, it is better to build a feature into your machine so the bases never get anywhere close to the critical temperature as opposed to having to cool them rapidly. 308 cases should not be a problem but annealing shorter cartridges can be a challenge in a gas fired annealing machine.

In the day, it was common to anneal short handgun cartridges by placing a batch of 50 upright in a pan of water. There had to be enough water to cover the cartridge bases and keep them cool while just few millimetres up the case brass was hot enough to be annealing. When the annealing was done on a cartridge it was tipped over into the water so that we could tell which ones were done. The purpose of tipping them over was to keep track of our progress and not for any benefit in the metallurgy of the brass.

I wonder if some of us are influenced by what we know about heat treating carbon steels. This is a different story altogether and the purpose of various heating/quenching cycles are well documented. Rapid quenching of carbon steels in oil or water are often required for hardness. Rates of cooling in the annealing process can vary depending on the final characteristics we are after in the steel. All of this is very common knowledge for carbon steels but beware of applying it in general to any and all other metals.

Thanks for the pics of your machine. Very impressive.
 
Last edited:
Hi Tozguy,

Many thanks for the additional information. It sure gets confusing when there is so much contradictory info on the net. Your info will really help me to get this thing up and running. I'm particularly interested in annealing my 250 Savage brass. It's pretty hard to come by now-days and I start getting split necks after only a few reloads.
 
Back
Top