Boring head for a mill - getting started

These bits seem to be ground as a D with the D being equal to the radius plus maybe 0.006". The bit is round with no additional relief under the cutting edge. Is there anything that can be done to make them cut better? (Besides lowering the speed to the correct SFM for the material!)
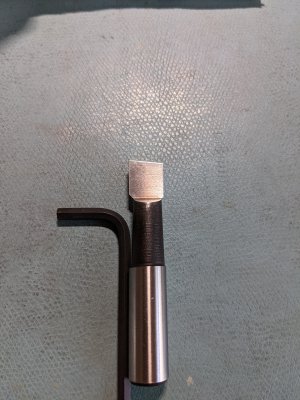
PXL_20210627_193323592.jpgPXL_20210627_193342791.jpg
This is one of the bits as received. Haven't honed it or altered it in any way. So these tool bits don't really have any relief under the cutting edge. Am I interpreting that correctly? Cutting tip is on the top of the 2nd photo.
 
Gosh, didn't even think of that. That would be 220 sfm or so, and I should keep it under 100? Have to put up a sticky in the shop for that. Lot's to remember. Have to check the bit then and see what kind of a mess I made.
Yes, for mild steel 100 sfm is about the max, you can get away with a little higher speed on an interrupted cut, as the tool has a little time to cool down when not actually cutting, but 80 to 100 sfm is the normal guideline.
 
These bits seem to be ground as a D with the D being equal to the radius plus maybe 0.006". The bit is round with no additional relief under the cutting edge. Is there anything that can be done to make them cut better? (Besides lowering the speed to the correct SFM for the material!)
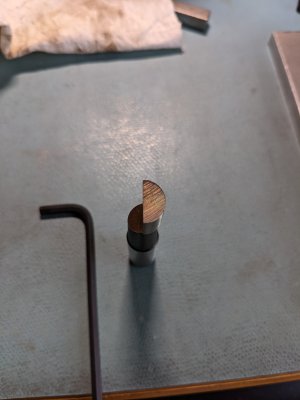
View attachment 370474View attachment 370475
This is one of the bits as received. Haven't honed it or altered it in any way. So these tool bits don't really have any relief under the cutting edge. Am I interpreting that correctly? Cutting tip is on the top of the 2nd photo.
That is pretty much the normal shape for that type of boring bit, when I use them, I set them with the vertical cutting face radial to the axis of the boring head travel. When possible, I used Bokum style boring bits that have back rake, and cut more freely than those pictured, which are sharpened on the end generally, the Bokum bits are only sharpened on top and afr form ground on the other surfaces.
 
front clearance would depend on how the tool is clocked, it does have some back rake, so it could be slightly tipped forwards to increase front clearance.
 
My Borite bars came sharp, but all you should need to do is hone the flat. That should make the edge where it hits the radius sharp. Maybe the flat on the end as well. The cutting edge is the top left corner in the side view pic. There looks to be slight clearance angles ground into it already, though that could be perspective. You only need a few degrees really. Just enough to not rub.

For alignment, I usually just install them with the cutting edge facing the cut, with perhaps a slight angle for clearance. It's a little like angling a lathe tool, the angle the edge hits the work changes the forces on the bit while cutting a little. If you look at the edge as you rotate the boring head, you can see how clocking the bit a little changes the cutting angle. A few degrees either way can make a difference, but I haven't noticed much. Then just set the stop and enable the power feed, off it goes. Don't forget to snug the gib and lock. You don't want it shifting while in the bore. :)
 
A couple of notes, Dial reads in .001's, cuts in .002's.

For a diameter under 4", (this is already mentioned), Use a HSS tool sticking out of the side of the tool holder, not the face. (Less spring this way, also less vibration.

The "D" shape of the cutter. Unless you're cutting about a 5/8" hole, there's going to be relief on the tool. The larger the hole the more relief. For a 5/8" hole, use a small cutter....
 
I'm a long way from an expert but do like the results I manage with a boring head. Using the power down on the mill will produce better results. Shortest, fattest bar that will do the job. Carbide bars are a lot stiffer and a must for small holes. Shop made bars are quite easy to make.
 
Grind an angle on a broken end mill, then grind a flat halfway through? Maybe?
That will work better if you also grind away some of the body above the cutting edge to give clearance.
Bars can be made by drilling a hole, for a piece of tool steel, in a steel bar. If drilled at an angle it can do a stopped flat bottom ledge. The ledge is good for stopping a bearing in place. Retain the tool steel cutter with a set screw from the bottom. 1/8" square tool steel works in a round drilled hole. The setscrew will keep the orientation. Simple and cheap. Make as needed so you can keep the lengths short. I machine a flat on the shank for the set screw on the boring head. Keeps from fighting the dimple caused by the set screw. It fixes the rake angle so be sure you've got that right.
When you adjust the dovetail slide, snug the outer two set screws so you can still move the slide to adjust the diameter of the cut. Use the center set screw as a lock after adjusting each time.
 
These bits seem to be ground as a D with the D being equal to the radius plus maybe 0.006". The bit is round with no additional relief under the cutting edge.

Because the flat part of the D is farther towards the curved part of the D than ½ way there is relief !
 
Back
Top