Annoying issue with dial indicator readings

Maplehead

Registered
Registered
Joined
Feb 20, 2017
Messages
437
Hi All
So I'm trying to make some guitar saddles that have a #6 x 40 threaded side to it. The saddles are from 3/8" round bar so I am taking the stock down quite a bit.
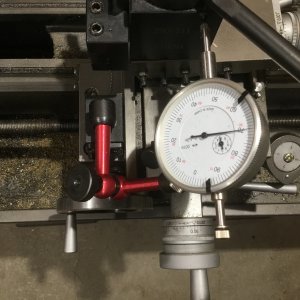
The goal is to get to the #6 max diameter of .138". My dial on my cross slide says it's in .002" increments. However, the dial indicator I hooked up shows it as incrementing .001" per graduation. I'll turn the cross slide five increments for a .005" cut and the dial indicator confirms I added .005". So great, I know what the increments are now so I can move on. Well, I was at .190" and I took .005" cuts down to .160" and stopped to measure. The micrometer read .130".
What the heck is going on?
I watched the dial on the cross slide and the dial indicator as I made each cut and they both matched .005" all the way down before I stopped.
Now I have to face that piece off aagain and start over.
Any and all help is greatly appreciated.
The lathe I'm using is a Jet BDB-919.
 

Attachments

  • 020BEAA3-B980-4E0A-8751-DDD0A6594DCB.jpeg
    020BEAA3-B980-4E0A-8751-DDD0A6594DCB.jpeg
    1.6 MB · Views: 64
Right in front of the .002 is a Ø symbol. This symbol means diameter. What that is telling you is that each graduation of the dial will remove .002 from the diameter of the part. Your dial indicator is measuring tool movement or radius of movement. so if you move in .005 on the dial indicator you are taking .010 off the diameter.

Of course than as you get to these real small diameters, there is also spring back to consider. The part is so thin that it deflects from the tool pressure and even though you moved in .005 it will actually take less than that off. The longer the stick out from the chuck the more pronounced this gets.
 
Last edited:
Right in front of the .002 is a Ø symbol. This symbol means diameter. What that is telling you is that each graduation of the dial will remove .002 from the diameter of the part. Your dial indicator is measuring tool movement or radius of movement. so if you move in .005 on the dial indicator you are taking .010 off the diameter.

Of course than as you get to these real small diameters, there is also spring back to consider. The part is so thin that it deflects from the tool pressure and even though you moved in .005 it will actually take less than that off. The longer the stick out from the chuck the more pronounced this gets.
Makes perfect sense and I did not see that at all. Thanks for posting this.
 
I encountered exactly this when the tool load forces of turning on a small part is enough to deflect the part.

Related, is a couple of graduated dials I had saved from a flea market purchase, for a "larger dials upgrade", which has 200 divisions. On a 10TPI cross slide advance, one of those divisions is the change in dimension off the diameter, for a cut. The 100 division dials tell you the depth of the cut direct - off the radius.

Joe Piecczynski has a YouTube video showing the technique of turning small parts by taking the cut off the face end, leaving the small diameter part remaining. He also has a video on "Extended Small Diameter Turning".
https://www.youtube.com/watch?v=vg6ug0FDhos
 
@Maplehead, what kind of turning tool are you using?

A 0.138" OD will deflect with a 0.005" DOC taken with an inserted carbide tool, especially if the nose radius is on the biggish side, say 0.015" or so. A well ground HSS tool will take a thou off without deflecting much at all when used with the proper lead angle.

When dealing with small diameters we always have to remember the cutting forces involved. I've turned a 1" long section of brass down to a consistent 0.050" diameter end to end with a simple HSS tool by just dialing in the cut. To do that with an insert would take more planning.
I second the use of hss (cemented carbide works too) for small diameter turning as most manual machines cannot either rotate fast enough or maintain the rigidity required to produce the sf/m for the geometry of carbide inserts to be beneficial.

Feathering a radius also allows for desirable results as it concentrates the load over a greater area reducing defection which in turn will allow for a more concentric straighter part. After desired diameter and length is reached simply machine the radius down to the needed profile and you should have a successful part.
 
I ran into this the other day trying to cut some brass down to a thin diameter using carbide. It didn't cut decent and I kept ending up with a taper even after multiple spring cuts. Switched to a HSS cutter with a nice sharp point and all the problems went away. I could take a thou or two off easily and no taper.
 
Back
Top