Aligning a mini-lathe

WobblyHand

H-M Supporter - Diamond Member
H-M Lifetime Diamond Member
Joined
Dec 18, 2019
Messages
6,464
It seems to me that aligning a mini-lathe is a little different from bigger ones. For one, the geometry of the lathe is different. So the adjustments would be a little different.

I've found a copy of Rollie's Dad Method of Lathe Alignment. I've just done the first horizontal measurements. The test rod is ground and 20 mm in diameter. 20 mm just fits through the spindle bore. The rod is sticking out 13.25" from the chuck. The measurements for the horizontal are:
0.5" from the chuck: min 0.0000", max 0.0018", average 0.0009"
9.75" from chuck : min 0.0008", max 0.0038", average 0.0015"
So the horizontal misalignment is 0.0006" if I've done this correctly. However, I'm not sure of the arithmetic sign. Is it negative in my case?
Next post I'll have the vertical measurement.

From RDM: 9. The difference between the "near end average distance" and "far end average distance" is a
measure of the misalignment of the spindle axis with the ways.


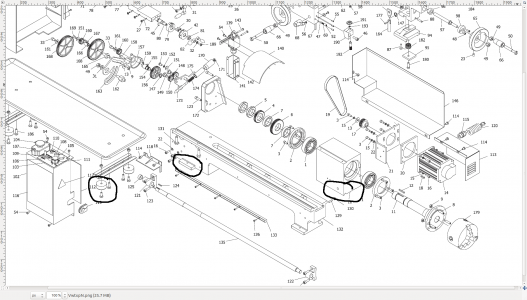
RDM tells us to put a shim under the near-side foot at the head stock end of the lathe. What do I need to do here? If I look at my mini-lathe drawing, are we talking about under that head stock casting #10, or under the ways casting #32 on the left side, or under the rubber donut #127?
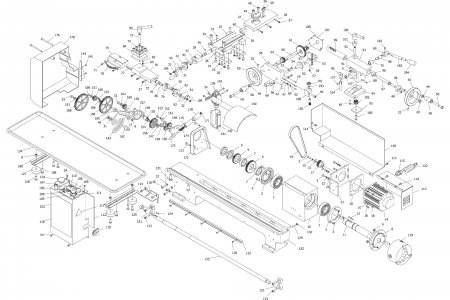
VwtxpN.jpg
A little confused, help me get un-befuddled. Thanks!
 
To get in the ballpark, I am cheating. My spindle is an number 3 morris taper (3MT), my tailstock is a 2MT. I bought a precision ground rod which has 3MT on one end, and a 2MT on the other. A separate bar will be mounted up in the chuck, and lightly turned without tail-stock support and the OD will be checked over the (roughly) one foot of machined surface to examine taper. The chuck will be removed, the 3MT end of a purchased reference bar will be slid into the headstock spindle, and then a dial indicator will be mounted to the compound. I will measure the error over the full length of the ways (horizontally and vertically). Then it will get popped out, and the 2MT end will be put in the tailstock. The same vertical and horizontal error will be measured over the full length of the ways (measured by the indicator mounted to the compound). This will be used to give me the original "factory" error of the lathe prior to the full tear down. The 3MT/2MT bar is supposed to be true to 0.0002 inch combined error to the tapers and O.D. I can use it for checking headstock to tailstock alignment, by putting it in the spindle, putting an indicator on it (horizontally and vertically), and then sliding the tailstock end over the 2MT end, and look at how much, and in which direction it changed. Once all of these errors are known, then I can calculate and correct the error.
 
Measured the vertical displacement:
At 1.2" from chuck: 0.0016" max, 0.00045 min, 0.000575" avg
At 10.5" from chuck: 0.0019" max, -0.0001 min, 0.0009" avg.
Near - far = -0.000325" over 9.3"

For horizontal Near - far = -0.0006" over 9.25"

Both measurements were taken with a dial indicator reading to 0.0001".

Relatively speaking, measuring the error is easy. You see, it's done. Having a ground rod is helpful. I measured the rod near both measurement points and the diameter was the same to a tenth. (0.7868" for both measurements)

Don't know what to do next. Honestly don't know where or how to shim this thing. Can someone help me with the how to shim part?
Which of these circled areas is the right place?
1598826366176.png
Thanks!
 
Last edited:
The test rod was from Amazon. It was $12 for a 15" custom cut piece of 20mm bearing rod for linear motion.
 
I would only reach of a shim if the error was huge, Even a shim which is 1/1000 of an inch thick in one corner seriously moves the angle the chuck is pointing.
 
I would only reach of a shim if the error was huge, Even a shim which is 1/1000 of an inch thick in one corner seriously moves the angle the chuck is pointing.
Is the correction 1:1, or something less, or more? Thinnest shim stock that's commonly available seems to be 0.0005". Half a thou would bring in the error on the horizontal to 0.0001". That would suit me fine. :D

Still don't know where to put the shim though... No one has answered that question...
 
If the block which is the headstock is 6 inches long, and you shim one end with a 1/1000 shim, by the time you are 12 inches from the block, your shift will be 2 thousandths of an inch. very small shims make a huge difference over the length of the bed. Keep in mind that the jaws of the chuck is about 4 inches out from the headstock block. Think of it like a lever, where your movement gets multiplied.
 
The RDM method is supposed to be a check for headstock alignment. If your numbers suggest horizontal misalignment then no shims would be required. It means the headstock is not aligned with the ways and you need to shift it to correct the amount of "off" you are measuring. In other words, you need to shift the headstock itself toward or away from you and then remeasure to see what that does. If you are also going to try to correct vertical misalignment then you may need to use shims under the headstock. That is a whole other can of worms.

EDIT: I wasn't clear above. You will need to rotate the headstock in minute amounts, retighten the locking bolts and repeat the RDM measurements. Repeat as necessary until you eliminate any significant error.
 
Last edited:
The RDM method is supposed to be a check for headstock alignment. If your numbers suggest horizontal misalignment then no shims would be required. It means the headstock is not aligned with the ways and you need to shift it to correct the amount of "off" you are measuring. In other words, you need to shift the headstock itself toward or away from you and then remeasure to see what that does. If you are also going to try to correct vertical misalignment then you may need to use shims under the headstock. That is a whole other can of worms.

EDIT: I wasn't clear above. You will need to rotate the headstock in minute amounts, retighten the locking bolts and repeat the RDM measurements. Repeat as necessary until you eliminate any significant error.
So it would seem my headstock is off by 6 tenths in the horizontal and 3 tenths in the vertical over about 9-1/4". What is confusing to me is the correction. @mikey For a mini-lathe, the horizontal correction would be to partially loosen the 3 bolts #131 that fasten the headstock casting #10 to the bed way #132, and rotate the headstock relative to the bed way? Please state yes or no, sometimes things are not obvious to me - that's why I am asking the question.

How does one move the headstock such a tiny, minute, amount in a controllable fashion? Does one tap the casting with a hammer? Use a lever? I could see myself battling with this for ages, some practical experience would be most helpful.
 
Back
Top