
-
Welcome back Guest! Did you know you can mentor other members here at H-M? If not, please check out our Relaunch of Hobby Machinist Mentoring Program!
You are using an out of date browser. It may not display this or other websites correctly.
You should upgrade or use an alternative browser.
You should upgrade or use an alternative browser.
Ageless 9 cylinder radial engine build thread
- Thread starter starr256
- Start date
- Joined
- Apr 7, 2018
- Messages
- 143
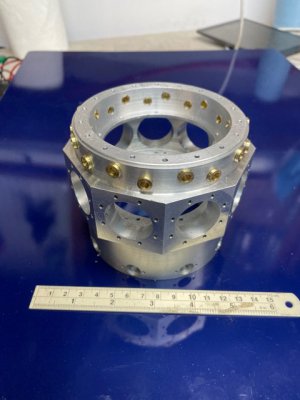
Finally, after making a five gallon bucket of aluminum chips, drilling ~150 holes, tapping 140+ 4-40 holes (one broken tap at hole 125), 18 tappet bushings made and installed, I am claiming victory. The crankcase id done till the oil pump is complete. Much was learned And practice. Lots of repetitive operations. No major issues, even the broken tap can be ignored with the hole moved.
On to the oil pump, front bearing, front and rear covers.......
On to the oil pump, front bearing, front and rear covers.......
Attachments
- Joined
- Apr 7, 2018
- Messages
- 143
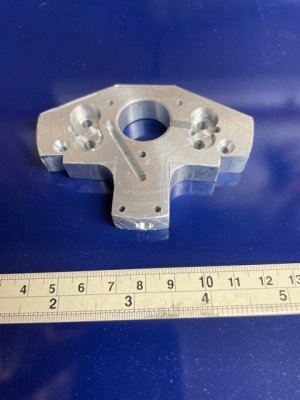
Oil pump housing done. Although a strange shape and lots of alignment with rear main bearing and the crankcase, nothing really odd or difficult with it. Waiting on gear cutters for the pump gears. I looked into purchasing the gears and found that it was cheaper to buy the needed cutters new (I don't buy used cutting tools anymore). Not by much.
There was one issue that I have not resolved satisfactorily. How to debur small holes on the inside of a hole or cavity?
There was one issue that I have not resolved satisfactorily. How to debur small holes on the inside of a hole or cavity?
Attachments
")
- Joined
- Oct 7, 2020
- Messages
- 2,326
Nice work, the crank case is beautiful. I'm sure glad the broken tap at hole #125 is a non issue.
Good for you taking on the build. Looks great so far. I'm about 90% done a 5 cylinder radial, glow ignition. Also my first engine & was in deep over my head. But it's coming together & has been very rewarding.Why didn't I go with the Tapmatic? The needed collet won't be here for another week or so. Jittery impatience, that's why.
There are a few things to pay attention to on your Tapmatic regarding blind holes.
- there is a calculation that determines what offset distance to set your your depth stop above where you want the tap to terminate. The reason is the mechanism will allow the tap to propagate further into hole even with no down feed, beyond the depth it appear when 'un-sprung'. What this means is, without correct depth stop, its amazingly easy to firmly spud the tap into the bottom of hole & break it. Ask me how I know. And yes it was a crankcase on the proverbial second last hole.
- Similarly pay attention to the over-hole distance. The plans may call for something shallower (ie. presuming hand tapping) that may require adjustments. So get real familiar with the unit beforehand on same material & hole conditions. A lower clutch setting may save you a break. A Tapmatic will allow you to chase an existing threaded hole no problem. Its really quite ingenious. But if you do, blow any the chips out. Always.
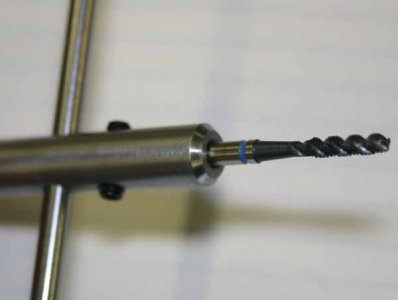
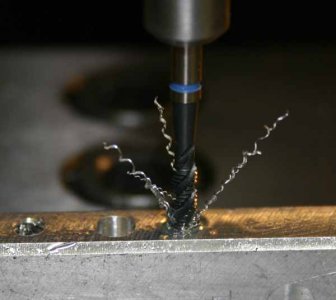
- get high quality new taps that eject chips outward not downward. Avoid using them on steel or other materials if you can. Its a bad area to try & save a few bucks if you value your time remaking complicated parts
- there is no miracle cutting fluid IMO. I find WD-40 works about the same as the dedicated aluminum products, its just a matter of how flushed my skin becomes after inhaling the stuff. I prefer a tapping cream I got from KBC. It seems to have less resistance & chips stick less, but always start each hole with a clean, brushed clean tap.
- all said, you have probably seen or already using these manual mode tapping aids. Sometimes if the hole positioning is the time consuming effort, its just as quick to pop it in after drilling right then & there while everything is aligned. The Tapmatic setup only makes sense if you can do a run of a bunch of holes IMO. The slender tommy bar style is mine. The knurled wheel adapters have been favored by model engineering types for a long time
Peter
Attachments

Maybe you have seen these Hodgson build links?
And these forums? (you can do a search, there have been are other Hodgson builds)
 www.homemodelenginemachinist.com
And these forums? (you can do a search, there have been are other Hodgson builds)
Home Model Engine Machinist Forum
Home model engine machinists & makers forum. Model engine making forums for engine plans, castings, CAD, CNC designs, lathe, Stirling, boilers & steam.
www.homemodelenginemachinist.com
- Joined
- Apr 7, 2018
- Messages
- 143
I have checked both sites and am duly humbled by both efforts. Dr. Ken-ichi Tsuzuki's was particularly instructive with his assessment of the design as drawn. He had tried a number of modifications to address construction tooling and design that failed. Each time he would state that if he had stuck with the design as drawn, the part would have worked fine. I was also impressed with his willingness to create additional tooling and jigs that would facilitate test a component, such as value leakage, cylinder compression, oil pump performance and timing issues. In the end, he had a working engine.
Mr. Tom's build journal was impressive for it's CAD modeling as well as the quality of the build itself.
I would recommend that anyone thinking of taking on Hodgson 9 Cylinder Radial Engine check out those two build journals.
Mr. Tom's build journal was impressive for it's CAD modeling as well as the quality of the build itself.
I would recommend that anyone thinking of taking on Hodgson 9 Cylinder Radial Engine check out those two build journals.
- Joined
- Apr 7, 2018
- Messages
- 143
I am one that tests each component as it is built. This provides me with a higher level of confidence that when the components are assembled the project will maybe function as designed. This is a vestige of my software engineering background. It also means building test fixtures. All of this slows development down. That's OK, as what else do I have to do being retired and all (household chores aside)? It also leads to the Changing-the-light-bulb-turning-into-a-rewiring-the-house syndrome. In this case I have been working on the the oil pump. I want to test the oil pump. To test the oil, I will need to create a test crank shaft. To hold things together, probably should install it in the crankcase. Of course, that means I need to make the fittings for the oil pump. And to make things easier to work on, need to make a stand for the engine. You can see where this is going. Sooooooo, this project is going to take a while.
PS - A side benefit is I now have a solid reason to get the welder I have wanted for a while.
PS - A side benefit is I now have a solid reason to get the welder I have wanted for a while.