Adapting a mismatched horizontal milling attachment set

ErichKeane

Making scrap at ludicrous speed.
H-M Lifetime Diamond Member
Joined
Aug 3, 2017
Messages
2,437
As some of you know, I recently grabbed a Bridgeport clone right angle attachment from a member here, and he sold me a support and arbor at the same time!

There have been a handful of times that a horizontal mill would come in handy, so I was super happy about the acquisition! I used the right angle attachment for the project I needed, so turned to the other parts.

Unfortunately, the arbor and arbor support aren't compatible, and the arbor support isn't compatible with my mill. I am determined to fix both of these.

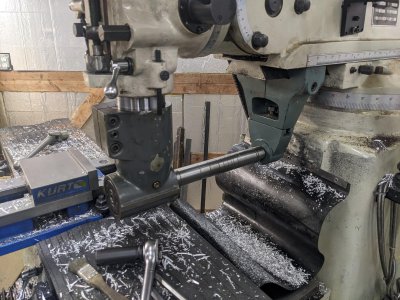
For those who don't know, there are two styles for arbor/support. The older style is a special bronze collet in the arbor support that the arbor spins in, and the arbor has a short part. This is the style arbor I have.

The other is just a bronze bushing in the arbor support, with the arbor having a longer area: this is the arbor support that I have :)

I decided to add a 1144 extension to my arbor to do this.

First, I bored a hunk of 1" 1144 to be a 2 thou press fit on the end of the arbor.
PXL_20230113_220150742.jpg

Then, I flipped it around and faced the other side.

PXL_20230113_220620605.jpg

I used some loctite 609 and a lead mallet to be hammer them together, after I discovered that my arbor press is roughly 2" too short for this job :)
PXL_20230113_221154507.jpg

Next, a quick centering in my 4 jaw:
PXL_20230113_222652495.jpg

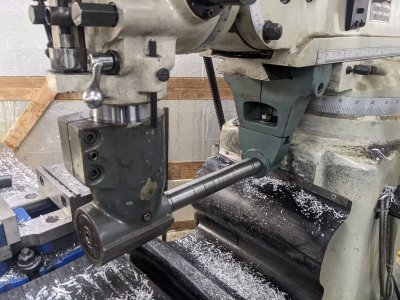
I center drilled it for tail support, then turned it down to a sliding fit in the arbor support:PXL_20230113_225642615.jpg

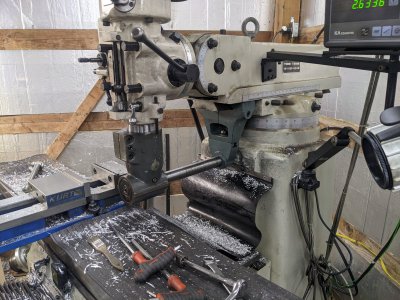
Next, I'll start working on making the arbor support work with my mill.
 
So there are two different mill/arbor support interfaces. 50 degree dovetails, and 55 degree. My mill is 55 degrees, and the arbor support is 50. So, they don't work together:) fortunately, there is enough extra meat on the arbor support I think I can get a 55 degrees dovetail set on it after some time on the shaper.

However, measuring inside dovetails that "index" on the "top" instead of the inside bottom is hard math, and I can't make tails of it.

So, my plan is to make a copy of the docetail on the mill that I can "copy", and hit a measurement over pins, then use as a "go/no-go gauge" when it comes to machining the actual part.

I started with a big block of aluminum, which I squared up on 4 sides, marked it out, and roughed it out.
PXL_20230114_000318152.jpgPXL_20230114_001630931.jpgPXL_20230114_003709050.jpg

I ended up a little narrow, but I figure the points aren't all that necessary to reproduce, just the angle, so I'm hopefully ok. Worst case, I'll just flip the block over :)

Next step will be to tilt the head to 55 degrees and machine the doverail, hopefully with a mill narrow enough it doesn't interfere with my ability to measure across pins.
 
Lovely work, following along! I envy the amount of time you have to spend on projects, but I'm happy these are getting used instead of being a tripping hazard in my garage :)
 
Lovely work, following along! I envy the amount of time you have to spend on projects, but I'm happy these are getting used instead of being a tripping hazard in my garage :)
I'm very fortunate with how much time I get! I work an "early" shift at work, so east coast time as WFH, so when I finish at 1 or 2, I get the afternoon to do my thing before my wife and kid are around.
 
Alright, so I opted to work on this today. I spent A LONG time grinding the tools, since I needed 1 for each side. But first, I had to deal with the aluminum test block. It came out on dimension, but also... bad. I ended up having a really hard time removing the 'inner corner' enough to work, and had to go back and re-cut a relief a few times.

PXL_20230118_000300955.jpg

Also, there are NO flat surfaces on the bodyother than the one flat on the table and the one straight up! So I centered it best I could with a straight-edge on the side of the casting, and used the amount that it cut to try to square it up best I could. Its not perfect, but good enough.

I ended up getting nearly a full cut on both sides, which I consider a success! Also, my shaper seems to cut a little bit of a scallop when doing the power-feed down in the head, which I am not sure about... I might need to tighten the gib there.

PXL_20230118_224635252.jpgPXL_20230119_012146660.jpg

After a day of making the part (and not a profit!), I got my test block to a nice slide-fit. At that point, I took it off the shaper, did a little fittling, and tried installing it on the mill:

PXL_20230119_012748119.jpg

AND, it gets about 1/2 way on with minor tapping (I could probably hammer it on!). I apparently made it too tight! Re-indicating this in would be a pain, so I've got a few plans to make up the difference. I think I screwed up in 2 ways:

1- I think the way I had it clamped 'opened' the jaws a few thou, so my test piece 'fit' nicely, but it was spread out a bit from what it is 'at rest'.

2- The ways are pretty mucky/covered in cosmoline. A big part of getting it to fit as much as I did was to put it on, clean the cosmo that came off the edge of it, and try again.

I'll probably do a few things to help it fit better:
First, I'll scrape the cosmo off a bit better.
Second I might try filing a bit on the flats. I did it a little, and it improved it, but I suspect I only need a few thou.
Third, and if I don't like the results on those, I'll try to set it up on the shaper/in the mill, and face off the top (as pictured) a few thou. That'll 'widen' the effective dovetail. I DID scotchbrite the top of it which also helped it fit better when I was just getting it started.


Either way, I'm about an hour of work away from getting it working perfect! The part that holds the arbor attaches on that bolt on the bottom you can see, and it can rotate/move left & right as necessary (and height is adjustable with the quill!), so there isn't really any alignment to be worried about.
 
woohoo! Great progress :) I would call that FTF - file to fit. Maybe blue it up every couple of iterations to see where it's hanging up so you don't take off more than you need to. Don't forget to file small flats on the outer points of each dovetail (support and mill). More than once I have forgotten to and found the issue wasn't the dimensions of the two parts, but the lack of clearance in the corners.
 
woohoo! Great progress :) I would call that FTF - file to fit. Maybe blue it up every couple of iterations to see where it's hanging up so you don't take off more than you need to. Don't forget to file small flats on the outer points of each dovetail (support and mill). More than once I have forgotten to and found the issue wasn't the dimensions of the two parts, but the lack of clearance in the corners.
Yep, sadly I'm at "FTF" time :D I DID break the edges best I can tell, but I'll double check! Fortunately, if I 'take too much' the clamp action should allow me to take up a few tens of thousanths. I'm beating myself up a touch, since when it was in the shaper I took a cut, and the test piece fit 'barely'. I decided since it was 10 minutes to dinner time, I was done. I guess I should have just waited until tomorrow and taken 1 more small cut :)
 
File to fit today was about 10 minutes :) The whole process went together pretty easy, with a mixture of removing material and 'shaving' off the cosmoline on the machine. I was able to get it to 'work' and assemble as a whole kit where my mill head was, but it was a bit of a pain. I ended up moving the head about an 1.5" closer to the operator (via the gear thing on the side!) to make this easier to get on/off, so that changes between the pictures. Otherwise, it looks like it'll work great! I didn't have a job for it, just wanted to test it out/take photos.

Either way, this is my first 'complete' project in what feels like ages :D So glad to have something done finally.
 

Attachments

  • PXL_20230120_215508829.jpg
    PXL_20230120_215508829.jpg
    545.8 KB · Views: 18
  • PXL_20230120_215335849.jpg
    PXL_20230120_215335849.jpg
    567.5 KB · Views: 17
  • PXL_20230120_215341588.jpg
    PXL_20230120_215341588.jpg
    621.6 KB · Views: 18
Back
Top