90's Delta 33-400 Radial Arm Saw Refresh

Thanks for your reply. I'll definitely check out the Tenryu blades.

So far, I've only done some cross cutting. There is minor blow out on the right side of the blade. If you look at picture 1875 in my previous post you can see the blowout on the board laying on the table. I cut them slightly longer than necessary just in case there were problems. The board on the table slightly overlaps the blade. I can still cut off about 1/4" to eliminate the blowout.
 
Looks like the kerf in your table might be a little too wrung out to properly support the wood fibers. Putting a 1/4" MDF sacrificial top on it would probably go a long way toward getting rid of your blow out. Kind of like putting a fresh zero clearance insert on a table saw or miter saw.

You might run into this issue on the fence side too since the gap in the aluminum is a bit wider than the blade. Should be easy to attach a sacrificial face to it though if you need to.
 
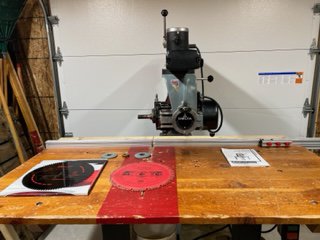
I finished setting up the saw for the pier project yesterday. The last things to do were to install a new blade and level the table. The table is far from perfect, but good hopefully enough for the project at hand. As I mentioned in another post the table is made from 1 1/4 x 6" white oak boards. The saw was built into a countertop. When it was removed there was no support at either end. Consequently, the table has a tendency to droop at the ends. It is also drooping at the front. That is in part due to the braces that had to be removed for access to the power box.

Now that the new power cord is installed, and the box is wired correctly I reinstalled the braces. They do minimize the front to back drop, but given they are 2 1/2" x 4" white oak they are heavy and add to the problem of side-to-side droop. I was able to minimize the droop to around .005" in both directions. I say "about .005" in that there are interruptions on the top from past abuse. I'm not sure that degree of levelness would be acceptable in the cabinet making world, but it should certainly be good enough for some pier planking.

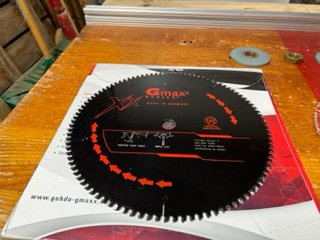
I also installed one of the new blades. This one is a Gmaxx 14" crosscut blade with 100 teeth. The teeth have a triple chip grind and a negative 2* rake. I haven't had a chance to try it out yet. It's only 18* outside. That's a little cool to be opening the garage doors and positioning the saw to cut some boards. Today's high is only supposed to be in the low 20's. Tomorrow it's supposed to go back to the mid 30's. If it actually makes it that high, I'll do a few test cuts.

As luck would have it, we were about an hour from home when the additional blades I ordered were delivered. The complete inventory will include 2 crosscut blades, 2 ripping blades, and 2 combination blades. I purchased 2 of each style to hopefully eliminate downtime when a blade needs sharpening. There's no one in the area that does triple chip or alternative top bevel grinds on 14" blades. The closest places are Sheboygan or Fon Du Lac. Turnaround time is usually a week or two depending on their workload.

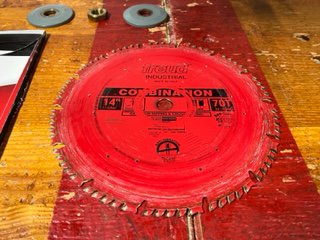
The original blade has some interesting deposits on the sides. It looks like white paint or plastic but can easily be removed by scratching it with a fingernail. I tried a little WD40, but it didn't touch the deposits. Here are some pictures of the saw as the saw stands today as well as the original and one of the new blades. Note the white streaks on the perimeter of the old (Freud) blade. If anyone has some suggestions as to what might work without removing the anti-stick coating, I would appreciate hearing them.
 

Attachments

  • IMG_1876.jpg
    IMG_1876.jpg
    46.2 KB · Views: 6
  • IMG_1877.jpg
    IMG_1877.jpg
    52.4 KB · Views: 6
  • IMG_1880.jpg
    IMG_1880.jpg
    70.5 KB · Views: 6
Last edited:
While I was out of town the new blades arrived for the saw. I now have a total of 6 blades, 2 combination blades, 2 crosscut blades, and 2 ripping blades. I put one of the new crosscut blades on the machine last weekend. The plan was to do some test cuts Saturday. However, when I woke up it was only 6*F and only got up to the low 20's. To top things off the wind was in the high 20 mph to the low 30 mph. A little too cool and windy to be rolling the saw out of the garage for just a few test cuts.

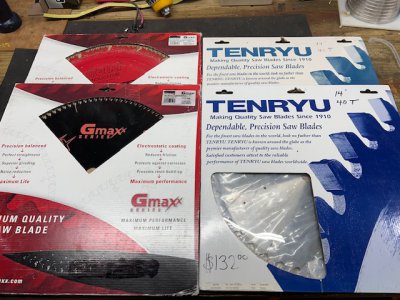
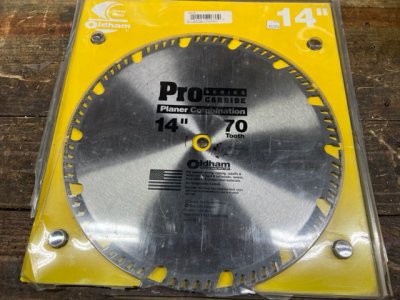
Attached are some pictures of the new blades. Pay no attention to the prices on the packages. The 2 Tenryu blades were $29.00 each, The Gmaxx blades were $74.00 each, and the Oldham blade was $45.00. As mentioned earlier I bought 2 of each because they have to be sent out for sharpening. It generally takes 1 to 2 weeks depending on the workload. I'll send out the Freud combination (red) blade for sharpening either late this week or early next week.
 

Attachments

  • IMG_1886.jpg
    IMG_1886.jpg
    118.4 KB · Views: 5
  • IMG_1888.jpg
    IMG_1888.jpg
    145.5 KB · Views: 5
Last edited:
Interested in hearing what you think about those blades once you get around to testing them.
 
Had some success with the "new" saw today. As mentioned earlier I installed a new GMAXX crosscut blade a couple weeks ago. Today it warmed to the 50's so I decided to cut some deck boards. So far I've cut 70 with the first 35 about 1/4" longer than necessary. I left them a little longer due to the minor blowout I was experiencing with the original blade. I'll cut them to size this afternoon then setup the saw for cutting the stringers.

I'm not sure how many of them will be cut today due to space considerations. I currently have piles of cut and full-size lumber scattered about in the garage. I'll do some rearranging before any more cutting is done. If all goes according to plan all the lumber will be cut this weekend. It's still too cool to glue and assemble the individual sections.

We're heading south for a couple week break in the cool weather. When we return it should be warm enough begin the assembly. I made a jig to speed things along, but there was no room in the truck for it this weekend. Next time up I'll bring it along and hopefully complete the project.

Thanks everyone for your tips and suggestions on this project. The "new" saw is in a whole different league than my old (1975) Dewalt 10" machine. Nothing against the Dewalt, it's just that the Delta is smoother, more powerful, and easier to setup than the older machine. It's like going from a Model T to a Ferrari.
 
The Delta 33-400 is in the shop and nearing completion. I finally cut the table down from 48" x 72" to a more useable size of 36" x 60". I did save the front 12" x 60" section so that it can be reattached for long crosscuts or wide rips.

The saw is up and running and I've spent the better part of a day trying to dial it in. The table is made of 1 1/4" x 6" oak boards glued together. The largest section is 24" x 60". It is bolted to the saw frame and has a brace running from front to back outboard of the frame about 6" from each end. The individual boards and the glued together section do have some slight warp in them.

When assembled on the saw frame the table is slightly higher in the center and has a droop at each end. The droop isn't much. I would say .015 from the blade to the end of the table. Even with this small amount of droop I'm having a hard time getting what I feel are acceptable cuts. Using a carpenter's square against the blade it appears the blade is at a perfect vertical right angle to the table and square to the fence. However, when I make a test cut the cut end is at 1* off on the vertical and about the same on the horizontal. I can see light between the square and the board on both the outer vertical and horizontal plane.

This got me to thinking about the material I was using for the test cuts. So far, it's been scrap 1 x 4's, 2 x 4's, and a few 1 x 6's. I'm sure they're not the best lumber in the world and may very well have minor twists or warps that could influence the quality of the cuts. Rather than waste any more time I thought I'd ask the experts what the best material for test cuts is?

As for blades the only one I've used so far is the GMAXX 2400. I've only used it for a few hundred cuts on pier decking and stair treads. It seems to be cutting like butter without any tear out. It doesn't show any signs of wear like the carbon steel blades on the old saw.
 
Last edited:
The saw is finally complete except for the dust hood I left at the family cottage by mistake. The table is cut down and squared to the frame. The blade is squared to the table, and I've made enough test cuts to be sure everything is working properly.

The only remaining task is to install the dust hood and plug in the dust collector. I have to admit I was a bit surprised as to the amount of dust the disconnected saw made. I've always had the other saws connected to the dust collections system and had forgotten what a mess they can make.

As mentioned previously I reduced the size of the table from 48" x 72" to 36" x 60". However, I saved the former front section (now 12" x 60") to be used for long crosscuts, and wide rips. Attached are a few pictures showing the saw with and without the front section installed.
 

Attachments

  • IMG_2122.jpg
    IMG_2122.jpg
    166.9 KB · Views: 5
  • IMG_2125.jpg
    IMG_2125.jpg
    163.6 KB · Views: 5
  • IMG_2127.jpg
    IMG_2127.jpg
    166.6 KB · Views: 5
  • IMG_2128.jpg
    IMG_2128.jpg
    171.3 KB · Views: 6
Back
Top