‘36 Chrysler Front Vent Window Puzzle

pdentrem

Active User
H-M Supporter Gold Member
Joined
Jan 28, 2011
Messages
3,486
In replacing the weatherstrips, I ran into a rain of falling parts. In removing the actuator mechanism cover in need to remove the nut, 4 pins and spring flew out. I can see witness marks where the pins were, but the orientation of the springs etc are the issue. The mechanism allows rotation of the dogs first to allow the latching arm to swing out of the way prior to the window to start its swing. Has anyone been in one of these before? I would prefer to finish this one before removing the other window.
Pierre
 

Attachments

  • 1D031657-7135-489A-B8E2-6EF9F102FF80.jpeg
    1D031657-7135-489A-B8E2-6EF9F102FF80.jpeg
    77 KB · Views: 32
  • F975D656-D5FE-4C6A-A293-34441A2EB5EE.jpeg
    F975D656-D5FE-4C6A-A293-34441A2EB5EE.jpeg
    155.6 KB · Views: 32
I got it figured out after stepping away from it for a couple days. I will include photos later but the 4 pins are set into the shell in pairs and the springs in pairs as well. Difficult to explain without writing a book so photos are worth 1000s of words.
 
The way this mechanism works is the handle moves first the cup only so that the latch can move out of the way of the window. Then as the 4 springs come into coil bind the cam then moves to rotate the vent window. The 4 pins act like a clutch to move the cam with the cup and springs.

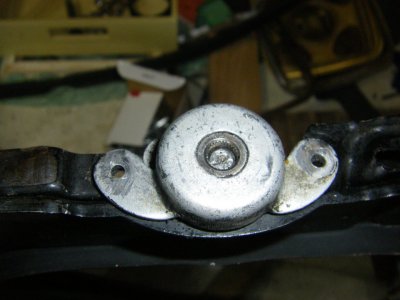
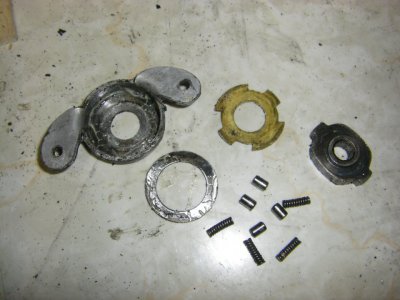
On removal of the vent window assembly you will find this cap. Under this cap is the “cam” that holds the vent window in place. Mine was held on by two rivets.


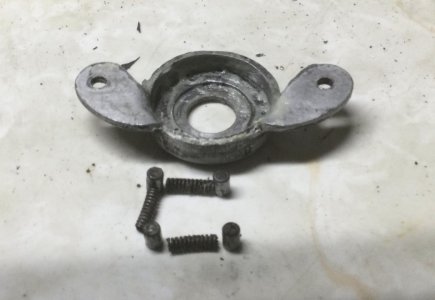
On removal you will have 4 pins and 4 small springs which will likely fall out. The cam and a brass piece that acts as a bearing and holds the springs and pins. Inside the cap there is a steel shim that the pins ride on.

To remove the vent window to replace the weatherstrip etc, the cam has to be removed. It is a press on with splines that engage the shaft of the window. Carefully lift off, may require hammer and drift pin to push the shaft out.

When done you will have this 4 finger cup. Clean all the parts.

To reassemble, have the vent window in the closed and locked position and the handle in the locked position as well.

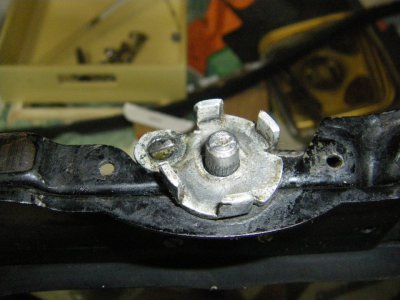
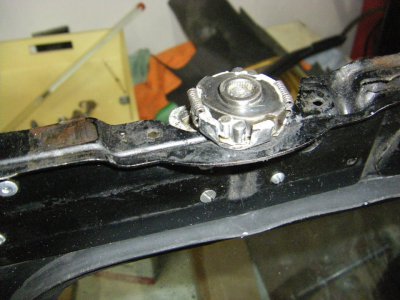
Reinstall the cam with the drive ends touching the legs of the cup. Use small taps to settle the cam into full engagement of the splines. See photo.
Use White Lithium grease to hold the pins and springs in place. See photo.
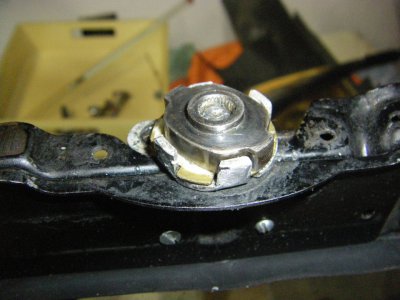
Now reinstall the cap with the steel bearing also lubricated with Lithium grease.
The tricky part is getting the cap on, which loosing a pin or spring can easily happen. The springs are more likely to drop down. I used a small flat screwdriver blade to carefully push the loose end of the springs back in line and the cap settled into place. Use rivets to finish the install of the cap.
Hope this is a help to others. I suspect that the Airflows are the same but no idea if so.
Pierre
 

Attachments

  • 87728F8C-590B-461E-8AAC-1F8F7B3A3775.jpeg
    87728F8C-590B-461E-8AAC-1F8F7B3A3775.jpeg
    93.7 KB · Views: 7
  • C72945C4-86A6-4D02-A28C-D1C7A30597D7.jpeg
    C72945C4-86A6-4D02-A28C-D1C7A30597D7.jpeg
    120 KB · Views: 3
  • 89E46D1A-9F73-4217-8722-A357247F5A5F.jpeg
    89E46D1A-9F73-4217-8722-A357247F5A5F.jpeg
    118.9 KB · Views: 5
  • D17FE027-FFC3-4B71-9DDC-EF97B8F73267.jpeg
    D17FE027-FFC3-4B71-9DDC-EF97B8F73267.jpeg
    105.8 KB · Views: 5
  • 84BF746A-0293-4E1C-823A-68590C58CE62.jpeg
    84BF746A-0293-4E1C-823A-68590C58CE62.jpeg
    134.4 KB · Views: 6
Finished product. Now to do the other side.
Pierre
image27.jpeg
 
Back
Top