1. How to remove gear sleeve? 2. Help with a magic gear.

RandyMcNally

Registered
Registered
Joined
Apr 7, 2020
Messages
39
Atlas 10F QC54.

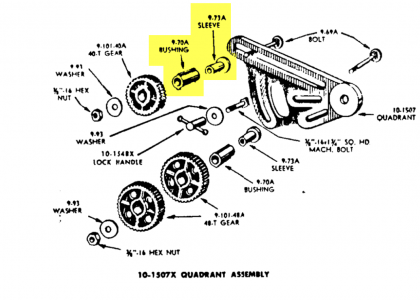
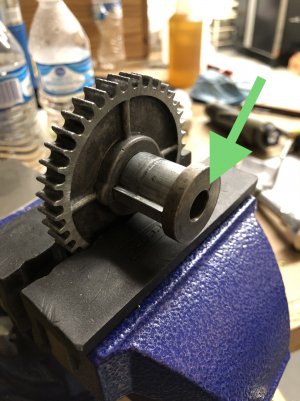
1. I give up: how do I get this 9-73A sleeve out of the the 9-70A bushing (1st & 2nd images below: parts diagram + photo), both of which are in the 40 tooth quadrant gear?
What's odd is the sleeve is completely free. I can spin it freely. It even wobbles inside the bushing so much that it probably needs to be replaced. Yet it is captive; I cannot get it out.
I've hammered lightly with a bronze/brass hammer handle on the sleeve - delivering blows with a nylon dead blow. This only brought the bushing out.

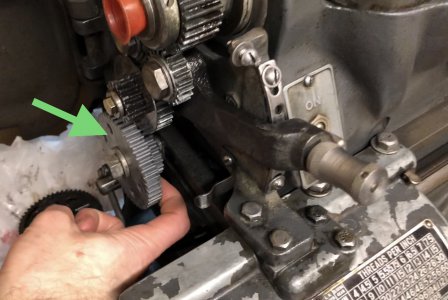
2. I'm doing this in an attempt to install this magical "half-speed power feed gear" found here - eBay link. (3rd image: photo)
Does anyone have experience with or opinions about this concept? I haven't figured out the install yet. Does not come with instructions. This is the Crafted youtube channel guy. He has a video of this concept, but it was using extra OEM gears - before he 3D printed the version I bought (ABS with oilite bronze bushing).
Part of this mod is removing one of the gears that comprise the 48 tooth + 48 tooth combination gear which meshes with the QC gearbox.
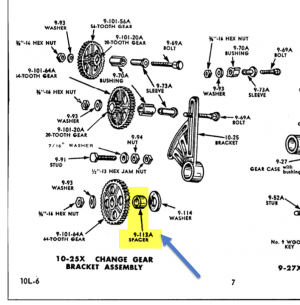
How will the one remaining 48 tooth be positioned rigidly on the bushing by itself? It seems to me like I will need a spacer like the 9-113A on the change gear model's quadrant (4th image: parts diagram). For that matter, I don't know how the 40 tooth from (1.) stayed rigidly positioned on its bushing; it does not have a spacer.

As usual, any help is greatly appreciated.
 

Attachments

  • QCGB Quadrant Assembly 10-1507X.png
    QCGB Quadrant Assembly 10-1507X.png
    262.8 KB · Views: 30
  • IMG_0951.jpg
    IMG_0951.jpg
    770.4 KB · Views: 27
  • IMG_0955.jpg
    IMG_0955.jpg
    383 KB · Views: 27
  • Change Gear Bracket Assembly 10-25X.png
    Change Gear Bracket Assembly 10-25X.png
    327.4 KB · Views: 29
I promise I didn't hammer on the gear as it's shown in the vice in my picture. That orientation was just to take the picture.
In fact, I didn't hammer on it with any conviction - probably why I can't get it out. I've broken enough parts on this lathe. Zamak and hammers don't mix :)
 
It's probably worn in such a way that the zamak has mushroomed over a ridge and is holding the bushing captive. I'd grab a couple appropriately
sized sockets and press it out in the vise. Maybe give a little heat during the process, but not too much
-Mark
 
Thanks @markba633csi. It’s dawned on me that I don’t even have to remove the sleeve from the bushing. I was just going to shove the sleeve right back into an identical bushing. <facepalm>

Now I just need to figure out what to do about the orphaned 48 tooth gear meshing with the gearbox. To buy/make a spacer or not?
I just can’t imagine a single gear on a double length bushing will stay in position on the bushing. Surely it needs to be fastened mechanically to prevent it from sliding axially along the bushing.
 
You could use a small diameter gear if you have one. It wouldn't be too difficult to make a spacer. It carries no load so it doesn't need to be an exact fit. It also doesn't need to be metal. It could be made from Delrin. A Dremel could be used to cut clearance for the keys.
 
Thanks @RJSakowski. I think I'm all set for now. I shoved the single gear onto the double bushing, and the fit is tight enough to alleviate most of my concern. I'll definitely keep an eye on it. That seems naive as I type it - I think the forces on [almost any] gears are high enough to overcome a fit that I didn't even need a vice for. I'll probably need to make a spacer. In fact, this is probably foreshadowing to my dumba** having to order a new gear soon haha.

I think it's funnier to recap the situation differently:
"So you're saying you didn't even TRY it before coming to the internet for help?"
Well...yeah, if you want to be a jerk about it. :D
 
For the halfspeed gear, you got taken. :)
I just bought a 24 tooth gear from Boston gear. They are more like $25. I pulled off one of the 48 tooth gears. That I mated with the 24 on the slide gear spindle. The 48 goes to the outside. Now, the moved 48 mates with the small drive gear. The moved 48 then drives the 24, which sits on and drives the other 48 which is still in its original position. The 48 on the slide gear blocks the idling 48 into place so it doesn't slip.

16tpi is the finest thread you can cut with this change, but the swap only takes a few minutes. I tend to do more turning than threading anyway. I'll post a video when I can get my wife to hold the camera.
 
Thanks @markba633csi. It’s dawned on me that I don’t even have to remove the sleeve from the bushing. I was just going to shove the sleeve right back into an identical bushing. <facepalm>

Now I just need to figure out what to do about the orphaned 48 tooth gear meshing with the gearbox. To buy/make a spacer or not?
I just can’t imagine a single gear on a double length bushing will stay in position on the bushing. Surely it needs to be fastened mechanically to prevent it from sliding axially along the bushing.
What keeps the slide gear from sliding in normal operation? :)
 
"So you're saying you didn't even TRY it before coming to the internet for help?"
I find nothing wrong with arming yourself with the knowledge of explorers who bravely blazed the same path that you are now on. It greatly helps in keeping the broken parts to a minimum. I mean, isn't that what the internet is for - beside watching cat videos?
 
For the halfspeed gear, you got taken. :)
I just bought a 24 tooth gear from Boston gear. They are more like $25. I pulled off one of the 48 tooth gears. That I mated with the 24 on the slide gear spindle. The 48 goes to the outside. Now, the moved 48 mates with the small drive gear. The moved 48 then drives the 24, which sits on and drives the other 48 which is still in its original position. The 48 on the slide gear blocks the idling 48 into place so it doesn't slip.

16tpi is the finest thread you can cut with this change, but the swap only takes a few minutes. I tend to do more turning than threading anyway. I'll post a video when I can get my wife to hold the camera.
Jokes on them, I would've paid more than both of them for half feed speeds haha.
That's good to know, thanks! I ain't no plastic scientist, but I expect I'll need to replace the MagicABS gear eventually. I'll be happy to be proven wrong. But for $25 I'll probably go ahead and order the Boston gear in anticipation.

What keeps the slide gear from sliding in normal operation? :)
I know, I know :D. I had this thought. I guess my brain was willfully ignoring the obvious. I do realize they are keyed (double keyed, actually). But ya know...we spend so much time chasing rigidity out in the garage -- it's turned me into a rigidity conspiracy theorist; I trust nothing. :)

I find nothing wrong with arming yourself with the knowledge of explorers who bravely blazed the same path that you are now on. It greatly helps in keeping the broken parts to a minimum. I mean, isn't that what the internet is for - beside watching cat videos?
My thoughts exactly!

<!Tangent warning>
I think about the "old guys" a lot in this hobby. My definition of "old guys" in this context is like that of Native Americans (and many other cultures): revered elders. At 41, I'm a whippersnapper in this hobby. And quite inexperienced. I work at a software company & sit at a computer all day. To some extent, I find answers on the internet for a living. The internet got me into this hobby by way of Youtube videos (I didn't know we could work with metal in the home shop! I thought that was reserved for factories. I'm gonna need me some of them machines!). Without the internet I wouldn't have access to the info needed to stay in this hobby. Anyway, the "old guys" didn't have that luxury; they figured it out themselves (and/or amongst buddies). That's impressive.
Also worth nothing the "old guys" on this forum are kind of peak impressive. They did the solo version AND they adapted to the new "cheat mode" by taking advantage of the internet.
 
Back
Top