AR 80% lower finishing - Order of operations?

I have a guy local that is going to do the Type III hard anodize. I have too many other expensive, time consuming hobbies to get into anodizing my own parts. LOL

As for the .223 Wylde chambered barrel, Noveske Rifleworks is quite literally over my back fence (not exaggerating) and my good friend is friends with the Noveske family and many employees. He has steered me in that direction since that is mainly what they use on their rifles. My friend buys blanks from PacNor and chambers and profiles them and he has 10 barrels in stock, so he is giving me a killer deal on a lightweight stainless barrel.

Very cool being so close to Noveske and that would be one heck of a good reason. :thumbzup:

I'll be real interested to see how yours comes out.

I didn't get a lot done today. I had to take a couple of tenths off of the rear area that the tab on the upper fits in to. I think when I milled it the first time I let it get a bit dry and the aluminum built up on the cutting edge just enough to not let it cut properly. It's all better now. :eek: That, and I cut out the trigger slot. Just did it "fast and dirty" with a 5/16" ball end mill. Positioned it at one end, plunged through, then just routed the rest of the slot. Not worth taking a pic of.

I'm waiting a bit to do the holes for the trigger group. I'm a bit on the "anal retentive" side for accuracy especially for placing and sizing holes for something like this (Even though it might not sound like it after I described how I did the trigger hole :rolleyes: but these holes are important). I am waiting on some reamers to arrive so I can drill then ream the holes to size. I'll have some more pics when that is under way.

-Ron
 
I really liked your soft vise jaw idea and picked up some aluminum today to replicate what you did. My vise isn't compatible with the monster jaws. Did you follow Ray's .106" depth for the Fire Control Pocket (FCP) cut away? I checked this dimension against the AR15 ACAD drawing on the web and it appears the height difference between the outside of the magazine area and the FCP is .110". My Tactical Machining jig has the cut away at around .109" - .110". I was wondering if he did this to apply additional pressure on the FCP.

-Joe


I am planning on making a couple of ARs for myself from 80% finished castings. I just finished making some vise jaws for my Kurt using Ray Brandes' drawings - http://www.lecreg.com/P4x4/ARblank.pdf

I"m sure that I'm over thinking this but now that I'm ready to drill some holes and mill out the receiver I'm looking for the "most accurate" or the "least error prone" way to do it. The way I see it I have three options for how to proceed.

One, fixture the receiver on it's side, locate the holes, drill all the way through and out the opposite side of the casting, then mill out the hammer and trigger cavity.
With this method, I know that drills can drift somewhat and the sides of the casting might not be perfectly parallel anyway. Holes on each side might not "match up" to where they should be.

Two, mill out the hammer and trigger cavity, fixture the receiver on it's side, locate the holes, and drill all the way through the casting out the other side.
This method has the same "problems" as the first but you are drilling through less material (less chance of deflection?) but when the drill hits the other side there is no pilot hole or punch mark and therefore a chance for the drill bit to "walk"?

Three, mill out the hammer and trigger cavity, fixture the receiver on it's side, locate the holes, drill out only that one side, flip the receiver over, re-indicate the holes, and drill the second side out.
The final method drills through less material, as "#2", but alleviates the chance of the drill "walking" as a spot drill can be used on both sides. Where this one is prone to error is simply in the indicating of the holes on both sides and how repeatable those measurements are.

All of the methods look to me to have both "pros" and "cons" but what I'm trying to find out is which "order of operations" would be the least prone to error and why.

Hopefully my explanation is adequate as to what I'm doing/looking for, so now I'd like to hear your thoughts.

Thanks,

-Ron
 
I really liked your soft vise jaw idea and picked up some aluminum today to replicate what you did. My vise isn't compatible with the monster jaws. Did you follow Ray's .106" depth for the Fire Control Pocket (FCP) cut away? I checked this dimension against the AR15 ACAD drawing on the web and it appears the height difference between the outside of the magazine area and the FCP is .110". My Tactical Machining jig has the cut away at around .109" - .110". I was wondering if he did this to apply additional pressure on the FCP.

-Joe

I'm not sure why that would be. Ray's "jig" is a fairly snug fit but there is still enough to horse the casting around a bit to get it indexed if the vise isn't cranked too tight.

One thing I would consider doing if (or when) I build another set of jaws for 80% castings, I would start by making wider, over-size jaws, maybe about 8". I would drill out points in both halves of the jaws in the pivot pin and take-down pin areas then press fit four pieces of drill rod (or some harder metal rod the size of the pins) in them. When closing the jaws on the casting the pivot point and take-down holes would engage the pressed-in rods. With the leveling/indexing of the casting being done on the pins it it would save me from having to put a DTI on the casting and getting it level with the table/vise/mill. You'd have to be careful to make provisions for touching off the pivot pin with and edge finder as well as access to the take-down holes for the same reason as I use that area to establish the center of the casting once it's in the vise. Hopefully that was understandable, pictures or drawings would be better but I have neither at the moment. :eek:

So far the jaws have worked fairly well.

-Ron
 
I did some searching last night on this and may have found the answer. The external magwell thickness varies quite a bit between lower suppliers. Some folks find they have to shim the FCP on the lowers from some suppliers for a given jig. I found one guy that clamps the lower FCP directly in the vise with the magwell protruding outside the jaws just to avoid the problem. The DTI dance is still required.

The Tactical Machining lower seems to be the gold standard for lowers and it follows the published dimensions. I can't believe how cheap these are now ($49). It is a very vanilla lower though.

I just ordered a lower from a different company (Broken Arms) and am curious to see how it is dimension wise. This is one of the improved class of lowers. It's best feature is a set of rear setscrews for removing upper/lower fit slop. A guy that designed and manufactured the first lower I bought a few years back really likes them. He bought two for his personal use since he no longer manufactures lowers.

Using the take down and pivot pins for alignment is a good idea. The old CNC build parties had a similar setup from what I recall. You may want to have the pins on the fixed side of the jaws only and keep them short. I am thinking that if the buffer tube is in the rear, the right side would be your fixed jaw and the one the pins will go on. This should leave a gap between the vise jaws and the pivot pin hole. You should be able to use your edge finder on the alignment pin in the gap. I did this on my TM jig. I am curious if under size pins are used on this kind of setup. The pin to pin dimension is 6.375 +/- .002" and the pin size is .25 +/- .001".

-Joe


I'm not sure why that would be. Ray's "jig" is a fairly snug fit but there is still enough to horse the casting around a bit to get it indexed if the vise isn't cranked too tight.

One thing I would consider doing if (or when) I build another set of jaws for 80% castings, I would start by making wider, over-size jaws, maybe about 8". I would drill out points in both halves of the jaws in the pivot pin and take-down pin areas then press fit four pieces of drill rod (or some harder metal rod the size of the pins) in them. When closing the jaws on the casting the pivot point and take-down holes would engage the pressed-in rods. With the leveling/indexing of the casting being done on the pins it it would save me from having to put a DTI on the casting and getting it level with the table/vise/mill. You'd have to be careful to make provisions for touching off the pivot pin with and edge finder as well as access to the take-down holes for the same reason as I use that area to establish the center of the casting once it's in the vise. Hopefully that was understandable, pictures or drawings would be better but I have neither at the moment. :eek:

So far the jaws have worked fairly well.

-Ron
 
I just checked my TM jig pins. They are .25 drill rod with the last quarter inch turned down to .2466". Undersized as I expected.

I did some searching last night on this and may have found the answer. The external magwell thickness varies quite a bit between lower suppliers. Some folks find they have to shim the FCP on the lowers from some suppliers for a given jig. I found one guy that clamps the lower FCP directly in the vise with the magwell protruding outside the jaws just to avoid the problem. The DTI dance is still required.

The Tactical Machining lower seems to be the gold standard for lowers and it follows the published dimensions. I can't believe how cheap these are now ($49). It is a very vanilla lower though.

I just ordered a lower from a different company (Broken Arms) and am curious to see how it is dimension wise. This is one of the improved class of lowers. It's best feature is a set of rear setscrews for removing upper/lower fit slop. A guy that designed and manufactured the first lower I bought a few years back really likes them. He bought two for his personal use since he no longer manufactures lowers.

Using the take down and pivot pins for alignment is a good idea. The old CNC build parties had a similar setup from what I recall. You may want to have the pins on the fixed side of the jaws only and keep them short. I am thinking that if the buffer tube is in the rear, the right side would be your fixed jaw and the one the pins will go on. This should leave a gap between the vise jaws and the pivot pin hole. You should be able to use your edge finder on the alignment pin in the gap. I did this on my TM jig. I am curious if under size pins are used on this kind of setup. The pin to pin dimension is 6.375 +/- .002" and the pin size is .25 +/- .001".

-Joe

I just checked my TM jig pins. They are .25 drill rod with the last quarter inch turned down to .2466". Undersized as I expected.

That makes sense, and I'm not surprises (although I hadn't thought about it until you brought it up :thumbzup:) as you'd have to make allowances for the tolerances.

Those lowers from Broken Arms look interesting and I'll be looking for your assessment once it's in your hands. Will you have to modify your clamps/holders for the more angular shape of the lower or are they still within "spec"? Their use of a set screw to take up the slop between the upper and lower is "interesting" to say the least but I'm not sure I am getting my head around just how it functions. Does it just put pressure on the upper's "take-down" tab?

I decided to wait on milling out the last couple lowers until I have some new end mills (due any time now) and still waiting on the spot drills. Quick rant - It sucks being in an area of the country where there is virtually no manufacturing and you have to order all your tools.

It's not like there are a lot of choices out there for a 7/16" corner radius end mill with a 1.25" - 2.0" LOC as it is. I could do it without the big LOC but it does nicely clean up the deep pockets. FYI - Maritool or Titan seem to be the places to look. If anyone else has other sources I'd be glad to hear about them.

-Ron
 
It doesn't matter where you live. Inventory is expensive so the larger online guys have the best selection. I heard YG-1 carbides endmills had a good finish on aluminum so I ordered some on Sunday from two different online vendors. I recommend downloading the YG-1 PDF catalog to get the best description of their parts. YG-1 appears to be huge and they do have aluminum corner radius mills. Sun Coast Tool out of Florida ships US mail and delivered my order to California on Wednesday. Carbide Emporium (Ohio) drop ships from the manufacturers warehouse in Illinois. I received my order from them on Thursday. These guys worried me a bit since their prices are good but their order processing needs work. I received no confirmation email from them and my order status is still in the "processing" stage. I called them Wednesday and they told me my order was shipped from the manufacturer's warehouse on Monday. Their shipping is $11.95 flat rate but their prices are pretty good.

FYI-Still waiting on my lower from Broken Arms.

-Joe

I decided to wait on milling out the last couple lowers until I have some new end mills (due any time now) and still waiting on the spot drills. Quick rant - It sucks being in an area of the country where there is virtually no manufacturing and you have to order all your tools.

It's not like there are a lot of choices out there for a 7/16" corner radius end mill with a 1.25" - 2.0" LOC as it is. I could do it without the big LOC but it does nicely clean up the deep pockets. FYI - Maritool or Titan seem to be the places to look. If anyone else has other sources I'd be glad to hear about them.

-Ron
 
Thanks Joe. I'll check those out as sources. I don't mind ordering the more exotic stuff but it is frustrating that one can't buy good taps, drill bits, plain end mills, etc. locally.

-Ron
 
Figured I'd do a quick follow-up as I have a couple more shots of the whole procedure...

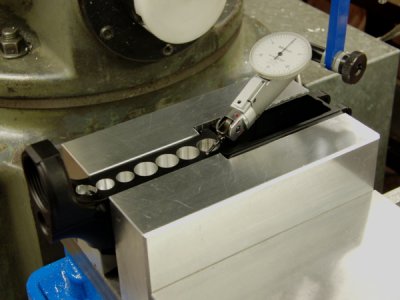
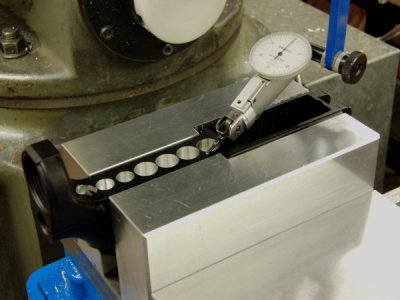
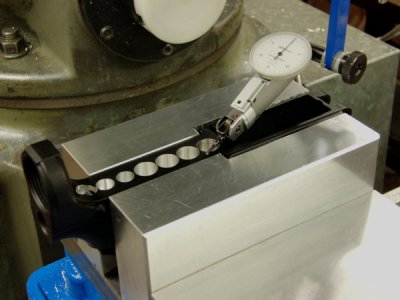
Here I put the drilled out casting back in the vise and used the DTI to make sure it was true with the mill.

arlowerjig14.JPG

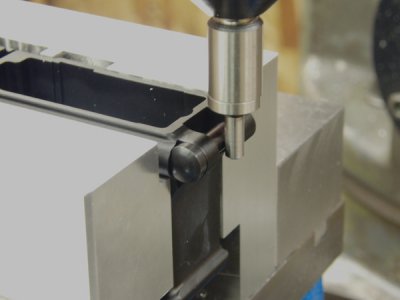
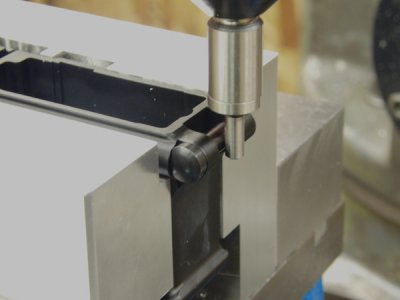
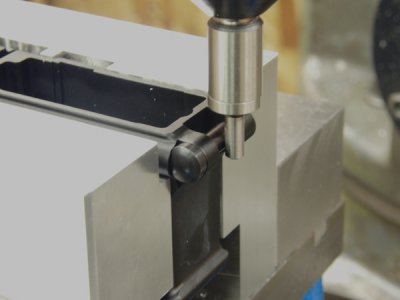
I installed the pivot pin and touched off of it with the edge finder to set the "0" on my X-axis.

arlowerjig12.JPG

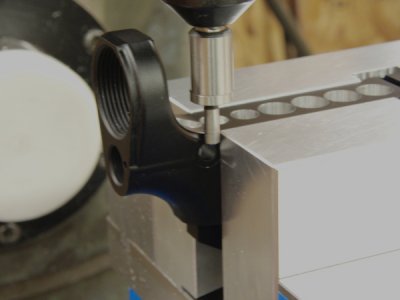
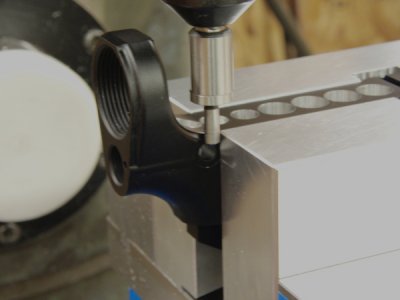
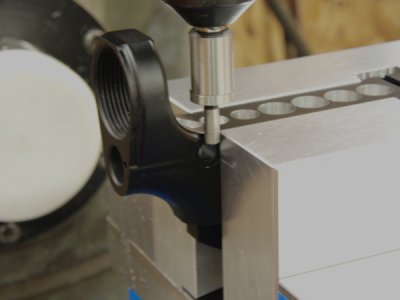
To set the Y-axis "0" I touched off one side of the casting, set the zero on my DRO, then switched to the other side and used the "1/2" distance function to find the center line.

arlowerjig13.JPG

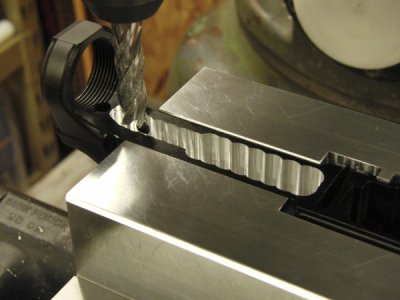
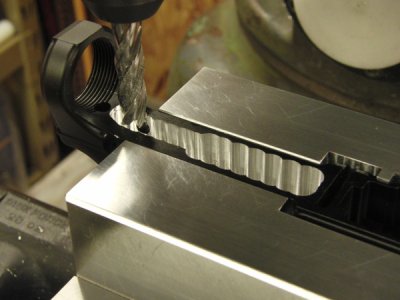
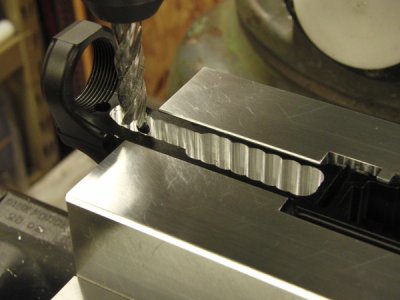
Finally, here is a shot just as I'm finishing up the plunge/roughing out.

arlowerjig15.JPG

-Ron

arlowerjig14.JPG

arlowerjig12.JPG

arlowerjig13.JPG

arlowerjig15.JPG

arlowerjig14.JPG

arlowerjig12.JPG

arlowerjig13.JPG

arlowerjig15.JPG
 
Back
Top