This is my first time posting on Hobby-Machinist.
I’ve wanted a CNC mill for a long time, but thought using a CNC mill was too far out of my reach due to the complexity converting a manual mill and the learning of CAD/CAM software not to mention a lack of machinist training. I looked at my needs and wants and made the decision to purchase a PM-833TV. My goal is to convert my PM-833TV to CNC over the next few months.
Here's the start of my journey….
After waiting for a couple of months, my mill arrived at my drop point. When I arrived at the warehouse dock, you could clearly see that crate was severely damaged and that the fan shroud was really dinted. I called Precision Matthews and described the damage and they advised to take pictures and when I uncreate it to take more and send them the pictures. It was loaded into my truck and I headed home. I unloaded it with a skid steer into the shop. I have to admit, it wasn’t the great start I had envisioned to my journey.


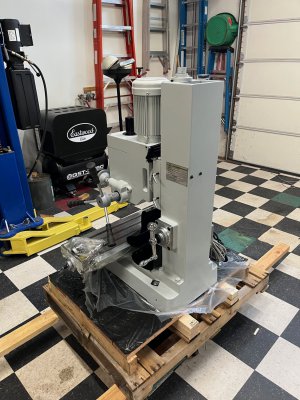
I took the crate apart and removed the plastic wrap. I now noticed that all 4 lag bolts holding the mill to the pallet were bent and no longer remotely holding the mill in place. The pallet was broken and somewhere along the way, they had placed the mill onto a second pallet. The mill was leaning backwards and the rear of the column had several rub marks from the crate. It was obvious that something shifted inside the trailer during transport and landed on top of the motor. I sent a detailed email outlining the damage and my concerns for issues I can’t see. The fan shroud and fan blade would definitely need to be replaced. I then lifted the mill off of the damaged pallet and set the mill down on a level pallet.


Precision Matthews then asked me to move the X, Y and Z through its full range of motion and to wire up the VFD and test to see if the motor runs. Everything moved smoothly, on the three axis, and I didn’t feel or see any damage to the ways. Precision Matthews said they would order a new fan shroud and fan blade which should take a couple of weeks to arrive. They assured me that the cast iron is tough and everything should be fine. I have to admit, I’m still concerned that there is damage I can’t see and won’t know until I get some test indicators on it.
I took this time to design up my stand and chip tray and start fabricating. The base is 46” wide, 30 deep and 34” high. It is all made out of 2 x 2 x 3/16 square tube, 2” x 2” x 1/4” angle iron for the mill to bolt too and various material for the levelling feet and tool chest support.


The chip tray was a piece of stainless-steel sheet (48” x 48”) that I had sitting around. The width of the tray determined the width of the stand in the end.
The levelling feet are made with steel pipe that needed to be cut down from a 3.25” ID to 3” ID to accommodate the puck diameter of 3”. I then welded on the top, the nuts, and ready rod on. The hockey pucks fit snugly inside the pipe and extend a 1/4” past the pipe edge. Hopefully this should keep the hockey pucks from deforming. Each foot has a jam nut to ensure they stay secure. Levelling the mill was very easy and quick.


I thought about using wheels on the stand to move the mill. I opted to design the stand so that I could use a pallet jack to move it. This proved to be a really good decision, as the stand had clearance for the engine hoist to slide under neath the stand. This made lifting and lowering and positioning the mill onto the stand really easy for a one-person job. The pallet jack makes moving the mill very easy and safe and makes it easy to adjust the levelling feet.


As Precision Matthews doesn’t supply paint to repair the marks on the rear of the column, they offered to pay for the paint and Bondo used. My small local Home Hardware store managed to match the paint perfectly. Some prep work, Bondo, sanding and paint made it look as good as new.

The tool chest sits on rubber pads.

The replacement fan shroud and fan will arrive in a few days. Having to wait 6 weeks for them to arrive is a little disappointing. Overall, the customer service from Precision Matthews has been very positive and responsive.
Next steps:
Make and install two 7” wide panels on each side of the tool chest.
Wire up a 220 volt on/off switch as the VFD fan running will drive me nuts. I may also run a 115-volt 20-amp circuit too.
Finish cleaning the mill.
Test the spindle for accuracy
Insert the TTS Adapter Collet and test for accuracy
Check the head against table with my tramming tool.
I’ve wanted a CNC mill for a long time, but thought using a CNC mill was too far out of my reach due to the complexity converting a manual mill and the learning of CAD/CAM software not to mention a lack of machinist training. I looked at my needs and wants and made the decision to purchase a PM-833TV. My goal is to convert my PM-833TV to CNC over the next few months.
Here's the start of my journey….
After waiting for a couple of months, my mill arrived at my drop point. When I arrived at the warehouse dock, you could clearly see that crate was severely damaged and that the fan shroud was really dinted. I called Precision Matthews and described the damage and they advised to take pictures and when I uncreate it to take more and send them the pictures. It was loaded into my truck and I headed home. I unloaded it with a skid steer into the shop. I have to admit, it wasn’t the great start I had envisioned to my journey.
I took the crate apart and removed the plastic wrap. I now noticed that all 4 lag bolts holding the mill to the pallet were bent and no longer remotely holding the mill in place. The pallet was broken and somewhere along the way, they had placed the mill onto a second pallet. The mill was leaning backwards and the rear of the column had several rub marks from the crate. It was obvious that something shifted inside the trailer during transport and landed on top of the motor. I sent a detailed email outlining the damage and my concerns for issues I can’t see. The fan shroud and fan blade would definitely need to be replaced. I then lifted the mill off of the damaged pallet and set the mill down on a level pallet.
Precision Matthews then asked me to move the X, Y and Z through its full range of motion and to wire up the VFD and test to see if the motor runs. Everything moved smoothly, on the three axis, and I didn’t feel or see any damage to the ways. Precision Matthews said they would order a new fan shroud and fan blade which should take a couple of weeks to arrive. They assured me that the cast iron is tough and everything should be fine. I have to admit, I’m still concerned that there is damage I can’t see and won’t know until I get some test indicators on it.
I took this time to design up my stand and chip tray and start fabricating. The base is 46” wide, 30 deep and 34” high. It is all made out of 2 x 2 x 3/16 square tube, 2” x 2” x 1/4” angle iron for the mill to bolt too and various material for the levelling feet and tool chest support.
The chip tray was a piece of stainless-steel sheet (48” x 48”) that I had sitting around. The width of the tray determined the width of the stand in the end.
The levelling feet are made with steel pipe that needed to be cut down from a 3.25” ID to 3” ID to accommodate the puck diameter of 3”. I then welded on the top, the nuts, and ready rod on. The hockey pucks fit snugly inside the pipe and extend a 1/4” past the pipe edge. Hopefully this should keep the hockey pucks from deforming. Each foot has a jam nut to ensure they stay secure. Levelling the mill was very easy and quick.
I thought about using wheels on the stand to move the mill. I opted to design the stand so that I could use a pallet jack to move it. This proved to be a really good decision, as the stand had clearance for the engine hoist to slide under neath the stand. This made lifting and lowering and positioning the mill onto the stand really easy for a one-person job. The pallet jack makes moving the mill very easy and safe and makes it easy to adjust the levelling feet.
As Precision Matthews doesn’t supply paint to repair the marks on the rear of the column, they offered to pay for the paint and Bondo used. My small local Home Hardware store managed to match the paint perfectly. Some prep work, Bondo, sanding and paint made it look as good as new.
The tool chest sits on rubber pads.
The replacement fan shroud and fan will arrive in a few days. Having to wait 6 weeks for them to arrive is a little disappointing. Overall, the customer service from Precision Matthews has been very positive and responsive.
Next steps:
Make and install two 7” wide panels on each side of the tool chest.
Wire up a 220 volt on/off switch as the VFD fan running will drive me nuts. I may also run a 115-volt 20-amp circuit too.
Finish cleaning the mill.
Test the spindle for accuracy
Insert the TTS Adapter Collet and test for accuracy
Check the head against table with my tramming tool.