What's the tool of choice for measuring TIR and why?

WobblyHand

H-M Supporter - Diamond Member
H-M Lifetime Diamond Member
Joined
Dec 18, 2019
Messages
7,425
Pretty sure I know which tool, but I'm not certain of the why it is best for the task. Can someone enlighten me? This is a common beginner's question and I have only seen it peripherally addressed on HM. Typical choices are a dial indicator (plunger) or a dial test indicator (lever). Why is one better than the other for this measurement?
 
Good question, let’s see what the more seasoned machinists say……
By the way, I always thought TIR, meant, total indicated runout.
Several years ago I was told it meant, total indicated reading.
The later makes sense.
 
I think often it's a matter of access and convenience- the finger of an indicator is more easily placed in tight confines like bored holes
-Mark
 
The lever is handy to check runout on stuff that is turning, or variation along surfaces. There is always some sine (cosine??) error anyway, simply because the lever is at an angle that is changing. It's a relative measure. One is more interested in getting the needle to stand still while against a moved surface.

The plunger type has the virtue of having a much greater range. Some will go more than a couple of inches, and the measure is true. It can be set against a lathe saddle or toolpost and directly measure the movement. Useful for accurately cutting to a shoulder or feature length. In theory, it can do everything a lever type can do, but setting it up over a small diameter can be awkward.
 
For general use, a plunger type is mostly what I grab for.
When scraping or doing finer indicating, the lever DTI gets the shoulder tap
 
Depends on a number of different factors, one reason why many of use use both a dial and test indicators. The range on test indicators is limited, and also non-linear the greater the travel extremes. They are typically used to zero out the TIR or compare different areas like sweeping a surface for alignment. As mentioned test indicators come with small tips and lengths that are good for tight places or sweeping holes and so forth. They are also useful where you need very light tip pressure such as zeroing a touch probe and so forth. Different test indicators require a specific inclination relative to the measurement surface.

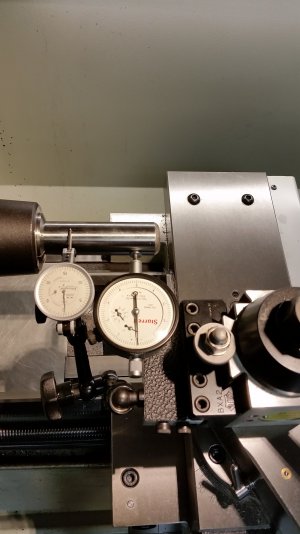
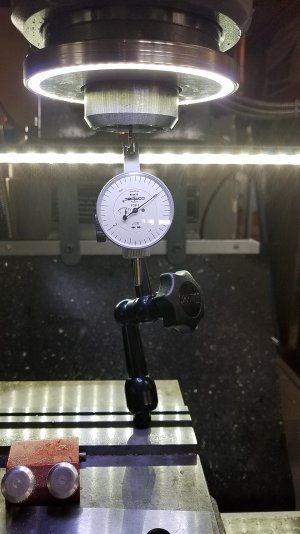
A dial indicator has longer travel and also has more versatility as to interchangeable tips, they are also designed to be more accurate linearly over there travel, so better if you want to measure travel accurately. I prefer a dial indicator with a flat or mushroom head for measuring TIR say on a lathe and dialing in stock with a 4J, but if short stock I will switch to a test indicator. My go to dial indicator is a starrett 25-511 which indicates down to 0.0001" with 0.200" travel, on the test indicator I use a multi revolution test indicator counter Compac and Interapid type, Compac is not longer made but the 215GA measure to 0.0001" with a range of 0.024".

20161218_124619.jpg
20190430_130110.jpg
 
Appreciate the varied answers. There's obviously some nuance in matching the mensuration instrument to the application. As we get more experienced we tend to "pick the right tool" more often. I'm asking the question for the newer machinists that come to HM for guidance. Quite often they may not pick the better tool. The point of the question is to attempt to put in simple terms when and why it is better to measure things a certain way. There's lots of wrong ways to measure stuff! I think we see it on HM often. So can we make up some guidance that captures some our collective experience, on the better ways to measure things? Something that we could point beginners to? There's some guidance on micrometers on HM, but I haven't seen anything on DTI's and DI's.

If I were to measure something that I expect to have a relatively low runout (<0.003") I'd pick my DTI over my DI. Obviously if I were to measure a spindle or a collet chuck inner surface I'd use a DTI as well. Are there other examples we can capture that would help beginners?
 
You asked about measuring TIR, but if the unasked question is about truing up raw stock in the chuck (minimizing the TIR) then I've got a different answer.

Believe it or not (I'm honestly not trying to be a smart aleck), most of the time I'd answer "my eyes" or "my fingers".

It's relatively rare for me to chuck up anything UNLESS I'm planning to turn the OD. Unless I'm aligning my lathe, or re-chucking something because I screwed up the order-of-ops, or I'm trying to step over my tailstock to turn a taper, I'm unlikely to actually measure TIR.

Instead, I'll put a turning tool (or whatever) on the compound and move it close to the work near the tailstock end. Sometimes, for really rough work, I'll just rest my right hand on the top slide and point at the work, trying not to move my finger. Then I'll turn the chuck (by hand!) and knock the work around until the gap between the tool and the work is pretty even around the entire circumference. Then I'll move the turning tool a little closer and repeat. Finally, I'll spin the work at cutting speeds and look for any "ghosting" from runout. Usually my turning tool is there and ready to make the first cut.

It's surprisingly easy to get within 0.005" TIR this way (+/- 0.0025") which is usually good enough for turning nominally sized stock.

You can avoid a lot of interrupted cuts, wasted stock, and wasted time if you get in the habit of doing this, IMO.
 
Last edited:
Oh: and as for measuring, I have opinons there, too (shocking, I know!).

The differences between a drop-plunger dial indicator and a DTI aren't usually about accuracy (you can get reasonably accurate 0.0005"/division indicators in either form factor). As others have mentioned, the difference is usually about access and travel. You aren't going to get 1" or more of travel on a DTI, nor are you going to sneak a drop-plunger into a 1/4" bore or other small feature.

For measuring runout, you don't need much travel (see above) so either will work fine. A good DTI is eye-wateringly expensive, though, so I'd probably opt to use a $15 HF "disposable" indicator for most general-purpose work, and save the ruby-tipped Interrapid tenths DTI for surface plate work (if only I owned the latter!).
 
Back
Top