- Joined
- Feb 1, 2015
- Messages
- 9,994
With much reluctance, I made the decision to sell my two deer rifles. Physical limitations no longer allow me to participate in annual gun deer season. No regrets as I have over 100 deer chalked up and I think I have taken my fair share.
I have a matched pair of Winchester Model 100's in .308 caliber. One is mine, bought in 1967 and the other was my Dad's, a few years older. My Dad's has a Bushnell Banner 3x9 BDC scope. The plastic cap which retains the BDC dial had failed, shearing the threads from the cap. A search on line yielded a OEM replacement cap as well as an aftermarket cap made from aluminum but hey, I have machines, right? In the true HM spirit, I decided to have a go at it.
I managed to get the threaded portion out of the scope by melting the end with a soldering iron and plunging a small flat blade screw driver into the molten plastic.
There were only two threads on the remnant but that was sufficient to determine that the thread pitch was 24 tpi. The O.D. measured at .234", identifying the thread as #12-24. With a fair amount of searching, I found a 12-24 screw and was able to confirm the thread identity.
I reverse engineered the old cap and made a model in SolidWorks. Is was apparent that the biggest issue would be work holding. The nature of the part would require three setups; one for the threaded side, one for the top side, and a third to cut the slot in the cap. The domed top surface offered little opportunity for holding the piece, precluding the use of my 5C collet chuck. Clearly, a fixture of some sort would be required. The fixture I elected to make was a cylinder with a concentric hole threaded for 12-24.
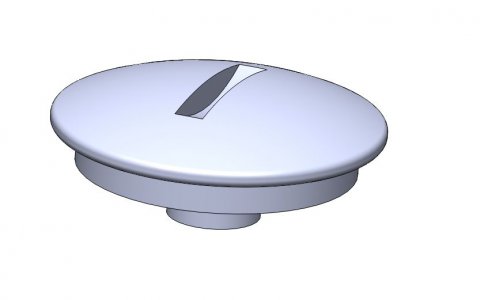
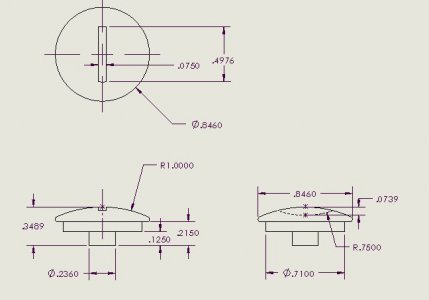
I mounted a piece of scrap aluminum in the lathe and turned about 1-1/2" to .68" and drilled a .196" hole 1-1/2" deep. The next problem was to cut the 12-24 thread. I searched through my entire collection of taps for a 12-24 tap to no avail. The only path left was to single point the thread. I didn't have a threading tool small enough to cut that thread so I had to grind one from a 1/8" tool bit. It was a bit fragile so I proceeded slowly with the threading to avoiding flexing the tool too much. Threading was done at 75 rpm which allowed ample control over the .55" thread depth. I used the screw that I had found as a gage to determine when the thread was finished.
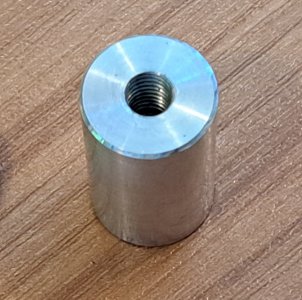
The fixture
Next, I chucked up a piece of 7/8" aluminum in the three jaw and turned 1" to .746" O.D. The next operation was turning the .710 dia. x .09" neck, followed by turning 1/2" length to .236" dia. I left the extra length for the thread for better registration in my fixture for the two remaining operations . Next, I single pointed the 12-26 threads, testing the fit with my fixture and finally, with the scope itself. Finally, I parted the piece at .8" total length.
The second operation was cutting the domed top. I mounted the fixture in the four jaw chuck, attached my part, and indicated it in to .0005" TIR. I free cut the dome, using a RPMT round insert to rough the profile, and a file, and some 150 grit emery cloth to finish the shape, followed by polishing with 400 grit and 2000- grit wet or dry using WD40 as a lubricant. Finally, I had to cut the slot so I moved the fixtured part to the mill and mounted horizontally in my vise. To cut the slot, I stacked tow .040" wide slitting saws on my shop made saw arbor. The saw diameter was 1.5", which was not ideal as a 1" slot would be a better fit for a US quarter but it was what I had. I cut the slot to .075" depth which gave me a slot width of .5"
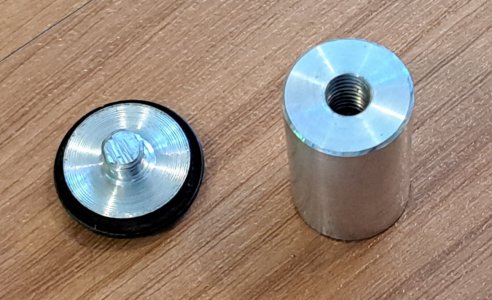
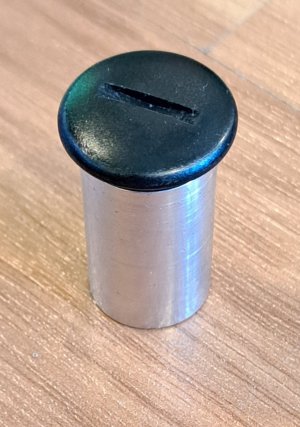
The fixture and finished part. The fixture with part mounted.
The final step was finishing. I could have left the cap bright but a shiny cap on a hunting rifle is not desirable. I used Birchwood Casey Aluminum Black to blacken the exposed surfaces and coated with automotive clear coat fir a protective finish.
The final result is a professional looking cap which is superior to the plastic that it replaced. The domed surface is thicker than the OEM cap and I could have worked it down a little more but the difference doesn't affect function or fit in any way so I decided to leave it as is.

I have a matched pair of Winchester Model 100's in .308 caliber. One is mine, bought in 1967 and the other was my Dad's, a few years older. My Dad's has a Bushnell Banner 3x9 BDC scope. The plastic cap which retains the BDC dial had failed, shearing the threads from the cap. A search on line yielded a OEM replacement cap as well as an aftermarket cap made from aluminum but hey, I have machines, right? In the true HM spirit, I decided to have a go at it.
I managed to get the threaded portion out of the scope by melting the end with a soldering iron and plunging a small flat blade screw driver into the molten plastic.
There were only two threads on the remnant but that was sufficient to determine that the thread pitch was 24 tpi. The O.D. measured at .234", identifying the thread as #12-24. With a fair amount of searching, I found a 12-24 screw and was able to confirm the thread identity.
I reverse engineered the old cap and made a model in SolidWorks. Is was apparent that the biggest issue would be work holding. The nature of the part would require three setups; one for the threaded side, one for the top side, and a third to cut the slot in the cap. The domed top surface offered little opportunity for holding the piece, precluding the use of my 5C collet chuck. Clearly, a fixture of some sort would be required. The fixture I elected to make was a cylinder with a concentric hole threaded for 12-24.


I mounted a piece of scrap aluminum in the lathe and turned about 1-1/2" to .68" and drilled a .196" hole 1-1/2" deep. The next problem was to cut the 12-24 thread. I searched through my entire collection of taps for a 12-24 tap to no avail. The only path left was to single point the thread. I didn't have a threading tool small enough to cut that thread so I had to grind one from a 1/8" tool bit. It was a bit fragile so I proceeded slowly with the threading to avoiding flexing the tool too much. Threading was done at 75 rpm which allowed ample control over the .55" thread depth. I used the screw that I had found as a gage to determine when the thread was finished.

The fixture
Next, I chucked up a piece of 7/8" aluminum in the three jaw and turned 1" to .746" O.D. The next operation was turning the .710 dia. x .09" neck, followed by turning 1/2" length to .236" dia. I left the extra length for the thread for better registration in my fixture for the two remaining operations . Next, I single pointed the 12-26 threads, testing the fit with my fixture and finally, with the scope itself. Finally, I parted the piece at .8" total length.
The second operation was cutting the domed top. I mounted the fixture in the four jaw chuck, attached my part, and indicated it in to .0005" TIR. I free cut the dome, using a RPMT round insert to rough the profile, and a file, and some 150 grit emery cloth to finish the shape, followed by polishing with 400 grit and 2000- grit wet or dry using WD40 as a lubricant. Finally, I had to cut the slot so I moved the fixtured part to the mill and mounted horizontally in my vise. To cut the slot, I stacked tow .040" wide slitting saws on my shop made saw arbor. The saw diameter was 1.5", which was not ideal as a 1" slot would be a better fit for a US quarter but it was what I had. I cut the slot to .075" depth which gave me a slot width of .5"


The fixture and finished part. The fixture with part mounted.
The final step was finishing. I could have left the cap bright but a shiny cap on a hunting rifle is not desirable. I used Birchwood Casey Aluminum Black to blacken the exposed surfaces and coated with automotive clear coat fir a protective finish.
The final result is a professional looking cap which is superior to the plastic that it replaced. The domed surface is thicker than the OEM cap and I could have worked it down a little more but the difference doesn't affect function or fit in any way so I decided to leave it as is.


