Upping my game in workholding?

Frank O

H-M Supporter - Gold Member
H-M Supporter Gold Member
Joined
Feb 14, 2017
Messages
106
Today I needed to drill some fairly precise holes in an aluminum heatsink about 5" x 8" x 1 3/8", using my LMS 5550 mill. If I put the workpiece in the one vise I have that's large enough it wouldn't have had sufficient Y-axis travel, so I figured I'd clamp it to the table. I have a pretty standard clamping kit (LMS #1144).

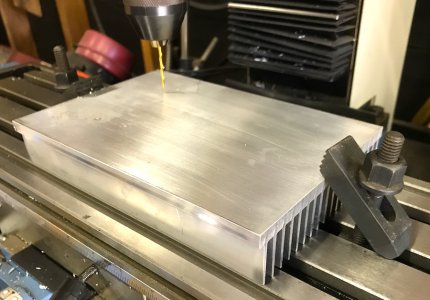
I didn't see a quick way to position the holddowns horizontally at the height of the top of the workpiece, so being short on time I just positioned them at an angle:
holddowns.jpg

I'd intended for the top corner of the workpiece to catch in one of the stairstep pockets on the holddown, but I can see from the photo it didn't end up this way.

So long story short, this worked well enough for this purpose. But I figure there must be a better way to do this. Any suggestions?
 
I use machinist jacks a lot for that type of setup. Set one under the free end end of the toe clamp, adjust so that the clamp toes down just a bit towards the work, and tighten the stud. Doesn’t take more than a few moments to set up. Nice beginner lathe project if you don’t have any.

-frank
 
@Frank O

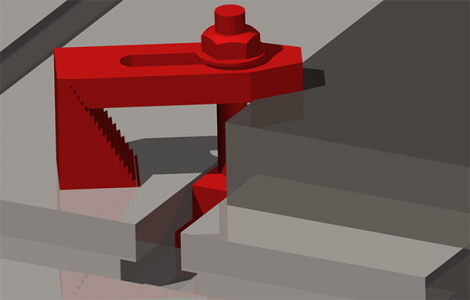
The typical method is like this:
1593484018851.png

The key points:
-the clamp bar is nearly horizontal; I usually aim for a little lower at the work piece
-the bolt is close to the work piece for best clamping
-multiple clamps should be used

All of these parts are found in the typical clamping kit.

-brino
 
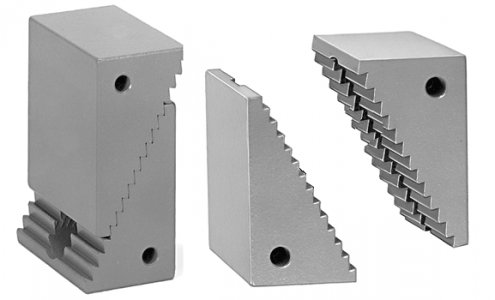
The triangle pieces, with teeth matching the toe clamp in the picture, are used to support the toothed end of the clamp.
The various length bolts go thru the slot in the toe clamp to clamp the NON toothed end of the clamp on the work.

Nice pic, Brino. A picture is worth MANY thousands of MY words.
 
That first picture I included above was just one I found from a web search.
I went back and found it again to give credit, it's from here:
https://www.cnccookbook.com/cnc-jigs-fixtures-workholding-solutions-milling/

It is also easy to accommodate thicker work pieces.
All you need is longer bolts and spacers (steel blocks, 1-2-3 blocks, etc.) under the triangle pieces.

Another neat way is to nest two the the triangle pieces together so their teeth interlock, and put the tail of the clamp on top.
1593531952981.png


I often use some 3 and 6 inch lengths of 1"x2" solid flat bar for spacers and for putting under the triangle blocks if they end up near (and try to tip into) a table t-slot.

-brino
 
That first picture I included above was just one I found from a web search.
I went back and found it again to give credit, it's from here:
https://www.cnccookbook.com/cnc-jigs-fixtures-workholding-solutions-milling/

It is also easy to accommodate thicker work pieces.
All you need is longer bolts and spacers (steel blocks, 1-2-3 blocks, etc.) under the triangle pieces.

Another neat way is to nest two the the triangle pieces together so their teeth interlock, and put the tail of the clamp on top.
View attachment 329118


I often use some 3 and 6 inch lengths of 1"x2" solid flat bar for spacers and for putting under the triangle blocks if they end up near (and try to tip into) a table t-slot.

-brino
This is my go to for most setups. I picked up several small sets of step blocks when they were on sale. I leave a couple of sets on my vertical bandsaw for setups. You can never have too many clamp sets and I buy all the pieces I can find in yard sales if they are cheap :)
 
Legos for machinists. What could be more fun? I think the only limitation for their use would be your imagination. Thanks brino for the lead which I bookmarked.
 
I hadn't thought of using that style of clamp for my bandsaw. Cool idea!
 
I can’t find any pix of my step blocks on my bandsaw, but several of the clamp arms I got in a yard sale. But there are some crucial things to be able to use them one being a sled. When I made mine I incorporated a backstop with threaded hold downs so I could put all thread in them. You have to look close under the clamp arms to see I used t-nuts to make the clamps work.I also used step blocks in my horizontal saw to balance the vise on small stuff before I installed a piece of all thread.
 

Attachments

  • F5B40014-D4B0-4294-82CC-5762F909E663.jpeg
    F5B40014-D4B0-4294-82CC-5762F909E663.jpeg
    1.3 MB · Views: 57
  • BEE6BF8E-2C4A-4E55-BB8F-B39C9D8F3784.jpeg
    BEE6BF8E-2C4A-4E55-BB8F-B39C9D8F3784.jpeg
    1.4 MB · Views: 57
  • 992304A7-9F12-43D7-8D3A-A35BA8145D1D.jpeg
    992304A7-9F12-43D7-8D3A-A35BA8145D1D.jpeg
    1.2 MB · Views: 67
Back
Top