- Joined
- Sep 4, 2013
- Messages
- 99
Making a glass lens on a lathe
This is the procedure that I used to make the lens for the compass in a tangent galvanometer. This tangent galvanometer dates from around the turn of the 20[SUP]th[/SUP] Century. Although a lens could be made from plastic much more easily, a restoration requires the manufacture of one made from glass.
This is not for the squeamish. You will be generating a fine dust of silicon dioxide (i.e., sand) that has the potential to grind your lath bed if not properly taken care of. You should also be wearing a dust mask. This procedure also assumes that you have some experience working with glass.
Total time from picking up the piece of glass to putting away the vacuum cleaner was one hour.
The materials you will need are:
1. A piece of glass that you can cut the lens out of. It must be large enough and of the right thickness. Do not use tempered glass since when you try to cut it, it can disintegrate.
2. A glasscutter. Some of them are rollers, but I have successfully used a carbide tipped scribe. This is used for roughing out the shape.
3. A glass “nibbler.” This device has two carbide cutters that almost meet and nibbles the glass away in very small chunks.
4. A center finding try square. Used to find the center of the circle.
5. A sharpie. Used to make temporary marks on the glass.
6. A broom stick at least two inches long to make a mandrel to hold and drive the glass.
7. 2 pieces of rubber to provide a cushion between the broomstick, the glass and the tailstock. You can use an old inner tube as a source of sheet rubber.
8. Rubber cement.
9. Dust mask.
10. Dremel tool with diamond face grinder.
11. A live center with a flat face adapter for the tailstock.
12. Calipers, bow dividers.
Lay out the piece of glass and mark the circle on it that you plan to cut out. Using the glass cutter, trim the piece of glass to rough shape. When you have roughed it out, then use the glass nibblers to trim the edges as close to the circle as you can. No need to try for perfection. Close at this point is quite good enough. But the closer you nibble to the line, the less you will have to grind off.
Beware of the diamond face grinder. It may not seem to be doing very much, but don’t let it fool you! It is. Once you have ground a perfect circle, measure it. Determine how much more you need to grind off and proceed slowly. Stop often to measure. Don’t remove the glass from the lathe! I have proved that it can be re-centered, but it is a tedious job. Measure on the lathe. Just remember-as if any experienced machinist needed it-that when you grind off 0.001," the diameter decreases by 0.002." You are approaching your finished size twice as fast as you are grinding.
Using the center finding try square, place the tips on the edge of the circle and locate the center. Theoretically, you can do this with two lines, but I prefer three to make certain I got everything right. They should meet in one point. I then lay out marks 1” and 2” from the center on the layout lines to facilitate centering the glass on the lathe.
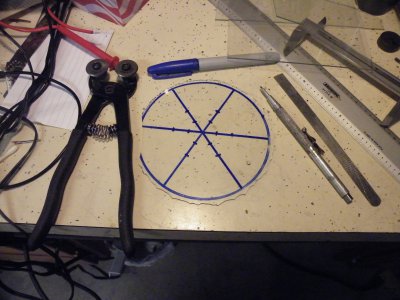
Figure 1
Showing Glass lens, nibbling tool, marker, scribe and scrap glass pieces. Note chip on the left edge of the glass lens.
Take the piece of broomstick and mount it in the chuck. Face it off flat. Cut a piece of rubber slightly larger than the diameter of the broomstick and glue it on with the rubber cement. Cut another piece of rubber the size of the tailstock.
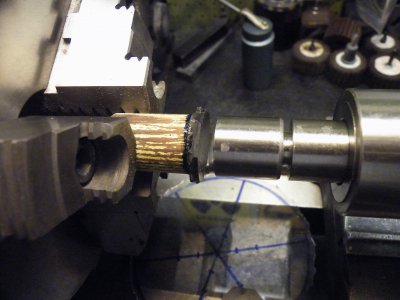
Mount the glass lens between the chuck and tailstock. I didn’t glue the rubber onto the tailstock because I didn’t want to be bothered with the cleanup, but it was option. By tilting the glass at an angle, you can pin the tailstock rubber in place while you advance the tailstock ram. I put enough pressure to cause the live center to rotate with the chuck and then just a tad more.
You may have noticed the chip on the edge of the lens. When I was rough cutting the glass, it didn't break on the line, but I decided to continue just to see if I could make the lens anyway. I offset the glass away from the chipped place in order to “move” the center of rotation away from the chip. The witness marks on the layout lines made this very much easier!
Put on your dust mask before starting the grinding operation.
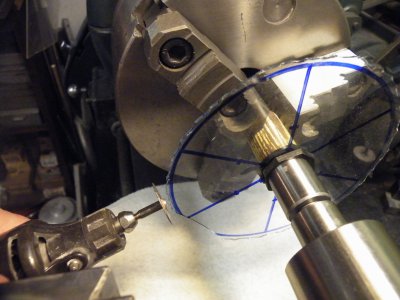
Figure 3
Showing the rough lens clamped in place between two rubber bushings with the Dremel tool and diamond face wheel. Ready to go!
I used a medium speed on the lathe and 30,000 rpm for the Dremel tool. Do not even think about mounting the Dremel tool on the tool post. The grinding is done entirely by hand! If you try to use the tool mounted on the tool post you are most likely going to break the glass. The tool needs to be able to be pushed away and yet kept in contact.
Start the lathe then the Dremel tool and bring the face of the tool slowly toward the edge of the lens. I brace my hand against the suitably positioned tool post, gently feeling my way inward until the face of the diamond tool just starts to touch the highpoints of the lens. I get a rapid fip, fip, fip as the blade touches the high points accompanied by little puffs of glass dust. Then, very gently, I apply some light pressure on the tool and let it take off those high points. Gradually advance the tool as the points are ground down. You must just let the tool do the work. Don’t push too hard!
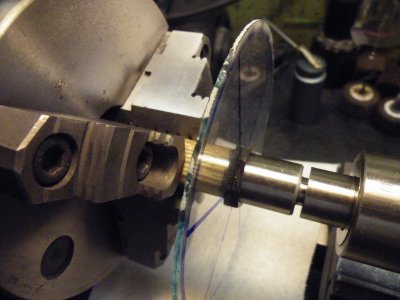
Figure 4
A few minutes of grinding has ground off some of the high points.
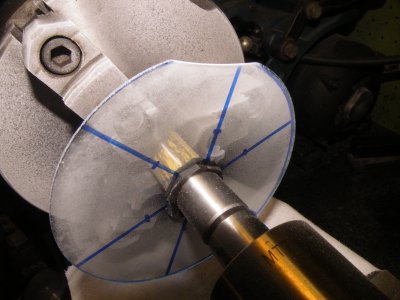
Figure 5
The glass swarf makes the glass lens easy to see. Notice the chip that is the only irregularity left in the edge of the lens. I admit that i did it this way just to see if I could. And I could and did.
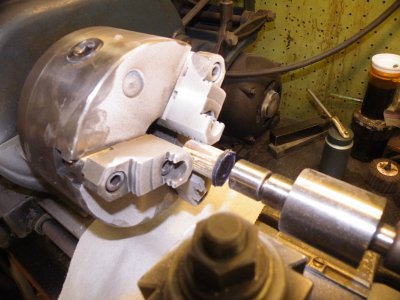
Figure 6
The glass swarf covers the face of the chuck-and everything else within a foot. The paper towel on the ways picked up a lot of the swarf, but not nearly all of it. It just meant that there was a little less to clean up.
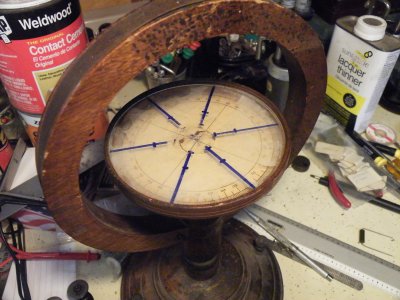
Figure 7
The lens in place on the top of the compass, still with the layout lines.
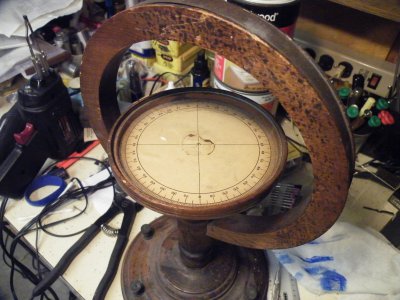
Figure 8
And the final product is a perfectly fitted glass lens, indistinguishable from the original. The chip is only a very slight mark on the edge about a half-inch long-barely visible.
I used a piece of oil soaked cloth to finish a wipe down to remove the residual glass dust after I had vacuumed everything. Throw the cloth away when you are done! Don't leave it lying around to be reused.
Hopes this helps somebody. I found it to be an interesting exercise in how to do something no one (That I knew) had even the remotest idea of how to accomplish.


This is the procedure that I used to make the lens for the compass in a tangent galvanometer. This tangent galvanometer dates from around the turn of the 20[SUP]th[/SUP] Century. Although a lens could be made from plastic much more easily, a restoration requires the manufacture of one made from glass.
This is not for the squeamish. You will be generating a fine dust of silicon dioxide (i.e., sand) that has the potential to grind your lath bed if not properly taken care of. You should also be wearing a dust mask. This procedure also assumes that you have some experience working with glass.
Total time from picking up the piece of glass to putting away the vacuum cleaner was one hour.
The materials you will need are:
1. A piece of glass that you can cut the lens out of. It must be large enough and of the right thickness. Do not use tempered glass since when you try to cut it, it can disintegrate.
2. A glasscutter. Some of them are rollers, but I have successfully used a carbide tipped scribe. This is used for roughing out the shape.
3. A glass “nibbler.” This device has two carbide cutters that almost meet and nibbles the glass away in very small chunks.
4. A center finding try square. Used to find the center of the circle.
5. A sharpie. Used to make temporary marks on the glass.
6. A broom stick at least two inches long to make a mandrel to hold and drive the glass.
7. 2 pieces of rubber to provide a cushion between the broomstick, the glass and the tailstock. You can use an old inner tube as a source of sheet rubber.
8. Rubber cement.
9. Dust mask.
10. Dremel tool with diamond face grinder.
11. A live center with a flat face adapter for the tailstock.
12. Calipers, bow dividers.
Lay out the piece of glass and mark the circle on it that you plan to cut out. Using the glass cutter, trim the piece of glass to rough shape. When you have roughed it out, then use the glass nibblers to trim the edges as close to the circle as you can. No need to try for perfection. Close at this point is quite good enough. But the closer you nibble to the line, the less you will have to grind off.
Beware of the diamond face grinder. It may not seem to be doing very much, but don’t let it fool you! It is. Once you have ground a perfect circle, measure it. Determine how much more you need to grind off and proceed slowly. Stop often to measure. Don’t remove the glass from the lathe! I have proved that it can be re-centered, but it is a tedious job. Measure on the lathe. Just remember-as if any experienced machinist needed it-that when you grind off 0.001," the diameter decreases by 0.002." You are approaching your finished size twice as fast as you are grinding.
Using the center finding try square, place the tips on the edge of the circle and locate the center. Theoretically, you can do this with two lines, but I prefer three to make certain I got everything right. They should meet in one point. I then lay out marks 1” and 2” from the center on the layout lines to facilitate centering the glass on the lathe.

Figure 1
Showing Glass lens, nibbling tool, marker, scribe and scrap glass pieces. Note chip on the left edge of the glass lens.
Take the piece of broomstick and mount it in the chuck. Face it off flat. Cut a piece of rubber slightly larger than the diameter of the broomstick and glue it on with the rubber cement. Cut another piece of rubber the size of the tailstock.

Figure 2
Broomstick mounted in chuck with rubber pad glued in place. Note flat face adapter in tailstock. Mount the glass lens between the chuck and tailstock. I didn’t glue the rubber onto the tailstock because I didn’t want to be bothered with the cleanup, but it was option. By tilting the glass at an angle, you can pin the tailstock rubber in place while you advance the tailstock ram. I put enough pressure to cause the live center to rotate with the chuck and then just a tad more.
You may have noticed the chip on the edge of the lens. When I was rough cutting the glass, it didn't break on the line, but I decided to continue just to see if I could make the lens anyway. I offset the glass away from the chipped place in order to “move” the center of rotation away from the chip. The witness marks on the layout lines made this very much easier!
Put on your dust mask before starting the grinding operation.

Figure 3
Showing the rough lens clamped in place between two rubber bushings with the Dremel tool and diamond face wheel. Ready to go!
I used a medium speed on the lathe and 30,000 rpm for the Dremel tool. Do not even think about mounting the Dremel tool on the tool post. The grinding is done entirely by hand! If you try to use the tool mounted on the tool post you are most likely going to break the glass. The tool needs to be able to be pushed away and yet kept in contact.
Start the lathe then the Dremel tool and bring the face of the tool slowly toward the edge of the lens. I brace my hand against the suitably positioned tool post, gently feeling my way inward until the face of the diamond tool just starts to touch the highpoints of the lens. I get a rapid fip, fip, fip as the blade touches the high points accompanied by little puffs of glass dust. Then, very gently, I apply some light pressure on the tool and let it take off those high points. Gradually advance the tool as the points are ground down. You must just let the tool do the work. Don’t push too hard!

Figure 4
A few minutes of grinding has ground off some of the high points.

Figure 5
The glass swarf makes the glass lens easy to see. Notice the chip that is the only irregularity left in the edge of the lens. I admit that i did it this way just to see if I could. And I could and did.

Figure 6
The glass swarf covers the face of the chuck-and everything else within a foot. The paper towel on the ways picked up a lot of the swarf, but not nearly all of it. It just meant that there was a little less to clean up.

Figure 7
The lens in place on the top of the compass, still with the layout lines.

Figure 8
And the final product is a perfectly fitted glass lens, indistinguishable from the original. The chip is only a very slight mark on the edge about a half-inch long-barely visible.
I used a piece of oil soaked cloth to finish a wipe down to remove the residual glass dust after I had vacuumed everything. Throw the cloth away when you are done! Don't leave it lying around to be reused.
Hopes this helps somebody. I found it to be an interesting exercise in how to do something no one (That I knew) had even the remotest idea of how to accomplish.


