Tool holders

mickri

H-M Supporter - Diamond Member
H-M Lifetime Diamond Member
Joined
Oct 31, 2016
Messages
2,720
I needed some more tool holders. Don't we always need more tool holders? I especially needed one for my parting blade. So this week I have been working on 3 more tool holders. I like the angled tool holders I have made in the past and am making two more. The third holder is for my parting blade.

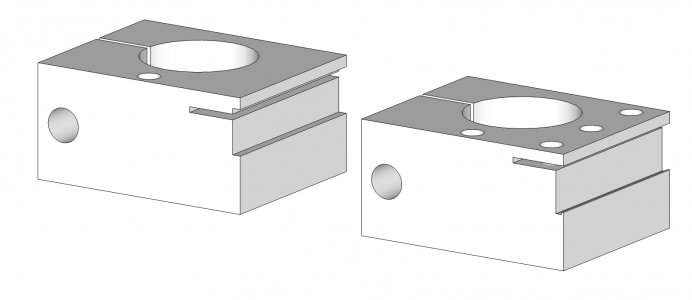
I had my parting blade held in one of my typical tool holders and it worked well. Until last week when I needed to part off a part right up against the chuck. I had to drag out one of my old craftsman parting blade holders and it barely cleared the chuck. Time to make one. There have been some threads recently where the top lip of the tool holder is tightened down on the parting blade to hold the blade in place. Winky"s Workshop has a video on one he made. I like this concept because the blade is right on the edge of the tool holder. All of my parting blades have the typical triangle shape. I know the consensus is the the T shaped blades are better but I don't want to buy another parting blade. I think that I already have a lifetime supply of parting blades. What I would like to get suggestions on is the shape of the slot that holds the blade and where the clamping slit should be positioned. Below is a drawing with a couple of possibilities.
parting tool holder ver 02.jpg

Help me out.
 
The "ideal" shape of the pocket will depend on the type pf parting blade you have - parallel flat sides, tapered flat sides, or a T-shaped profile. You might need to machine a matching taper into your pocket, or cut a relief groove at the top if your blade is T-shaped. The design on the right might be better, if only because the "beam" you need to tighten down is a bit thinner, therefore easier to flex.
 
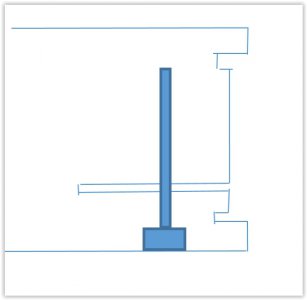
I would take a slightly different approach. I am assuming you will use a P-type blade. In order to hold the blade securely in a dead vertical orientation, you need the body of the blade to register against a solid part of the tool holder. To do this, you have to have a relief area that the top of the blade for the wider cutting part to fit into. Below that you need a slot that can apply holding force. The problem is that as the part below this clamping slot moves up to trap the blade, it will want to push the bottom of the blade inward and that can push the blade itself away from the vertical wall it is resting against. I know this is so from making holders like this before. The answer is to put another relief slot at the bottom of the blade slot and this relieves that tendency to move the blade around. It works. I would use clamping screws from the bottom. See the crappy drawing.


part.JPG
 
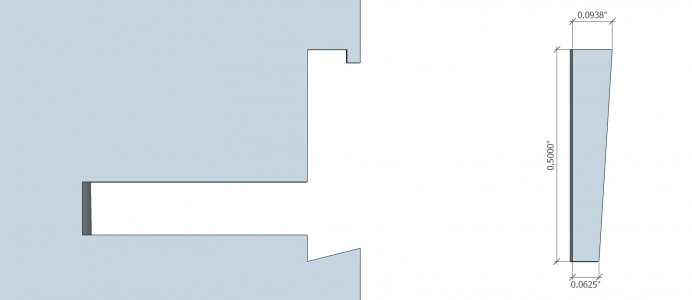
Each of my blades have the same shape. The only difference is how tall the blade is. The heights are 0.493, 0.500 and 0.590. Looking straight on from the cutting end the left side is straight up and down. The top is 3/32 and the bottom is 1/16. The craftsman parting blade holder has a slight angle on the bottom to keep the bottom of the blade against the holder. The clamping bolt on the top also has a slight angle to keep the top in. Here is my latest pocket shape. The bottom is angled and the top has a pocket for the top of the blade to sit in. Might be easier to angle the top too. Still thinking about whether to clamp from the bottom or the top.

parting tool holder ver 03.jpg
 
What will you do if you ever have to use a P or T-type blade? At least in my opinion, they actually work better than those old style blades because they have a 5 degree relief angle on each side of the blade to reduce rubbing.
 
Probably make a tool holder to fit the P or T type blade. Or modify the one I am making now. I know that I am parting challenged. Yet lately my parting efforts have not been the total disasters like in the past. I think part of my recent successes have been attributable two things. First is making my setup as rigid as possible. Mikey your explanations in other threads of the forces involved have really helped me to maximize the rigidity of my setup. Second being very careful to get the blade really sharp.
 
Rigidity is the key to parting, no question. Sharp helps but not nearly as much as rigidity. I may sharpen the parting blades used in my rear mounted parting tool holder maybe once or twice a year and have zero issues parting. The reason this can happen is because a rear mounted tool is so rigid. So yes, we agree. I will watch your post with interest!
 
After thinking things over I have made two decisions. First I am going to angle the bottom to force the bottom of the blade into the holder. Second has to do with rigidity. If I have the tightening screws and slot towards the bottom of the holder this would force the holder to be higher on the tool post and possible allow more flex in the post of the tool holder. Not good IMHO. So I will make the holder like my original drawings.

This leaves two remaining issues. One is the shape of the top of the slot. Should it be angled like I plan to do on the bottom and like craftsman did in their parting tool holders? Or make a slot for the blade to fit in like in the drawing I posted above? My concern with making a slot is can I get the slot precise enough to truly hold the blade rigidly in place. I don't know if I have the skill to do that. Second is the depth of the slit. My drawings have the slit going in a far as the tool post. I have thought about making the slit go further in so it would be easier to clamp the blade in place. This is what Winky did in his video. His slit goes half way through the holder. But he is not clamping his holder against a post. So I wonder what effect this might have on being able to securely clamp the holder to the post.

What do you guys think?
 
I was hoping to get these holders done today. Not. I was up most of last night helping my elderly mother. Didn't get much sleep. Moving pretty slow today. Went to get my drill bit for 1/4x20 tap and nowhere to be found. I was missing some other small drills due to breakage. Ordered a set of small drill bits. Will get them sometime next week. Started laying out where the slot should go on the parting blade holder and realized that I had forgotten to figure in the 3/16 thickness of the base in my initial layout drawings. Got me to thinking that with the holder resting on the base there would be around 1/4" from the top of the slot to the top of the base. This would be more rigid than having the holder up the post a bit. Of course I can't just put the holder on the post to scribe a line because the holder won't slide all the way down to be base. ARG!!! Out with the 4 jaw and dial the holder in so I can cut a big chamfer on the bottom of the holder. Also needed to face off the base a touch to get the holder to sit nice and flat on the base. Get this all done and get my line scribed. Have 0.272 from the line to the top. Life is good. Get the slot scribed and over to the mill to cut it. Lots of careful measuring. Much to my surprise I am able to cut the slot spot on so that the parting blade is exactly on center. Life is even better. That's all for today. I'll have some pic's when I get it done.
 
Sorry to hear Mom is having some trouble. Hope she is doing okay, Chuck.
 
Back
Top