- Joined
- Jun 26, 2018
- Messages
- 1,733
I picked this metrology section for a reason. Though this is about threading, the questions are more about measuring than the process of threading.
As the ELS is up and running in my lathe, I really wanted to start to finish use the Machinist Handbook parameters and do lots of measuring from begining to end to come to the final product rather than grabbing a manufactured nut and do the old go/no go technique.
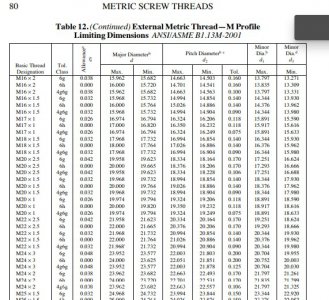
I took the outside diameter to 24.07mm as the hand book show a 24mm x 2 Major diameter to be 24.00 to 24.513
I did many passes with a 60 degree carbide threading tool to end up with a minor diameter of 22.108mm (M.H show max of 21.835 to 22.210)
Using the 3 wire technique, it shows I need to use the "45" wires. Now I hate using these, but this is about measuring so... I used a piece of foam to hold and came up with 24.408mm subtracting 1.7mm (card in 3 wire said this is the "constant") so I end up with 22.708mm. M.H says the pitch diameter should be between 22.701 and 22.925)
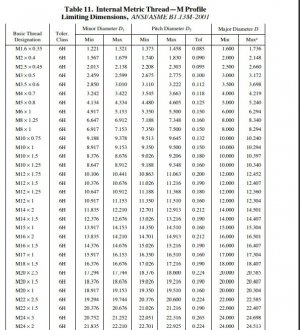
When I go to put the nut on the final product, I can only get on about 1 turn. I Dykem'd the threads and hit it with the nut again. It pretty much was removing ink from all places. This says to me everything is right...but just too large and I would need to take the major and minor down equally. Doing all the same measuring, I now had a pitch diameter of 22.563mm (the MINIMUM per M.H. is 22.701) but it now fit great....Maybe SLIGHTLY on the snug side, that is, there is zero wiggle from 2 turns in to all the way down. I will post the reference page just to show what I went off of (24x2). Now this is 6h tolerance class, not sure if that plays, but I only saw that or 4h. I would think 2a would have been more ideal but I would expect it to fit (?)
Any ideas based on measurements I used and the results? I wouldn't think the "best" home shop technique is trying a nut until it fits...? If your doing a 10mm thread, you pretty much turn that diameter and just thread what ever pitch until you nut goes on. BUT, if like me, you want to try doing it to "the Books" specs, well I didn't have spectacular initial results.


