Taper Attachment makes wobbly tapers

yukon_rose

Registered
Registered
Joined
Jan 9, 2020
Messages
81
I have an Atlas Taper Attachment that produces improper tapers. I've traced the problem to This Part:
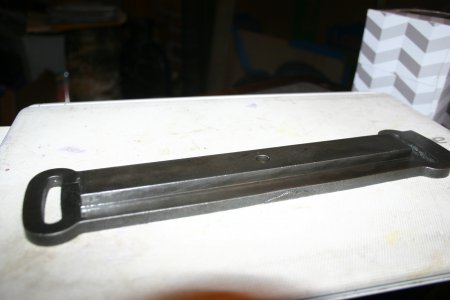
IMG_6185.JPG

The center part of the piece measures 1.004" at one end; 0.999" in the center and 1.002" at the other end.

How would you fix the piece such that the center part is the same width along its entire length?

Gary
 
Can you tell which side is wavy? Or is it both? I'd consider using a milling machine (or surface grinder) to flatten the sides. However, you might need to install a thicker gib to make up for any material you removed.
 
I've honed each side slightly. Based on the shiny spots that showed up, I'd say both sides need attention.

My mill isn't big enough to do the piece in one pass.

My surface grinder IS big enough. How would you set it up?

Gary
 
I had a similar problem, but not nearly that much variation. The design of my attachment was different, the guide bar is a separate piece, but the same general idea. I put to offending part on the mill and took a very light cut with a new carbide tool. I took some extra fooling around because my mill has some slop but the final truing was done on the surface plate by lapping. I also found that some error was being introduced by the attachment to the lathe bed. It was a sloppy fit and when the taper bar got to it's wider point it would increase the pull on the attachment and cause some movement. Solution was to make a better fitting, wider attachment bracket.

Since I lack the ability to grind a MT after turning, I still go thru the process of final fitting with a quality, matching, commercial part. Nothing more than a marker and some silicone carbide paper glued to a flat bar. Spin the part, grind off high spots. Sounds crude but works. I've done a couple of internal tapers but they are a lot harder for me to do. I had to buy taper reamers (import) and still didn't get the kind of fit I thought I should, but it worked.
 
If you have a long enough flat edge, you could use bluing and a hand file to get it straight.
 
I've honed each side slightly. Based on the shiny spots that showed up, I'd say both sides need attention.

My mill isn't big enough to do the piece in one pass.

My surface grinder IS big enough. How would you set it up?

Gary


I'd do it straight 'up', bolted on the ends (through the stock slots) to angle plates. Use a long straightedge (or parallels) to get the initial side reasonably straight based on the other side (basically, just pick up the 2 highest 'points' of the 3 you shiney'ed up). Depending on whether you have a straightedge on your mag-chuck or not, you will have to 'indicate' it straight along the left/right axis.

Surface grind 1 side flat. Flip it over, and do the other side. 2nd side is going to naturally be easier, since you'll have way less setup.

Alternatively, if you can indicate it straight on the 'flat', you can edge-cut with your surface grinder. But I've never had any luck doing that and making it turn out right.
 
How would you set it up?
On edge. Grind the back side flat first so you have a good surface to bolt the bar to your angle plates. Grind the first edge then use gage blocks to set the second side.
Grinding wheel not big enough? Tilt the head or work to enough angle to clear, use your diamond dresser to make a flat on the wheel to match.

It might be easier to just make a two part assembly. Mill a base plate and a separate guide bar that you can surface grind perfect. If you are lucky maybe you can just buy a ground piece of tool steel bar to fit. Bolt the two parts together & even let the bar into the base a little. Drill & ream the pivot point after the two parts are assembled.

There always seems to be some slack in the system that makes the first inch or so of travel not good. Then there is the issue of some slop in the carriage travel feed. You can eliminate most of that by letting your hand provide some resistance on the carriage hand-wheel.
The 2 part solution seems like a great idea. I hadn't thought of that. Its remaking rather than just 'fixing', but it would allow you to not have to shrink the center section, potentially below the size you can adjust gibs for.
 
Back
Top