- Joined
- Jul 28, 2017
- Messages
- 2,565
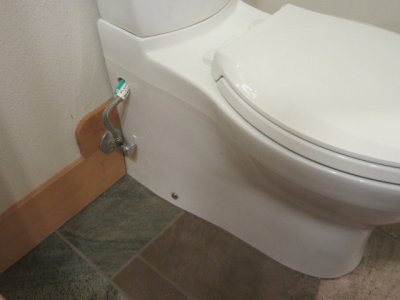
10 years ago we moved into our new house. So now we're seeing some failures show up in the things we had put in the house. One of those things is a Kohler "Persuade" toilet. It looks real nice, being a skirted toilet -- see below....

But the plumber that sold us on the thing (we have TWO of them) didn't tell us some stuff. Many of you probably are already rolling your eyes, thinking "how the HELL can you replace the parts that most-often fail in a toilet like that???". Well, the most common approach is to hire another plumber (most likely NOT the same guy that sold it to you in the first place) to pull the ENTIRE TOILET so he/she can replace the fill valve or flapper. So replacing a $10 fill valve will cost a few hundred bucks. Yeah. Style.
I tried the usual tactics of flushing the fill valve and replacing the gasket, but no luck. Closer examination of the fill valve assembly showed that the float probably had water in it -- water in the tank would go up over the top of the float well before the valve started closing. The float in the other toilet of the same type was riding high, with the water coming up about halfway up on the float. So I knew that flushing out the fill valve or replacing the gasket was a lost cause.
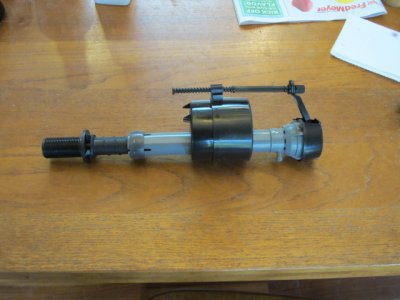
Further examination of the bad float revealed that it was part of a Fluidmaster 400, perhaps one of the most common fill valves out there. So I bought one to look it over, and discovered something. The valve is a two-part assembly. The bottom part basically is a threaded tube. The bottom goes through the tank and the water supply is connected to it. The top has a very coarse thread that's used to adjust the position of the valve/float assembly.
The whole thing looks like this:

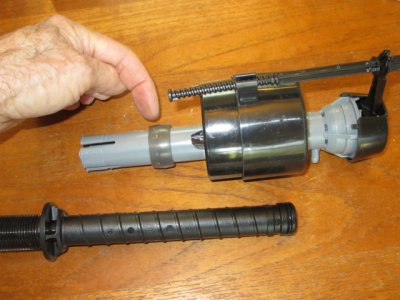
I thought it might be possible to unscrew the top part and just pull it out, to replace with a new one -- but there wasn't enough clearance in the tank to rotate the assembly and back it out. Also, I found that it wasn't possible to separate the top and bottom. Until I noticed the plastic retainer ring:

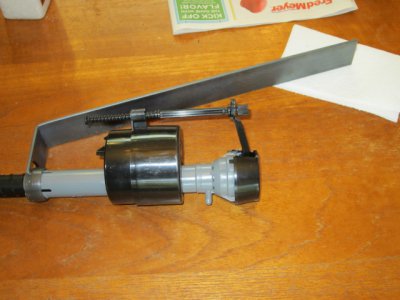
If the ring is pushed up, the slotted end of the tube can expand, permitting the two pieces to be separated with a tug. But my problem wasn't solved yet, because there wasn't enough room to get my hand past (and under) the float. So a tool was called for:

I bought a piece of 1.5" HRS from the local hardware store, cut it to length and milled a slot that was wide enough so the tool went partway up the curved side of that plastic ring, 1.25 inches. I milled a shallow groove about 2 inches up from the end, to help me make a straight bend in the steel. Clamped the end in my vise and heated the grooved area with my turbo torch. When the area started glowing a dark red I bent the handle over at about a 60 degree angle. After it cooled, I reached into the (now empty) tank, snagged the ring, pulled it up, and pulled the top part of the fill valve off. A quick test showed that the old fill valve was a perfect fit to the bottom part of my new fill valve, so the new fill valve went into the tank. My tool easily pushed the plastic retaining ring into place, and a few moments later I enjoyed a quiet fill and a quiet shutoff.

But the plumber that sold us on the thing (we have TWO of them) didn't tell us some stuff. Many of you probably are already rolling your eyes, thinking "how the HELL can you replace the parts that most-often fail in a toilet like that???". Well, the most common approach is to hire another plumber (most likely NOT the same guy that sold it to you in the first place) to pull the ENTIRE TOILET so he/she can replace the fill valve or flapper. So replacing a $10 fill valve will cost a few hundred bucks. Yeah. Style.
I tried the usual tactics of flushing the fill valve and replacing the gasket, but no luck. Closer examination of the fill valve assembly showed that the float probably had water in it -- water in the tank would go up over the top of the float well before the valve started closing. The float in the other toilet of the same type was riding high, with the water coming up about halfway up on the float. So I knew that flushing out the fill valve or replacing the gasket was a lost cause.
Further examination of the bad float revealed that it was part of a Fluidmaster 400, perhaps one of the most common fill valves out there. So I bought one to look it over, and discovered something. The valve is a two-part assembly. The bottom part basically is a threaded tube. The bottom goes through the tank and the water supply is connected to it. The top has a very coarse thread that's used to adjust the position of the valve/float assembly.
The whole thing looks like this:

I thought it might be possible to unscrew the top part and just pull it out, to replace with a new one -- but there wasn't enough clearance in the tank to rotate the assembly and back it out. Also, I found that it wasn't possible to separate the top and bottom. Until I noticed the plastic retainer ring:

If the ring is pushed up, the slotted end of the tube can expand, permitting the two pieces to be separated with a tug. But my problem wasn't solved yet, because there wasn't enough room to get my hand past (and under) the float. So a tool was called for:

I bought a piece of 1.5" HRS from the local hardware store, cut it to length and milled a slot that was wide enough so the tool went partway up the curved side of that plastic ring, 1.25 inches. I milled a shallow groove about 2 inches up from the end, to help me make a straight bend in the steel. Clamped the end in my vise and heated the grooved area with my turbo torch. When the area started glowing a dark red I bent the handle over at about a 60 degree angle. After it cooled, I reached into the (now empty) tank, snagged the ring, pulled it up, and pulled the top part of the fill valve off. A quick test showed that the old fill valve was a perfect fit to the bottom part of my new fill valve, so the new fill valve went into the tank. My tool easily pushed the plastic retaining ring into place, and a few moments later I enjoyed a quiet fill and a quiet shutoff.

 , sometimes it does take a little "persuade" to get them go potty
 .
. Mike
Mike