
- Joined
- Apr 22, 2016
- Messages
- 987
In the last 3 – 7 years I have cutdown over 20 large maple trees in my yard. Several were over 4 feet at the stump and with up to 5 trunks grown together at the base. Most of them would reach to my house if blown down in a storm. Eleven of them were in the lawn that is kept cut, making for a real pain to cut grass.
About 10 years ago I bought a used zero turn mower, thinking it would make going around those trees easier. NOT SO. And having no experience or knowledge of zero turn mowers, this one had a front engine and had little traction at the rear wheels, so it almost always spun the tires when trying to make a tight turn, tearing up the lawn. It was also dangerous on side hills and would just as soon go straight down than ride along the crest. I would not let anyone use it for this reason. It finally ended up sitting in a storage building, in my way. When thinking about selling it, I figured that if a good engine was needed for any future project, I would probably pay more for an engine like that than could be got for the whole thing, so I kept it. When it was decided that more room was needed in that building, I removed the engine and put the rest outside.
That engine and most of the rest of the mower sure came in handy when I considered building a stump grinder to get rid of all those eyesores.
Watching many websites and YouTube videos began to bring a plan into being.
Most of the hand operated (not mounted on a large machine) grinders are 8 – 12 HP at the most. This engine was a 17.5 HP Briggs and Stratton Intec heavy-duty. It also has electric start and electric clutch, both of which were used.

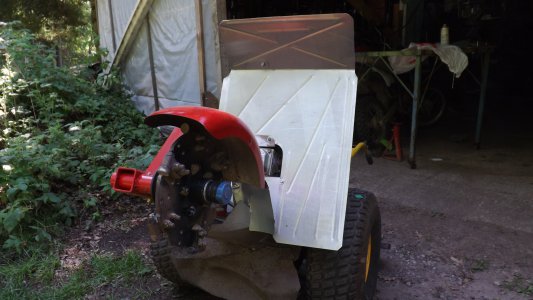
The cutter head was made from a 3/8” thick, round 12” plate which I had on hand (a drop from a local fabrication site that I sometimes get metal from). This was machined somewhat true (although rusty) and with a center hole concentric to fit a 5-bolt trailer hub. Bolt circle drilled on my Bridgeport mill with DRO.
A stub axle (arbor) was made from 2” solid stock with bearing and seal surfaces and a 1 -1/16” thread. Six Carbide stump grinder teeth were fitted to the plate with brackets trued on mill and within 2 grams weight of each other. Then a 4” pulley (also on hand) was machined and welded to the backside of the hub.


The mower frame was cut to size and cleaned of all unwanted brackets etc. It was strengthened on the bottom to mount the wheel axle bearings. Bearings and shaft came from my cousin's circular sawmill. It had a slight bend in it (no good for a saw arbor) but just fine for use on this machine. I had made him a new larger arbor and took the old one in exchange.

The right-side wheel was bored out, so it is freewheeling all the time. The left wheel is prevented from turning on the shaft by a double D splice.
I made an 8” drum for the spring brake that holds the axle and left wheel locked while grinding and the brake bands came from some kind of go cart bought from Amazon.


The release lever is on the left handlebar.

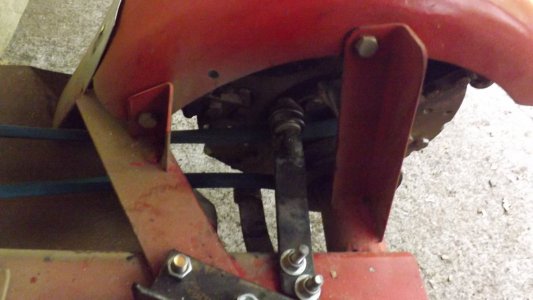
The cutter head is extended out from the front of the machine by a 2” square tube sandwiched between1-1/2” angle. Belt tension is adjusted with slotted bolts and a threaded shaft that both tightens and loosens the belt for service.

A 5/8” Kevlar belt drives the cutter, also converting vertical shaft engine to horizontal cutter. Because the belt is long, it tends to whip at high speed (I run the engine at full speed and let the governor take care of RPM), so two sets of belt guides keep it from disengaging from the pulley at the head. These things were learned by experience (I.E. multiple prototypes)") The bearings for these guides will be replaced with larger ones. Another learning experience
The bearings for these guides will be replaced with larger ones. Another learning experience
During the 1st few tests, I found that more and better shielding was needed to protect the operator from the large amount of chips and chunks that go flying. I think I've added more guards at least 5 times so far.
Building this involved some calculation and a lot of guessing. The weight of the cutter head must be somewhat equal to the force, up or down, at the handlebars. At first, I was having to push down on the handles to keep from digging in too much. Just guessing, I found a piece of steel and clamped it to the rear of the frame.

Perfect! So, I weighed it with a bathroom scale, and it was just over 50 pounds. Then from the web I calculated the amount of concrete that would about equal that and made a form to pour one from Ready Crete. 52 pounds! Cast in some anchors to bolt it on and it works well.

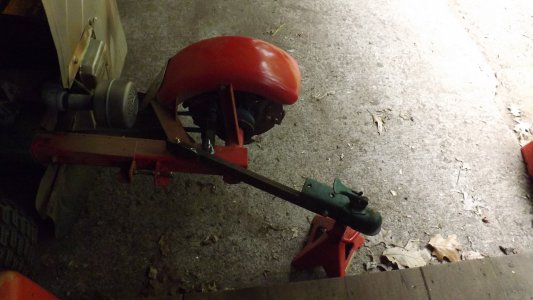
Pushing it around my yard and all the hills was a chore so I made a quickly detachable trailer hitch so it could be pulled around with my homemade side-by-side yard buggy.

I've only got a few stumps to go and I'll be done with it. Not anticipating more stumps, I plan to sell it and at least recover some of my investment. I'm sure I've saved thousands of dollars by not hiring a commercial service to do this. It was still a fun project and everything you do that you haven't done before increases your experience and keeps your brain exercised.


Thanks for looking
Aaron
About 10 years ago I bought a used zero turn mower, thinking it would make going around those trees easier. NOT SO. And having no experience or knowledge of zero turn mowers, this one had a front engine and had little traction at the rear wheels, so it almost always spun the tires when trying to make a tight turn, tearing up the lawn. It was also dangerous on side hills and would just as soon go straight down than ride along the crest. I would not let anyone use it for this reason. It finally ended up sitting in a storage building, in my way. When thinking about selling it, I figured that if a good engine was needed for any future project, I would probably pay more for an engine like that than could be got for the whole thing, so I kept it. When it was decided that more room was needed in that building, I removed the engine and put the rest outside.
That engine and most of the rest of the mower sure came in handy when I considered building a stump grinder to get rid of all those eyesores.
Watching many websites and YouTube videos began to bring a plan into being.
Most of the hand operated (not mounted on a large machine) grinders are 8 – 12 HP at the most. This engine was a 17.5 HP Briggs and Stratton Intec heavy-duty. It also has electric start and electric clutch, both of which were used.
The cutter head was made from a 3/8” thick, round 12” plate which I had on hand (a drop from a local fabrication site that I sometimes get metal from). This was machined somewhat true (although rusty) and with a center hole concentric to fit a 5-bolt trailer hub. Bolt circle drilled on my Bridgeport mill with DRO.
A stub axle (arbor) was made from 2” solid stock with bearing and seal surfaces and a 1 -1/16” thread. Six Carbide stump grinder teeth were fitted to the plate with brackets trued on mill and within 2 grams weight of each other. Then a 4” pulley (also on hand) was machined and welded to the backside of the hub.
The mower frame was cut to size and cleaned of all unwanted brackets etc. It was strengthened on the bottom to mount the wheel axle bearings. Bearings and shaft came from my cousin's circular sawmill. It had a slight bend in it (no good for a saw arbor) but just fine for use on this machine. I had made him a new larger arbor and took the old one in exchange.
The right-side wheel was bored out, so it is freewheeling all the time. The left wheel is prevented from turning on the shaft by a double D splice.
I made an 8” drum for the spring brake that holds the axle and left wheel locked while grinding and the brake bands came from some kind of go cart bought from Amazon.
The release lever is on the left handlebar.
The cutter head is extended out from the front of the machine by a 2” square tube sandwiched between1-1/2” angle. Belt tension is adjusted with slotted bolts and a threaded shaft that both tightens and loosens the belt for service.
A 5/8” Kevlar belt drives the cutter, also converting vertical shaft engine to horizontal cutter. Because the belt is long, it tends to whip at high speed (I run the engine at full speed and let the governor take care of RPM), so two sets of belt guides keep it from disengaging from the pulley at the head. These things were learned by experience (I.E. multiple prototypes)
The bearings for these guides will be replaced with larger ones. Another learning experienceDuring the 1st few tests, I found that more and better shielding was needed to protect the operator from the large amount of chips and chunks that go flying. I think I've added more guards at least 5 times so far.
Building this involved some calculation and a lot of guessing. The weight of the cutter head must be somewhat equal to the force, up or down, at the handlebars. At first, I was having to push down on the handles to keep from digging in too much. Just guessing, I found a piece of steel and clamped it to the rear of the frame.
Perfect! So, I weighed it with a bathroom scale, and it was just over 50 pounds. Then from the web I calculated the amount of concrete that would about equal that and made a form to pour one from Ready Crete. 52 pounds! Cast in some anchors to bolt it on and it works well.
Pushing it around my yard and all the hills was a chore so I made a quickly detachable trailer hitch so it could be pulled around with my homemade side-by-side yard buggy.
I've only got a few stumps to go and I'll be done with it. Not anticipating more stumps, I plan to sell it and at least recover some of my investment. I'm sure I've saved thousands of dollars by not hiring a commercial service to do this. It was still a fun project and everything you do that you haven't done before increases your experience and keeps your brain exercised.
Thanks for looking
Aaron

 The tow hitch is something that I had made also . Great idea and saves you some pushing/pulling .


