Stepper Motor Sizing Question

Keith Foor

Registered
Registered
Joined
Aug 4, 2015
Messages
291
I have an excello 602 mill that i am looking to add CNC to. I am trying to figure out what torque and size stepper motors I am going to need. I am debating the Z axis being off the knee and not the spindle but the speed with that oof course may be an issue. I am wanting to maintain the manual abilities of the machine as well. Plans are for a belt drive configuration due to wanting to maintain the manual aspects of the machine.

Any input or personal experience would be great .
 
Kudos for wanting to maintain the manual capability!

A typical DC servo motor for that application would be rated at about 32 in/lb of torque. With a stepper you typically would want to double that to prevent decoupling under spike loads and quick acceleration. So around 65 in/lb. Adding a bit more is a good thing. A common size is a NEMA 34, 1270 oz/in (about 82 in/lb). I have used these on larger machines than the 602, and were I to replace the servos on mine, this is what I would use. A 1:1 belt ratio would provide plenty of torque.

When using the system manually, you will want to electrically disconnect the steppers from the drive to prevent feeding back voltage to the drives, also the steppers are hard to turn when connected to the drive. A 4 pole switch or a plug would work well for this. You could also use a 4 pole relay for each motor and control all of them from a single switch. I do recommend switching Z separately, it's nice to be able to turn Z off and still use the X/Y positioning for manual hole drilling. I run mine that way many times.

I would (did) put the Z on the quill, but design it so it can be easily decoupled for manual use. This can be done two ways. One way is to bolt the ball nut carrier to a modified quill stop, this is the most common. Or build a geared unit that drives the quill pinon that can be shifted out of gear with a lever. This method also requires biasing the quill up with a counter balance to eliminate backlash. This system is not common, and in fact there may only be one in existence.
 
Yeah, the Z axis is the one I am debating. The quill on the excello can only be accessed from the right side where the handle is. Since I don't have a drill press of any account I use the mill as a press as well. I have actually considered doing the knee and seeing how that turns out and possibly doing the quill later. I had not thought about using the quill depth guide to drive a ball screw do the Z but that may be a way to go. Issue I see with that is disconnecting it for manual operation. This is going to be my first attempt at anything like this but I figure I have the hardware to make the adapter plates and such so it shouldn't be a big deal.
My next project will be a 1923 O series South Bend lathe. I got it without any change gears so it's threading abilities are a bit lacking.
It will be direct drive and run off a pendant completely as I have another smaller Atlas lathe to do most things that the big dog will do.
The Atlas will remain manual as it's a temporary lathe until the big shop is done and I replace it with another 13 inch gear head lathe.
 
Putting the Z on the knee would be an interesting way of doing it, I have heard of it being done but have never actually seen one. It would be interesting to replace the knee screw with a ball screw. The acme thread knee screw has self holding capability, where the ball screw would drift down. When unpowered, you would have to lock the knee, but that knee power feed would sure be nice.

Both of those will be fun projects. I am going to CNC my DoAll grinder, I have all the parts, I just need time to work on it.
 
Jim I'm curious to what benefit is a cnc grinder, is it anymore than just not having to crank the traverse wheel so much?
 
Jim I'm curious to what benefit is a cnc grinder, is it anymore than just not having to crank the traverse wheel so much?

Partly just to see if I can do it properly, but mostly just for fun. I want to try to profile grinding. The machine already has hydraulic X&Y, but that's all coming out and will be all electric. I want to keep full manual operation also. It will be an interesting engineering excersize.
 
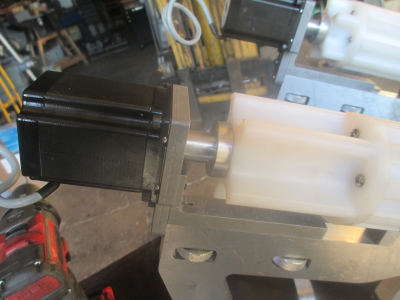
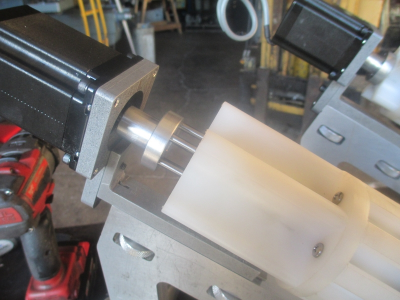
Here is a zero backlash, quick disconnect drive coupling I just built for a stepper motor drive system.

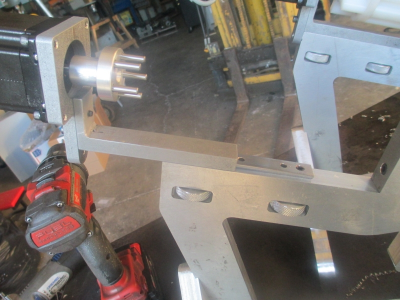
The stepper motor mount slides on a dovetail that is tightened down with the thumb nuts in the frame. This holds the motor in alignment and provides a secure clamping system. The 5 pins slide into reamed holes in the UHMW coupling. This is made special for this particular machine to allow easy operator change out of the drum.

But... this same system will work very well to drive a lead screw and allow a quick disconnect for manual operation. The only thing I would do different on a lead screw drive is make the dovetail a bit wider for more stability, this one is only 1/2 inch wide. I only had 3/4 inch of total width to work with here.

upload_2016-1-25_16-12-5.png

The holes are a smidgen undersize for a ''press'' fit. This maintains the zero lash. The UHMW is resilient and will easily stretch a bit when inserting the drive pins. They slide together very easy. The pins stick out about 5/8 inch.
upload_2016-1-25_16-12-30.png

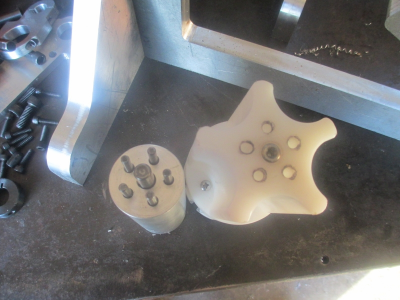
One pin would be able to more than transmit the full torque of this NEMA 23 motor. I used 5 pins because when you add up the tolerances, you get a much tighter fit with 5 pins. This coupling will also take some degree of miss alignment and still work OK. I used 304 SS for the male dovetail rather than aluminum to prevent galling of the sliding parts. I tried some Delrin, but because of the small cross section it was not very stable. An aluminum to aluminum sliding surface would not live very long without trying cold weld together. The male dovetail was machined , then hand fit with a file to match the female dovetail in the motor mount. It is a tight sliding fit.

upload_2016-1-25_16-12-48.png

This drive end is part of the fixture I used to do the machining on the UHMW, the SS axle was not in the part at that time hence the center pin in the fixture.

upload_2016-1-25_16-13-35.png
 
Back
Top