Steam Punk Lights

arlo

Active User
Registered
Joined
Nov 15, 2012
Messages
56
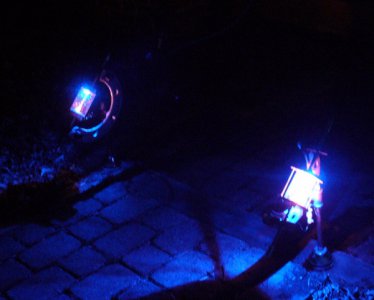
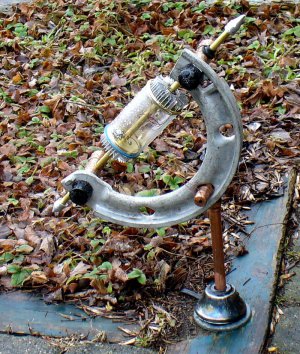
There isn't very much machining on these outdoor lights but they certainly qualify as an "Other" project. They're part of my 12 volt outdoor lighting. Each light uses a 1 watt blue LD and a 1 watt yellow LED that wants to be orange. The near light uses an LED driver instead of just a current limiting resistor will be brighter until I upgrade the other light. For 2 watts of energy apiece, there is a lot of light. As you can see, there's a lot of plumbing parts incorporated.

If you're not familiar with Steam Punk, it's science fiction based on steam powered machinery. I haven't figured out how to efficiently use steam power to power the LEDs.
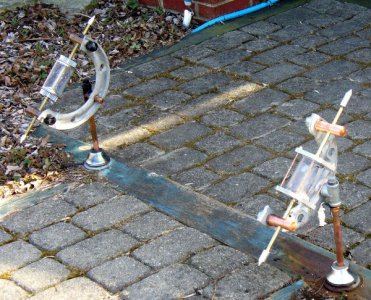
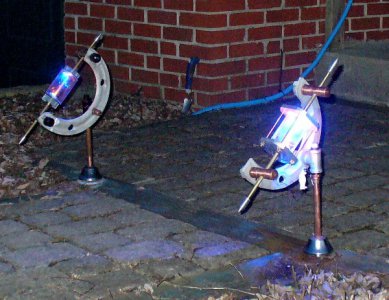
DayLight.JPGTwiLight.JPGDark.JPG

DayLight.JPG TwiLight.JPG Dark.JPG
 
Ditto, I love the steam punk idea and your lights are very sharp, thanks for sharing-

Dave
 
Big steampunk fan. These are great. Can you post a close up picture of the right one. Some of the best lights I have seen.

Jeff
 
Big steampunk fan. These are great. Can you post a close up picture of the right one. Some of the best lights I have seen.

Jeff

I'll get some more photos when Ohio's version of spring is more cooperative.

I originally wanted to use amber beer bottle glass for the LED housing. There are plenty of articles on-line showing how moderately clever people can cut bottles. I am obviously not moderately clever. In the interest of art, I emptied a number of bottles and tried to create a glass tube. The results varied but I wasn't satisfied with them. I found some votive candles holders at a craft store and used them. I think amber glass would look a lot better.

The C-shaped mounts are from a surplus store. The kid at the counter thought they were from high voltage transmission lines. The center shaft is 3/8" brass, threaded at both ends for home made al finials. The glass tube on the right-hand light has 3/8" al on both ends. These al pieces were turned to round off the corners and a shallow recess was cut into both faces. This recess matches the tube diameter and is filled with RTV to seal the chamber and to cushion the glass edge. The assembly uses "E" clips to hold it on the brass rod. 1 Watt LEDs are mounted to the al end pieces. One end uses a blue LED and the other uses a yellow. I'd hoped that from a distance they'd looked green but they look blue with orange glints. The wiring is down with magnet wire and I used extra long pieces inside the glass tube and twisted them so they'd look like a filament. They don't look like a filament.

I found some LED drivers on eBay for $1 apiece. This is the first time I've used LED drivers and I am very happy with the result. I think they are a lot more efficient than using a current limiting resistor. The power supply is a 12 VDC wall wart but the LED drivers are compatible with the standard 12 VAC low voltage systems sold at big box stores.

The rest of the mounting is copper and galvanized plumbing pieces.

The left hand light uses brass plates intended to be used as sliding closet door pulls as the glass tube caps. Mounted on their exteriors are al heat sinks used for electronics. It uses a blue gasket to seal the glass tube. I plan to upgrade this light to use an LED driver and to replace the rubber retaining ring holding the brass rod in place. I do have a better picture of it, taken before the lights were buried.

LeftHand.JPG

LeftHand.JPG
 
Thanks for the better picture. Very nicely done. It reminds me of an armillary crossed with and industrial fuse. You nailed the steampunk look.

Jeff
 
Very nicely done!

I'll get some more photos when Ohio's version of spring is more cooperative.

I originally wanted to use amber beer bottle glass for the LED housing. There are plenty of articles on-line showing how moderately clever people can cut bottles. I am obviously not moderately clever. In the interest of art, I emptied a number of bottles and tried to create a glass tube. The results varied but I wasn't satisfied with them. I found some votive candles holders at a craft store and used them. I think amber glass would look a lot better.
You are giving me idea now! Did you consider a metal cork arrangement for the beer bottles? That is solve your bottle cutting issue by not cutting them at all. You probably wouldn't fit into the crescent though.
The C-shaped mounts are from a surplus store. The kid at the counter thought they were from high voltage transmission lines. The center shaft is 3/8" brass, threaded at both ends for home made al finials. The glass tube on the right-hand light has 3/8" al on both ends. These al pieces were turned to round off the corners and a shallow recess was cut into both faces. This recess matches the tube diameter and is filled with RTV to seal the chamber and to cushion the glass edge. The assembly uses "E" clips to hold it on the brass rod. 1 Watt LEDs are mounted to the al end pieces. One end uses a blue LED and the other uses a yellow. I'd hoped that from a distance they'd looked green but they look blue with orange glints. The wiring is down with magnet wire and I used extra long pieces inside the glass tube and twisted them so they'd look like a filament. They don't look like a filament.
With amber glass nobody would see what is inside. You might not be able to model a filament but that might be a good place to put some speculative art.

As a side not filaments themselves are becoming history just like steam and the use of copper and brass has. Maybe someday filament punk will be the rage.
I found some LED drivers on eBay for $1 apiece. This is the first time I've used LED drivers and I am very happy with the result. I think they are a lot more efficient than using a current limiting resistor. The power supply is a 12 VDC wall wart but the LED drivers are compatible with the standard 12 VAC low voltage systems sold at big box stores.
How are they doing heat wise? This is something I'd worry about as wattage is increased
The rest of the mounting is copper and galvanized plumbing pieces.

The left hand light uses brass plates intended to be used as sliding closet door pulls as the glass tube caps. Mounted on their exteriors are al heat sinks used for electronics. It uses a blue gasket to seal the glass tube. I plan to upgrade this light to use an LED driver and to replace the rubber retaining ring holding the brass rod in place. I do have a better picture of it, taken before the lights were


They look pretty neat to me.
 
I purchased some colored bottles from a craft store but I really wanted to use the brass rod as a skewer. Maybe I could have drilled a hole in the bottom of the bottle but I was also concerned about mounting the LEDs. The tube worked better for both of these reasons.

The clear glass vs the amber glass is probably a toss-up in the daylight. At night, I thought that the amber would be more interesting. Especially with the two colored LEDs inside. The filament look was used only becasue I used clear glass. If you copyright "Filament Punk" now you might collect dues from hipsters some day.

I was worried about the heat, too. For the light that uses a resistor to limit the current, the heat from the resistor is about 2 Watts or a little more. It gets warm enough that you don't want to hold it for very long. The LED driver gets warm but not hot. It was a little below freezing last night and we got a lot of wet snow. The lights are on whenever it's dark. This morning, both lights were snow covered. I'm eager to accept this as proof that they're not going to get too hot.

I appreciate the compliments people have made. I now know what an armillary looks like. Now that would make a cool light. My skills have got a long way to go.
 
Those are very cool as well as the night pics!
 
Back
Top