- Joined
- Jun 23, 2011
- Messages
- 786
Our little family paddle-boat (pedal boat) had a bent and broken rudder-shaft. I asked my 7 year old daughter if she would like to help me make a new one. I was so pleased when she jumped up and said YEAH!
So, down to the shop we went. She saw the broken pieces and I asked her what we needed to make a new one. She identified three pieces: the shaft and two end caps. "That's easy!", she said. "Let's just see", I said.
So we started looking for a suitable piece in the scrap bin to make a shaft out of. She found a 3' length of 3/4" dia 6061 aluminum. I showed her how to measure the diameter with a dial caliper. The aluminum rod came in at 0.752 and the original shaft 0.734. She concluded it was too thick and too long.
To the band saw we went. She marked off the right length, I set it in the band saw, she tightend up the vise and turned on the saw.
Then, she noticed that the ends were rough cut because of the saw and wanted them nice and neat. So, to the lathe we went for facing and center drilling.
Of course it was still too thick. So we talked about how to make it smaller. She correctly guessed we needed to "shave it down". So, between centers it went. With a little help with the subtraction and setting of the cross slide, she actuated the carriage feed and thinner it got. Her immediate response when seeing the old oxidized aluminum turned away to reveal the bright aluminum underneath was "COOL!!!".
Then, we set about talking how to make the end caps. Oddly enough, her first suggestion was to make a counterbore in the end caps "just big enough" and tap them onto the shaft using some "super sticky glue" to make sure they don't come off. A press fit! After a bit more discussion, we decided we would use screws to hold on the end plates - something she could assemble all by herself at the pond when we bring the new shaft.
She realized we needed to drill holes in the ends of the shaft to take the screws. We consulted the tap drill chart, and drilled holes. She attempted to screw in the screws but they wouldn't go. I called her attention to the fact that there were threads on the screw. She then started wondering how can we "cut some threads in that little hole." Hence, her introduction to a tap.
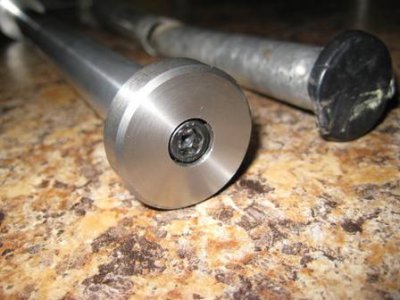
We then set about making the end caps. She didn't like the idea of the screw heads "sticking out" because they'd "get caught on the pond weeds". She suggested we make the "hole in the middle bigger, but not all the way through". A counterbore! So that's how we made 'em.
I gave her the two end caps, the shaft, two Allen head cap screws, and an Allen key, and she assembled the new rudder shaft all by herself. I wanted to use SS screws, but didn't have any kicking around. Tomorrow we'll stop by our friend at the hardware store to get them.
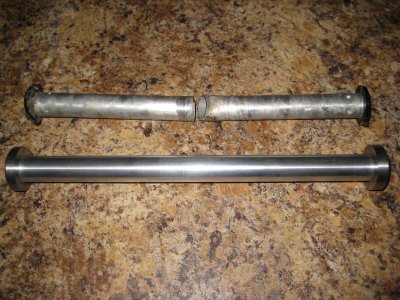
Here are pictures of the broken shaft and the new one:


When asked if she still thought it was easy, her reply: "It's not really easy, but wasn't hard either."
I'm a proud poppa!
John


So, down to the shop we went. She saw the broken pieces and I asked her what we needed to make a new one. She identified three pieces: the shaft and two end caps. "That's easy!", she said. "Let's just see", I said.
So we started looking for a suitable piece in the scrap bin to make a shaft out of. She found a 3' length of 3/4" dia 6061 aluminum. I showed her how to measure the diameter with a dial caliper. The aluminum rod came in at 0.752 and the original shaft 0.734. She concluded it was too thick and too long.
To the band saw we went. She marked off the right length, I set it in the band saw, she tightend up the vise and turned on the saw.
Then, she noticed that the ends were rough cut because of the saw and wanted them nice and neat. So, to the lathe we went for facing and center drilling.
Of course it was still too thick. So we talked about how to make it smaller. She correctly guessed we needed to "shave it down". So, between centers it went. With a little help with the subtraction and setting of the cross slide, she actuated the carriage feed and thinner it got. Her immediate response when seeing the old oxidized aluminum turned away to reveal the bright aluminum underneath was "COOL!!!".
Then, we set about talking how to make the end caps. Oddly enough, her first suggestion was to make a counterbore in the end caps "just big enough" and tap them onto the shaft using some "super sticky glue" to make sure they don't come off. A press fit! After a bit more discussion, we decided we would use screws to hold on the end plates - something she could assemble all by herself at the pond when we bring the new shaft.
She realized we needed to drill holes in the ends of the shaft to take the screws. We consulted the tap drill chart, and drilled holes. She attempted to screw in the screws but they wouldn't go. I called her attention to the fact that there were threads on the screw. She then started wondering how can we "cut some threads in that little hole." Hence, her introduction to a tap.
We then set about making the end caps. She didn't like the idea of the screw heads "sticking out" because they'd "get caught on the pond weeds". She suggested we make the "hole in the middle bigger, but not all the way through". A counterbore! So that's how we made 'em.
I gave her the two end caps, the shaft, two Allen head cap screws, and an Allen key, and she assembled the new rudder shaft all by herself. I wanted to use SS screws, but didn't have any kicking around. Tomorrow we'll stop by our friend at the hardware store to get them.
Here are pictures of the broken shaft and the new one:


When asked if she still thought it was easy, her reply: "It's not really easy, but wasn't hard either."
I'm a proud poppa!
John


Last edited:
