- Joined
- Oct 30, 2019
- Messages
- 225
A bit of backstory that explains some of the approach and challenges along the way below:
Our shop building was put in place by the previous owners of our house shortly after they purchased, around 2000-2001. The house is fairly small, and one of the coupleship was a musician -- teacher/instructor, performer with routine travels, some writing and recording at home, etc. They built the shop, a 48x60 pole barn, with the intention of finishing a substantial portion of the footprint as a music studio and office space.
This space is approximately 42x25, with some interesting features:
Overall, we are absolutely spoiled by the thought and care they put into constructing this building. The couple was a pretty capable set of DIYers, though I did end up replacing most of the electrical work in the building to as I was expanding upon it. Almost all of the work inside the shop was done by them. Regarding electrical, I may post a thread on some electrical work we did in the shop, since it was only had the minimum outlets and lighting needed for light office/musical work.
Ok, with that background done...
The plan was to portion off a segment of the finished studio/office room for a woodshop. The single large finished room was not usable to us for a particular purpose. The goals were to create a woodshop space for dust and noise containment, as my wife has a growing interest in woodworking and furniture repair/restoration. Specific goals and constraints:
Those goals and constraints created a pretty clear picture of what to do:
The first step was moving everything out of this side of the room. With the space afforded to us by this building, we had been collecting free materials and future projects. This particular space is immediately adjacent to the garage, which made it a convenient dumping ground for material without cluttering the garage more than it already was prone to.


We carted home a bunch of framing-grade 2x4s from the local lumberyard. We had learned over time that picking through Home Depot's retail-grade lumber wasn't worth the time and retail experience versus being able to pull our trailer up to the stack in a constructor yard, where all of the lumber is good enough and basically the same price.
At this point we did not yet have a truck, but our long-suffering Civic was fine for pulling a small utility trailer in-town for light duty uses such as this. The same trailer was occasionally used with a rental truck for heavier loads.

Next was laying out the rough opening for the new wall.


This picture below shows the location with regard to the HVAC return and the garage door, leaving some room on either side for furnishings, storage, etc.

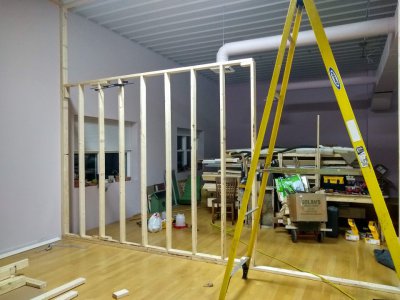
With the tedious rough opening decisions and placement done, framing was ... pretty productive and straightforward. We built sections of 8' wall and lifted them into place, then used decking screws to secure the sections into the rough opening.
One thing I struggled with a bit as we were planning this wall.... how do you build a wall over 8' tall without spending a fortune on specialized lumber or using sheet metal studs? I wanted to avoid the sheet metal since this would provide one solid wall we could mount cabinets on eventually. I did not find the clearest answer on the "right" way to do this, but decided to build an 8' wall and then the remaining 5' wall on top of it in the same style.
The biggest problem with that approach is the horizontal "knee" that is formed between the two, I was concerned about rigidity. Not because it is load bearing, it clearly isn't... but because I could picture accidentally rolling a 400 lb table into the wall and not wanting it to buckle... or mounting 1000 lbs of cabinets+contents on the wall and finding that it started tilting inward.
We decided this should be sufficiently solved by:

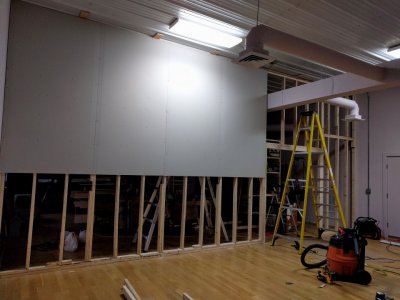
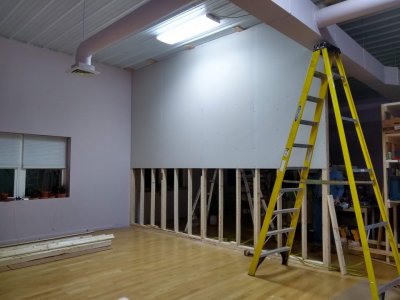
With the framing done, onto drywall. 3/8 drywall is sufficient for this purpose and we didn't really want to hoist thicker sheets up to this ceiling anyway; it really is just dust abatement. If we decide we wanted more soundproofing for the future use of the remaining finished space, we can always put fiberglass insulation batts in the wall before we drywall the other side.


The bottom 10" remaining is a result of the 13' ceiling. I decided I would add a more utilitarian kickplate out of OSB or plywood after we figured out how to cover the floor.
On that note...
Our shop building was put in place by the previous owners of our house shortly after they purchased, around 2000-2001. The house is fairly small, and one of the coupleship was a musician -- teacher/instructor, performer with routine travels, some writing and recording at home, etc. They built the shop, a 48x60 pole barn, with the intention of finishing a substantial portion of the footprint as a music studio and office space.
This space is approximately 42x25, with some interesting features:
- Full HVAC, to protect instruments and their tuning from temperature and humidity fluctuations (3 ton heat pump that covers the whole building except the garage)
- The room is out-of-square by design, to reduce echo/improve acoustics
- The ceiling inside the shop is 13' from the ground; perforated sheet metal with blown-in cellulose insulation above
- Only one exterior wall for temperature stability, there is a small tapered walkway off the garage to provide space from another wall and provide one of the wall tapers
- White oak flooring, suspended off the underlying concrete slab on sleeper 2x4s; with double moisture barrier (above and below the concrete)
- All walls are covered in two layers of 0.5" drywall totalling 1" for acoustics (probably glued between layers as well to prevent resonance)
- Insulated exterior-grade steel doors used where this room meets the rest of the building; a double door to the garage plus one to the finished hallway
- All of the interior walls for this room are insulated, along with the exterior walls
Overall, we are absolutely spoiled by the thought and care they put into constructing this building. The couple was a pretty capable set of DIYers, though I did end up replacing most of the electrical work in the building to as I was expanding upon it. Almost all of the work inside the shop was done by them. Regarding electrical, I may post a thread on some electrical work we did in the shop, since it was only had the minimum outlets and lighting needed for light office/musical work.
Ok, with that background done...
The plan was to portion off a segment of the finished studio/office room for a woodshop. The single large finished room was not usable to us for a particular purpose. The goals were to create a woodshop space for dust and noise containment, as my wife has a growing interest in woodworking and furniture repair/restoration. Specific goals and constraints:
- Approximately 30% of the finished room portioned off for the new woodshop space
- At least one of the 3 double windows should be in the woodshop
- There are HVAC return ducts for the studio room, one large and one small. We did not want any of these in the woodshop as it would be too easy to suck dust in
- The woodshop should be adjacent to the garage, so the double door could be used for moving equipment or projects in and out over time
- The woodshop should have a double door of its own, to the remainder of the studio space. This way furniture, tools, or projects could be moved into and out of that space -- whatever its future use might hold
- Somehow protect the nice wood flooring from the abuse it would surely suffer in any kind of shop space, even a woodshop due to the likelihood of using the space for painting, finishing, abrasion from sliding/moving materials, and general clumsiness.
- Build various tables with some material we had collected locally, eventually add cabinets and other storage space, etc
Those goals and constraints created a pretty clear picture of what to do:
- The woodshop would be at the east end of the finished space, because that is where the garage is
- The partitioning wall would be between the 1st and 2nd window along the exterior wall; extend perpendicular from the exterior wall, and meet the tapered wall (that partitions off the garage) ~27 feet away
- The placement of the wall would be determined by the larger HVAC return which is in the garage wall. Not right against the register, but leaving a few feet on the studio side so that shelves or other items could be placed in the newly-formed corner without obstructing airflow. The exact placement of the entire wall was dictated by where the nearest stud was located in this garage-facing wall.
- Ideally we would make no permanent disruptive damage to the floor, HVAC, or walls of the greater room. We would like any wall and flooring to be removable with barely a sign it was ever there - in case us or future owners didn't want a woodshop or otherwise needed to repurpose the space
The first step was moving everything out of this side of the room. With the space afforded to us by this building, we had been collecting free materials and future projects. This particular space is immediately adjacent to the garage, which made it a convenient dumping ground for material without cluttering the garage more than it already was prone to.


We carted home a bunch of framing-grade 2x4s from the local lumberyard. We had learned over time that picking through Home Depot's retail-grade lumber wasn't worth the time and retail experience versus being able to pull our trailer up to the stack in a constructor yard, where all of the lumber is good enough and basically the same price.
At this point we did not yet have a truck, but our long-suffering Civic was fine for pulling a small utility trailer in-town for light duty uses such as this. The same trailer was occasionally used with a rental truck for heavier loads.

Next was laying out the rough opening for the new wall.
- Fastening to the exterior wall was straightforward because there is horizontal framing between the main structure of the building
- The garage-facing wall (and all other interior walls in the building) are sheet metal studs to help with the height. We started with this wall, because the vertical stud in this wall was the singlemost rigid constraint on the new wall placement. We located the exact center of the sheet metal stud and drilled for 1/2" toggle anchors to get the best purchase on the structure of the stud itself.
- On the ceiling we fastened through to the stringers between the roof trusses, with pine boards cut to fill in some features (where the new lumber was clamping the ceiling) formed into the sheet metal
- The floor.... I e-mailed the previous owners to ask about how the floor was set up. They told me about the 2x4 sleepers and their approximate spacing. With a stud finder set to "deep scan" mode, I found areas that maaaybe there were 2x4s between it. Then using my smallest drill bit, probed the area until locating a support. At that point we drilled a pilot hole and fastened the new rough-opening 2x4 down with decking screws. We made as few holes as possible.


This picture below shows the location with regard to the HVAC return and the garage door, leaving some room on either side for furnishings, storage, etc.

With the tedious rough opening decisions and placement done, framing was ... pretty productive and straightforward. We built sections of 8' wall and lifted them into place, then used decking screws to secure the sections into the rough opening.
One thing I struggled with a bit as we were planning this wall.... how do you build a wall over 8' tall without spending a fortune on specialized lumber or using sheet metal studs? I wanted to avoid the sheet metal since this would provide one solid wall we could mount cabinets on eventually. I did not find the clearest answer on the "right" way to do this, but decided to build an 8' wall and then the remaining 5' wall on top of it in the same style.
The biggest problem with that approach is the horizontal "knee" that is formed between the two, I was concerned about rigidity. Not because it is load bearing, it clearly isn't... but because I could picture accidentally rolling a 400 lb table into the wall and not wanting it to buckle... or mounting 1000 lbs of cabinets+contents on the wall and finding that it started tilting inward.
We decided this should be sufficiently solved by:
- Laminating/sistering 2 layers of 2x4s to form vertical posts (from floor to ceiling) around the new doorway separating the woodshop from the remaining room. With the wall sections being installed, this makes 3x the 2x4 thickness in that area
- Drywall, which would be installed eventually on both sides of the wall (at least on the woodshop side for dust containment for now) - should provide a bit more rigidity as well... much like OSB sheathing on houses is ultimately what provides diagonal bracing and rigidity there (not including houses that require explicit diagonal bracing due to local building codes for earthquake, tornado, or other considerations)

With the framing done, onto drywall. 3/8 drywall is sufficient for this purpose and we didn't really want to hoist thicker sheets up to this ceiling anyway; it really is just dust abatement. If we decide we wanted more soundproofing for the future use of the remaining finished space, we can always put fiberglass insulation batts in the wall before we drywall the other side.


The bottom 10" remaining is a result of the 13' ceiling. I decided I would add a more utilitarian kickplate out of OSB or plywood after we figured out how to cover the floor.
On that note...
Attachments
Last edited:


