- Joined
- Mar 26, 2018
- Messages
- 2,725
Been working on a steam engine and really been having a hard time holding parallelism on parts where one side is machined and then flipped onto parallels in my milling vise. I finally stuck an indicator in the spindle and tested the vise and found it to be almost 4 thou out of flat with the table in both directions - Yikes!
I bought this vise right away when I got my mill and I think I have gotten away without too many issues because I left the vise overhang the back of the table by about 1". You'll see from the initial bluing that the bottom of the vise is banana shaped and when I recently moved the vise (placing one end on the table this time), it left it crooked on the machine.
Here is the vise. They no longer offer this model, but I think it cost me about $110 eight years ago.

I do not own nor have access to a surface grinder, but I have recently been tooling up to get into scraping so I figured why not try it out.
Disclaimer: I have no idea what I am doing and I am not trying to teach others. This is my first or second part I have ever scraped on and I am learning new things every minute. Please be understanding of this in your comments.
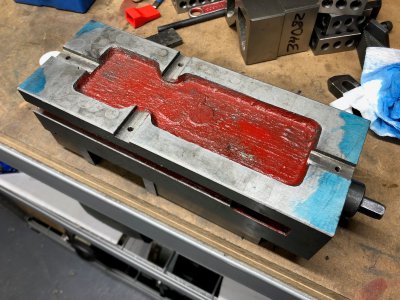
Here is the initial bluing using Canode blue. Even with a thick layer of blue, you can see there is only a small contact area in each corner. I didn't measure the actual concavity but I would have to guess it was several thousandths since it took be almost 2 hours to develop this down to a roughly flat surface.
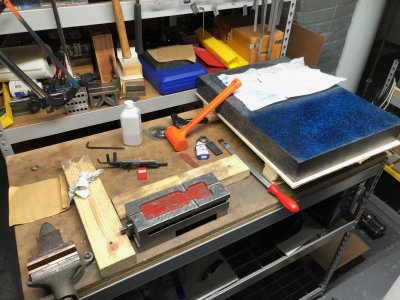
Here is my work setup. The surface plate is 18x24 with blue on about half of it. I have some 2x4s screwed into the table top to act as a work stop. I recently switched from using paper towels to spread the blue to a small rubber brayer and boy should I have done that a long time ago. The brayer makes quick work of developing a flat and thin bluing on the plate.
Couple of things I learned on scraping day 1. I really dislike the canode ink. It seems greasy and smeary compared to the Hi Spot Blue and if it is thin enough to get a good marking then it is almost invisible. I have switched back to using the Dykem for now, but I am looking at sourcing some Charbonnel Concentrated Blue since it sounds like it is a deep pigment and is water washable .
I was waiting on getting into scraping until after I had built a slow speed carbide grinder, however hand sharpening really isn't too hard. My technique is poor enough so far that an imperfect polish on the blade is of zero consequence. I'm finding the carbide blade to dull much faster than I expected causing me to exert a lot more effort to make a stroke. A quick swipe of two on the 1500 grit diamond lapping wheel I bought gets it to be nice and sharp again. I am not sure how hard the vise is (or isn't)
Following Connelly's suggestions on how to slide the part from one side, only a few inches and a few strokes, without any additional downward pressure really does work. Compared with pushing down from the top and rubbing in a lot of circles, I feel the Connelly method generates more consistent blue patterns which are representative of what the part actually looks like.
Digging the corner of the blade into the part is very easy, especially with the unusually large radius of the factory Sandvik scraper blade. I do intend to get this more along the lines of a 60mm radius, but that is a lot of carbide to remove using hand sharpening methods. Im developing the radius a bit more each time I go to re-sharpen. Rolling the corners over on the blade seems to help a lot but I have some nasty score lines in the bottom of the vise.
It is hard to keep the blue on the plate clean and free of chips, dirt, or dust. It is worth the effort to deep clean parts before scraping them. I also cover the blue with a paper towel any time I am not active printing the part.
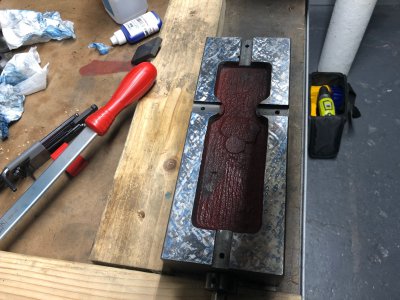
It is hard to see in the image below, but I have gotten a relatively full bearing contact across the bottom of the vise. Next I need to start measuring parallelism of the top to the bottom. Probably should have been doing that the whole time, but I did try to "scrape straight down" when developing flatness on the bottom. I have been hinge testing the part continuously which did help me find some convexity I had put into the part after some cycles of bad bluing. Now it hinges at the 30% mark on both sides.
I have a fair degree of distrust of the flatness of my no name import surface plate. It is the best that I have though so I will work with it. I can get the part to hinge differently in different places on the plate which is a bit concerning.
I'm not sure to what extent to scrape this vise. I could stop after getting the bottom parallel to the factory grind on the top, or I could lightly scrape the top flat as well in case it too is a banana. I could scrape the sides square to the bottom to account for the rare cases where I use the vise flat on its side. I could scrape the fixed and moving jaws to get them square to the bedways. I could also scrape the tops of the jaws flat, parallel to the bed, and coplanar to each other which would help in the rare cases where I put the jaws on the outside of the vise for oversized parts.
Anyways, it is a start. Can't make this any worse than it was to begin with.
I bought this vise right away when I got my mill and I think I have gotten away without too many issues because I left the vise overhang the back of the table by about 1". You'll see from the initial bluing that the bottom of the vise is banana shaped and when I recently moved the vise (placing one end on the table this time), it left it crooked on the machine.
Here is the vise. They no longer offer this model, but I think it cost me about $110 eight years ago.

I do not own nor have access to a surface grinder, but I have recently been tooling up to get into scraping so I figured why not try it out.
Disclaimer: I have no idea what I am doing and I am not trying to teach others. This is my first or second part I have ever scraped on and I am learning new things every minute. Please be understanding of this in your comments.
Here is the initial bluing using Canode blue. Even with a thick layer of blue, you can see there is only a small contact area in each corner. I didn't measure the actual concavity but I would have to guess it was several thousandths since it took be almost 2 hours to develop this down to a roughly flat surface.

Here is my work setup. The surface plate is 18x24 with blue on about half of it. I have some 2x4s screwed into the table top to act as a work stop. I recently switched from using paper towels to spread the blue to a small rubber brayer and boy should I have done that a long time ago. The brayer makes quick work of developing a flat and thin bluing on the plate.

Couple of things I learned on scraping day 1. I really dislike the canode ink. It seems greasy and smeary compared to the Hi Spot Blue and if it is thin enough to get a good marking then it is almost invisible. I have switched back to using the Dykem for now, but I am looking at sourcing some Charbonnel Concentrated Blue since it sounds like it is a deep pigment and is water washable .
I was waiting on getting into scraping until after I had built a slow speed carbide grinder, however hand sharpening really isn't too hard. My technique is poor enough so far that an imperfect polish on the blade is of zero consequence. I'm finding the carbide blade to dull much faster than I expected causing me to exert a lot more effort to make a stroke. A quick swipe of two on the 1500 grit diamond lapping wheel I bought gets it to be nice and sharp again. I am not sure how hard the vise is (or isn't)
Following Connelly's suggestions on how to slide the part from one side, only a few inches and a few strokes, without any additional downward pressure really does work. Compared with pushing down from the top and rubbing in a lot of circles, I feel the Connelly method generates more consistent blue patterns which are representative of what the part actually looks like.
Digging the corner of the blade into the part is very easy, especially with the unusually large radius of the factory Sandvik scraper blade. I do intend to get this more along the lines of a 60mm radius, but that is a lot of carbide to remove using hand sharpening methods. Im developing the radius a bit more each time I go to re-sharpen. Rolling the corners over on the blade seems to help a lot but I have some nasty score lines in the bottom of the vise.
It is hard to keep the blue on the plate clean and free of chips, dirt, or dust. It is worth the effort to deep clean parts before scraping them. I also cover the blue with a paper towel any time I am not active printing the part.
It is hard to see in the image below, but I have gotten a relatively full bearing contact across the bottom of the vise. Next I need to start measuring parallelism of the top to the bottom. Probably should have been doing that the whole time, but I did try to "scrape straight down" when developing flatness on the bottom. I have been hinge testing the part continuously which did help me find some convexity I had put into the part after some cycles of bad bluing. Now it hinges at the 30% mark on both sides.

I have a fair degree of distrust of the flatness of my no name import surface plate. It is the best that I have though so I will work with it. I can get the part to hinge differently in different places on the plate which is a bit concerning.
I'm not sure to what extent to scrape this vise. I could stop after getting the bottom parallel to the factory grind on the top, or I could lightly scrape the top flat as well in case it too is a banana. I could scrape the sides square to the bottom to account for the rare cases where I use the vise flat on its side. I could scrape the fixed and moving jaws to get them square to the bedways. I could also scrape the tops of the jaws flat, parallel to the bed, and coplanar to each other which would help in the rare cases where I put the jaws on the outside of the vise for oversized parts.
Anyways, it is a start. Can't make this any worse than it was to begin with.
Last edited:

