Rotary Broach - Can it really be this simple?

kcoffield

Registered
Registered
Joined
Oct 2, 2020
Messages
175
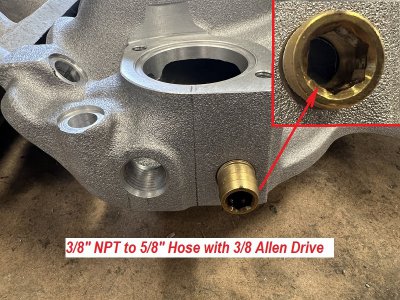
I needed to duplicate this confined space hose barb. It’s 3/8”NPT male on one end and 5/8” hose on the other, but no room for an external hex drive , thus the internal hex key drive. So after looking at the commercial rotary broach offerings and seeing $400+ and $40+/cutter, I was surfing around the forum and found these two threads.

https://www.hobby-machinist.com/threads/a-simple-compact-rotary-broach.33032/

https://www.hobby-machinist.com/threads/rotary-broach.30404/

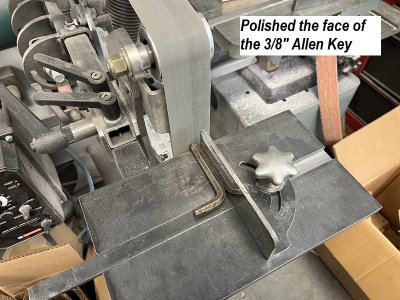
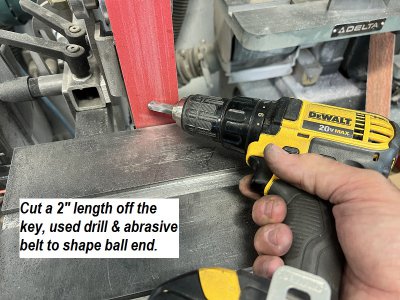
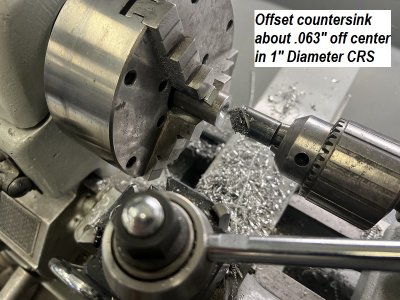
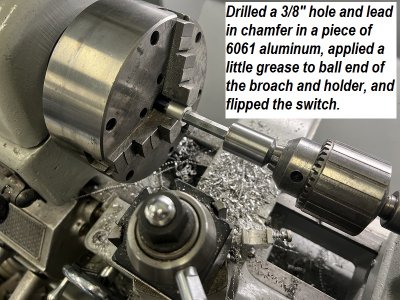
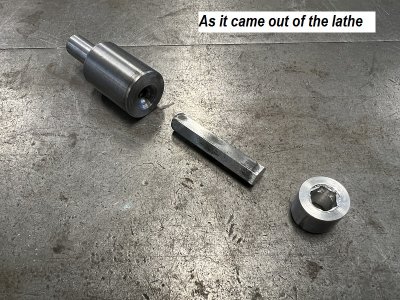
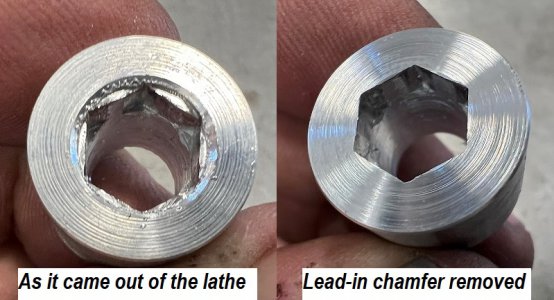
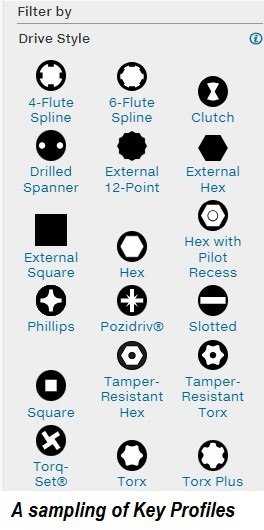
Now I’m a firm believer that things should be as simple as possible, just not simpler. I took a junk 3/8” Allen key, a small piece of 1” D CRS, and literally have <30 minutes total invested. The actual machining/broaching took about 10 seconds on a light duty Atlas hobby lathe. The last picture is a sample of some of the key profiles available from McMaster Carr, all for ~$3.50 or less. I’m sure it will do the brass fitting I need. The cutting face is flat. The rear ball is literally just as I shaped it on the belt. You could offset the tail stock instead of making an offset drive, but there was virtually no difference in making the drive offset, and it takes 5 seconds to load it in the Jacobs chuck.

What do you guys think?

Possible improvements:
  • Relieve the backside of the cutting surface for deeper broaching. Either grind on the band sander or plunge cuts on the mill with a carbide end mill.
  • Make the eccentric from tool steel for durability though I doubt I need to for my usage
  • Might actually have to grind tool steel cutters for steel, but maybe not, I haven’t tried. Depends on how hard the keys and stock are.
Best,
Kelly
 

Attachments

  • 1 Allen Drive Hose Barb.JPG
    1 Allen Drive Hose Barb.JPG
    287.4 KB · Views: 122
  • 2 Dress Key Face.JPG
    2 Dress Key Face.JPG
    240.6 KB · Views: 106
  • 3 Shape Ball End.JPG
    3 Shape Ball End.JPG
    234.9 KB · Views: 103
  • 4 Make Eccentric Drive.JPG
    4 Make Eccentric Drive.JPG
    198.2 KB · Views: 106
  • 5 Test It.JPG
    5 Test It.JPG
    230 KB · Views: 107
  • 6 So Simple.JPG
    6 So Simple.JPG
    291.5 KB · Views: 104
  • 7 The Result.JPG
    7 The Result.JPG
    167.3 KB · Views: 109
  • 8 McMaster Key Profiles.jpg
    8 McMaster Key Profiles.jpg
    67.3 KB · Views: 118
I needed to duplicate this confined space hose barb. It’s 3/8”NPT male on one end and 5/8” hose on the other, but no room for an external hex drive , thus the internal hex key drive. So after looking at the commercial rotary broach offerings and seeing $400+ and $40+/cutter, I was surfing around the forum and found these two threads.

https://www.hobby-machinist.com/threads/a-simple-compact-rotary-broach.33032/

https://www.hobby-machinist.com/threads/rotary-broach.30404/

Now I’m a firm believer that things should be as simple as possible, just not simpler. I took a junk 3/8” Allen key, a small piece of 1” D CRS, and literally have <30 minutes total invested. The actual machining/broaching took about 10 seconds on a light duty Atlas hobby lathe. The last picture is a sample of some of the key profiles available from McMaster Carr, all for ~$3.50 or less. I’m sure it will do the brass fitting I need. The cutting face is flat. The rear ball is literally just as I shaped it on the belt. You could offset the tail stock instead of making an offset drive, but there was virtually no difference in making the drive offset, and it takes 5 seconds to load it in the Jacobs chuck.

What do you guys think?

Possible improvements:
  • Relieve the backside of the cutting surface for deeper broaching. Either grind on the band sander or plunge cuts on the mill with a carbide end mill.
  • Make the eccentric from tool steel for durability though I doubt I need to for my usage
  • Might actually have to grind tool steel cutters for steel, but maybe not, I haven’t tried. Depends on how hard the keys and stock are.
Best,
Kelly
Thanks, Kelly (and thanks for the excellent documentation).

Are you really just driving the tool by pressing it against the offset countersunk hole? I have to try this!!
 
Are you really just driving the tool by pressing it against the offset countersunk hole? I have to try this!!
Yes, tail stock ram pressure only. The cutter did stick in the sample stock because it was not relieved behind the cutting surface and the hole was the same size as the key across flats. It came out with a few light taps. If you drill the hole slightly oversize the broach wont stick. I may I'll install the relief cuts before I cut my brass barb.....but maybe not! :)

Best,
Kelly
 
Last edited:
Thanks for taking the time to create such clear documentation (and sharing it)!

GsT
 
I really like that idea! Thanks.
I wonder if Allen keys can be heat treated to harden them.
Your method seems like it could easily be moved to the mill also.
 
I'm not buying it completely. Maybe it works in soft metal, but no, I don't believe it will work in steel. The offset is the little chiseling action that occurs by the offset sending in a little of the cutter at a time. All you are doing is ramming the broach through. So for steel, or bronze I think you are going to need an offset, or a stepped broach.

so it works for soft material, That's all you have proven right now. I'm curious how much pressure you needed to dial in on the quill. Would an arbor press be better?
 
I wonder if Allen keys can be heat treated to harden them.

Though not all a keys are created equal most are hardened, and certainly enough so for soft materials, but don't expect wonders......it was free stock and 30 minutes.

Your method seems like it could easily be moved to the mill also.

Yes, the eccentric becomes live in that case. The cutting action is similar.

I'm not buying it completely. Maybe it works in soft metal, but no, I don't believe it will work in steel. The offset is the little chiseling action that occurs by the offset sending in a little of the cutter at a time. All you are doing is ramming the broach through. So for steel, or bronze I think you are going to need an offset, or a stepped broach.

so it works for soft material, That's all you have proven right now. I'm curious how much pressure you needed to dial in on the quill. Would an arbor press be better?

The cutting action is similar to the examples in the links. The cutting face of the tool is anchored in the stock so it spins at the lathe speed as it cuts The other end is constrained and spins in the offset countersink and as the stock in the lathe chuck and the cutter turns, the cutter is forced to rock in the cutting surface and cause the cutting action on the near side of the angle similar to the linked other example........it's just fewer pieces and a more crude approximation to the same result, but if you could have seen the burrs rolled up in the hole when removed from the lathe, it does appear to cut......now as far durability? Are you a production shop or a hobbyist?

You can make the cutting action more aggressive by either increasing the offset in the eccentric or shortening the broach length, both will increase the rocking and aggressiveness of cut (but not necessarily accuracy), but either of those actions requires more relief behind the cutting surface for a given depth of cut capability.

As to whether it will cut steel, that's just purely a matter of the hardness of the cutter versus the stock to be cut which I already alluded to, but not a matter of the design approach. If you actually read the links I provided, there is an argument for a flat cutting face as opposed to a concave dish in the end, and they without doubt are easier to prep. I think I could take a piece of 1/4" lathe tool steel, square/polish the face, ball the other end, and broach a square hole in mild steel.

Best,
Kelly
 
Last edited:
Though not all a keys are created equal most are hardened, and certainly enough so for soft materials, but don't expect wonders......it was free stock and 30 minutes.


Yes, the eccentric just becomes live in that case.


You are completely mistaken on the portion I bolded. The cutting action works exactly the same as commercial RBs and as the examples in the links. The cutting face of the tool is anchored in the stock so it spins at the lathe speed as it cuts The other end is constrained and spins in the offset countersink and as the stock in the lathe chuck and the cutter turns, the cutter is forced to rock in the cutting surface and cause the cutting action similar to the linked other examples........it's just fewer pieces and a more crude approximation to the same result, but if you could have seen the burrs rolled up in the hole when removed from the lathe, you wouldn't question the efficacy of the approach......now as far durability? Are you a production shop or a hobbyist?

You can make the cutting action more aggressive by either increasing the offset in the eccentric or shortening the broach length, both will increase the rocking and aggressiveness of cut (but not necessarily accuracy), but either of those actions requires more relief behind the cutting surface for a given depth of cut capability.

As to whether it will cut steel, that's just purely a matter of the hardness of the cutter versus the stock to be cut which I already alluded to, but not a matter of the design approach. If you actually read the links I provided, there is an argument for a flat cutting face as opposed to a concave dish in the end, and they without doubt are easier to prep. With certainty, I could take a piece of 1/4" lathe tool steel, square/polish the face, ball the other end, and broach a square hole in mild steel.

Best,
Kelly
ok, I wasn't clear that you had a rocking action. Your holder did not look to offer that. Ok, I retract everything I said, you were only referring to the tooling.
 
ok, I wasn't clear that you had a rocking action. Your holder did not look to offer that. Ok, I retract everything I said, you were only referring to the tooling.
No worries. It wasn't obvious to me at first either.

It's not my brainchild. I was inspired by the two linked threads. I just examined why/how it worked, simplified, and reduced the number of pieces.

For the case where the stock is chucked and the eccentric is stationary in the tailstock, every ½ revolution Points 1 & 2 trade positions. The actual cutting stroke won’t necessarily be ~.013” because that will depend upon the rate at which you advance the tailstock ram.

It’s slightly different for the case where the eccentric is live in a mill or drill press with stationary stock but same result. Since the stock is stationary, as the broach imbeds in the stock, it doesn’t spin and the ball end slips at the eccentric, but the ball end orbits on the throw of the eccentric. This makes the points on the broach rock up and down in sequence around the hex points creating the same cutting stroke.

If you look at the diagram below, you can also see the potential importance of relieving the backside of the cutting edge for deeper cuts, but the broached hole should really be slightly larger than the key size. However not relieving the cutter causes it to cut slightly oversize, though that is probably cold working as opposed to cutting and will become more difficult with hard materials.

I didn’t use any cutting fluid……but it could only help.

Best,
Kelly
RB Cutting Action.jpg
 
I made one like this for broaching a "D" shaped hole in aluminum. It was for a BNC connector and worked very well. I made the cutter out of W-1 but didn't even bother to harden it, since I was only going to use it on aluminum. If I _do_ need to use it on steel I will.

I made the cutter by facing one end and used a large drill as a kind of "forming tool" to create a dish shape on the end. Then turned a slight taper until the end matched the target diameter. This produced the reliefs for the cutter. Then I put it in my mill and milled the flat. The concave shape on the end was deep enough so that the flat still had a good cutting edge. I flipped it over and drilled a shallow hole for a bearing ball that was to be part of the rotating eccentric action.

I didn't tilt the head or work to mill the flat, so it had no relief on its exterior face. In retrospect this might be why the cutter was a little difficult to remove from the finished hole. The cutting edges also may have rolled back some due to the cutting forces so neglecting to harden it might be the issue. But for a first-time use I was pleased with the result. The cutter was easy to make so re-doing it is a trivial thing to do.

In this case, I used the broach on my mill. I had been concerned that the drive force might cause the ball to pop out of one of the holes but that wasn't a problem.
 
Back
Top