Rockwell 23-505: cracked wheel flange - repairable or run it? Use parts from Baldor tool grinder?

keeena

H-M Supporter - Gold Member
H-M Supporter Gold Member
Joined
Jun 10, 2019
Messages
537
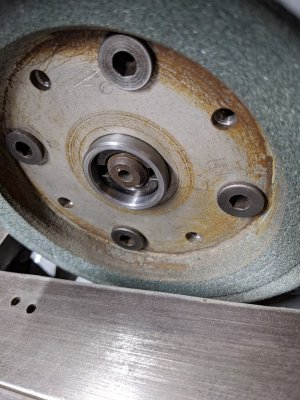
I recently picked up an old Rockwell 23-505 diamond tool grinder which I tore down to give it a bit of a refresh. I noticed that one of the wheel flanges (the disc which mounts on the arbor and grinding wheels bolt onto it) has a hairline crack where it fits over the arbor. The crack is on the key way and the material is aluminum. The crack is about 3/4" long...about a third to a half the total length of the bore. The wall thickness where its cracked is quite a bit thinner at the back half of the flange; it's easily 3x+ thicker towards the face of the wheel so I'd highly doubt it would propagate further.Should this be repaired? (maybe "needs" is a better word). Does it even look fixable?
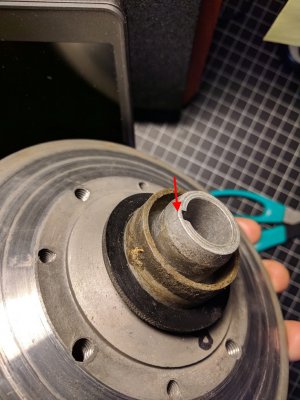
IMG_20191128_145145.jpg

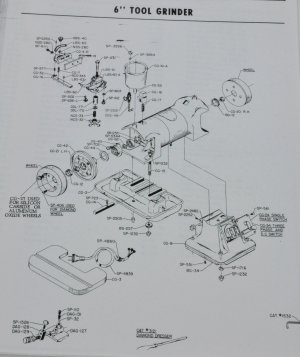
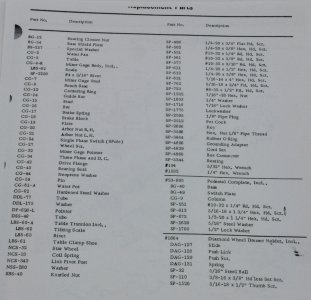
I'm also having a heck of a time finding part manuals, let alone parts. While very similar to the Baldor 500-series tool grinders, this Rockwell seems rare. If anyone has 23-505 part lists, could you please share?

I'm curious if the Baldor flange wheel would fit? The Baldor flange wheel p/n is HA6104A01SP and seems it can be had for about $50. It has the same spindle size of 0.75" and generally I'd guess it would fit. But the Rockwell's wheel has this grooved ring which interfaces with another flange inside the grinder housing and seems specific to the Rockwell. That said, I believe the groove is just to help prevent grinding dust from getting to the bearing. Depending on depth of the Baldor flanged wheel, i suppose it could be machined to work with this groove or I can machine a sleeve. Anyway, if anyone with the Baldor tool grinders (500, 510, 522, 523) can can share pictures and dimensions of this flange wheel: I'd be grateful!
 
You could possibly machine the diameter down and press a steel sleeve over it, or possibly just run it.

That is an interesting idea - didn't even consider something like that. It would be a bit tricky to machine but probably doable with a custom-ground tool; it would have to be very narrow to get inside that groove. The cut would remove all the material at the top of the keyway, but i assume that's not a big deal.

While looking at your idea, I realized that the arbor is not 0.75"...its actually 0.668" which is a very odd imperial dimension (basically dead on 17mm). Every bolt on this is imperial...odd. But anyway: means that Baldor flange wheel wouldn't fit without sleeving it down.
 
the sleeve would have to be fairly thin, perhaps about the root diameter of the chamfer.
 
Is there room to drill a hole at the point where the crack meets good metal? Im not sure if it would make a difference or work to stop the crack from traveling further being its aluminum but I dont think it would hurt especially if you decide to just run it without repair.
 
I wonder if you could Tig weld that crack or take it a professional welder to do it. If they weld only on the outside of the hub I bet it would work just fine.
 
Is there room to drill a hole at the point where the crack meets good metal?

Good tip and I know that this is a first step to keep cracks from propagating. Unfortunately can't through-hole drill this because of where the crack ends - the outer lip of that groove would be in the way. Interestingly someone did dimple it with a drill from inside the bore. Can only be done at a very shallow angle and they didn't get very far. :)

I wonder if you could Tig weld that crack or take it a professional welder to do it. If they weld only on the outside of the hub I bet it would work just fine.

Yep, that was the first thought I had but would only be able to get exposed part of the flange. Maybe good enough to help hold it together though?

Would brazing be a good choice? I'd think the filler would flow into the crack more fully than welding because you'd be heating the whole part. Not sure if this is a good idea though?
 
I honestly do not know. I haven't done a part like this but I would prefer to keep the heat as concentrated as I could and Tig would be what I would use. Maybe consult a pro welder?
 
I finished reconditioning the grinder and found that the cracked wheel is a bit worse than i thought. It spread the wheel a bit on the backside causing some weeble-wobble and rubbing on the grinder's mating inner flange. The latter was easily fixed by turning down that beveled part a bit, but the loose fit would require re-sleeving. The wheel doesn't wobble when it's bolted to the arbor so I'm going to leave as-is for now. I think I'd like to tackle making a new wheel completely from scratch...would be a interesting project to learn a couple new skills.

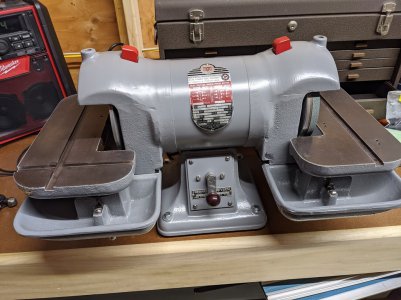
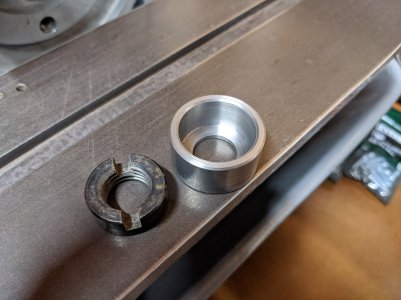
Here's a pic of the restoration. Unfortunately don't have pics as it was when I bought it. I had to replace the bearings and clean up the rotor because the worn bearings caused the laminations to bridge the separators/slots. I also had to machine some centering bushings for the grinding discs. I'm not sure what they are supposed look like; the ones I made are retained by the arbor nut. Pretty simple part and it revealed that the original wheels weren't running true because they weren't well centered. And a complete disassemble, sandblast, and paint. Wasn't too bad considering first equipment rebuild I've tackled; learned a few things along the way. It absolutely purrs now.

IMG_20191218_130437.jpg

IMG_20191219_021014.jpg
IMG_20191219_022818.jpg

Still looking for a parts diagram if anyone has one and is willing to share!
 
Back
Top