- Joined
- Aug 22, 2012
- Messages
- 4,273
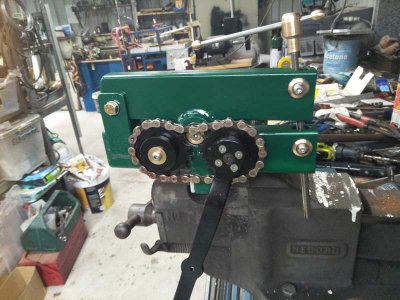
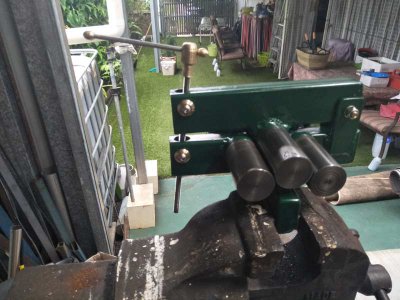
Finished of a smallish ring roller today.
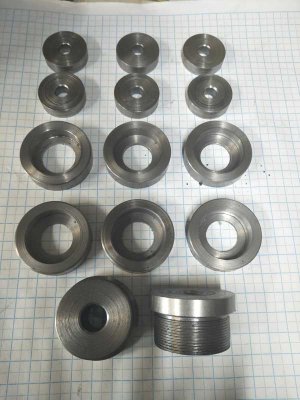
It all started with a length of 40mm steel where I turned and cut these

6 Bearing holders, 6 imitation bearings and two threaded sections or hubs for the bicycle sprockets.
The imitation bearings sat in the holders that were bolted then welded to some 25x50x3mm steel box section.
The idea of the imitation bearings was for alignment and also so real bearings didnt get destroyed from the heat of the welding process.
The same 40mm dia steel was then used for the rollers by turning 75mm down to a 12mm shaft.
The bearings sit in the welded holders with the 12mm shaft passing through and bolted in place.
Bicycle sprockets were screwed and locked onto the bosses and slid onto the 12mm shafts, locked in place with two grub screws with the handle bolted to one of the hubs.
I opted to only have two driven rollers to avoid the complexity of the third roller being driven. (mainly because I couldnt work out an easy method)
all the fixings and unpainted parts are either stainless or brass including the tension screw.

I screwed an aluminium pad each side of the base part that sits in the vice to protect the paint and to make it a more secure grip.
The handle has positions for two places depending upon how much pressure is required to roll the metal.

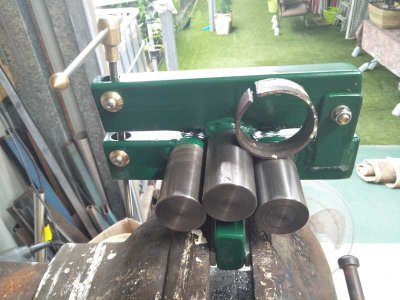
This is the test ring that I think is almost as small as it will roll.

The next test will be two 12mm square aluminium bars rolled to a 303mm dia circle.
I'm hoping I can feed the end along side the ring so as to get a perfect circle without the flat ends.
I also need two 303mm dia rings in 0.9mm stainless, 40mm wide that will be bolted to the aluminium rings.
These are for the mirror cells in the giant binocular.
It all started with a length of 40mm steel where I turned and cut these

6 Bearing holders, 6 imitation bearings and two threaded sections or hubs for the bicycle sprockets.
The imitation bearings sat in the holders that were bolted then welded to some 25x50x3mm steel box section.
The idea of the imitation bearings was for alignment and also so real bearings didnt get destroyed from the heat of the welding process.
The same 40mm dia steel was then used for the rollers by turning 75mm down to a 12mm shaft.
The bearings sit in the welded holders with the 12mm shaft passing through and bolted in place.
Bicycle sprockets were screwed and locked onto the bosses and slid onto the 12mm shafts, locked in place with two grub screws with the handle bolted to one of the hubs.
I opted to only have two driven rollers to avoid the complexity of the third roller being driven. (mainly because I couldnt work out an easy method)
all the fixings and unpainted parts are either stainless or brass including the tension screw.

I screwed an aluminium pad each side of the base part that sits in the vice to protect the paint and to make it a more secure grip.
The handle has positions for two places depending upon how much pressure is required to roll the metal.

This is the test ring that I think is almost as small as it will roll.

The next test will be two 12mm square aluminium bars rolled to a 303mm dia circle.
I'm hoping I can feed the end along side the ring so as to get a perfect circle without the flat ends.
I also need two 303mm dia rings in 0.9mm stainless, 40mm wide that will be bolted to the aluminium rings.
These are for the mirror cells in the giant binocular.

