- Joined
- Dec 31, 2013
- Messages
- 327
I've had my South Bend 10K since this spring and was lucky enough to purchase a lathe that was in pretty good shape. While a large overhaul isn't necessary, I felt it was time to start on some preventative maintenance. Since the lathe doesn't need new paint (although it would look nice), I'm just going to do small repairs on the lathe between projects.
The first and most import job on the repair list is pulling the spindle and replacing the spindle oil wicks. A lubricated spindle is a happy spindle and obviously this is the last part of the lathe you want to ruin.
For reference, I recommend the book "A Guide to Renovating the South Bend Lathe". The same supplier also sells a nice die-cut wick kit. Also check-out this video from forum member Halligan142 for more information on removing the spindle:
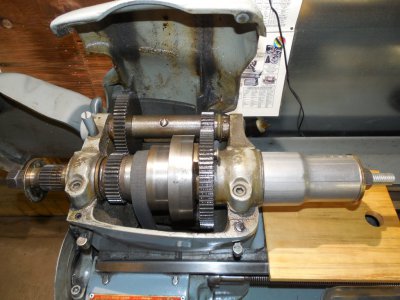
Here you can see that the take-up collar was removed and the puller was installed to remove the spindle. The book would have you knock the spindle loose with a hammer, but like Halligan142 a spindle puller was used. Why not, since it was already assembled? The spindle puller is just a length of 5/8" all-thread, with appropriate nuts and washers and a exhaust-pipe coupling to fit over the spindle and press against the bearing housing.
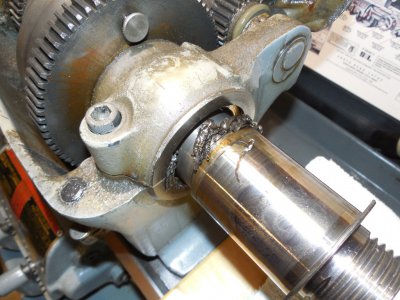
This is some of the weird cellophane-like packing that was found when the spindle was pulled. It was only present at this bearing on the chuck side so it very well could be just junk from a turning job. In any event, I didn't replace it.
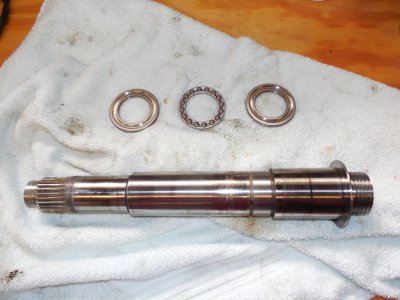
The spindle and thrust bearing cleaned-up and ready to reinstall. You can't feel those faint lines shown on the spindle.
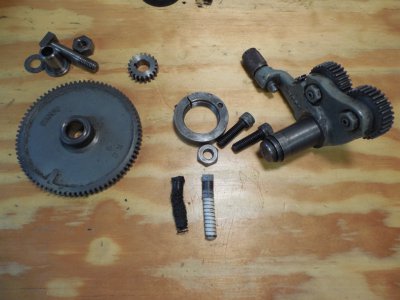
Some parts cleaned and ready for installation. Much of this job is cleaning parts. Two spindle oil wicks are at the bottom, with the original on the left beside a new one. As you can see, the old one was well used. It's quite possible this is the original 40 year old wick, which is well over the book's recommended service life of 5 to 10 years. Probably very few SB lathes enjoy such a vigorous service schedule, however.
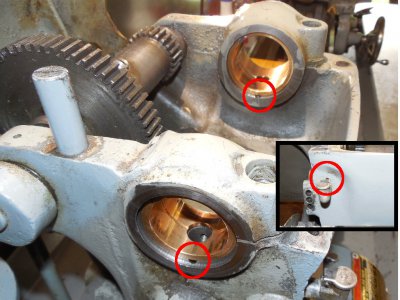
Since this job wasn't planned to be a total dissemble and restoration, the headstock was left in place on the bed which also saved the original South Bend Texalon belt. The oil reservoirs were cleaned as best as possible with brake cleaner, pipe cleaners and compressed air. Well used tar-like spindle oil, metal shavings and more of that cellophane were some of the junk removed from the oil passages. Make sure the oil drain holes at the bottom of both sides of the bronze bearings are clear as well as the breather holes above the Gits oilers.
If you think you are going to need to adjust the bearing clearance, now would probably be a good time to loosen-up the shim packs.
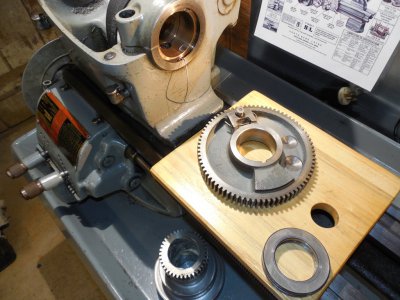
Parts cleaned and ready for the spindle installation. You can see the wire stuck into the spindle wick through the oil drain hole to keep it down for installation.
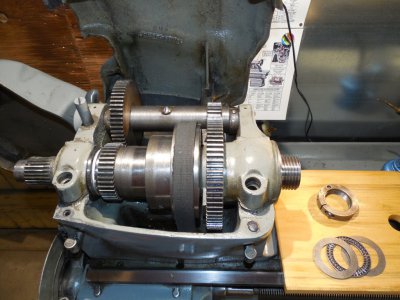
Looks like I forgot to take a picture of pressing the shaft home, but the procedure is well documented in Halligans's video, including your reaction when you forget to put the spindle through the belt.
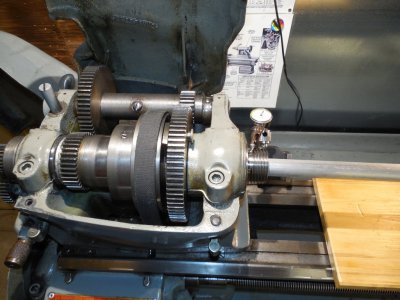
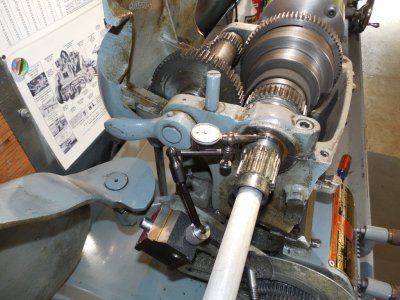
The bearings were adjusted following the procedure outlined in the book. The recommended bearing spacing for a SB 10K lathe (Bronze shell bearings) is .0007-.0010. I'm not used to working "to the tenths" and found the procedure a bit tedious. Also, the Starrett Last Word indicator with .0005 resolution that was used was a little coarse for the job.
I ended-up shooting for "a hair over .001" and calling it good. I found keeping the indicator as close as possible to the bearings gave the most consistent results. On the far side of the spindle that meant removing the take-up collar. Yes, the spindle will move left and right when you do that.
The book warns that maintaining minimum bearing clearance is vital for adequate lubrication of the spindle, so I felt better being slightly on the open side. The spindle feels great when turned by hand, but if oil consumption becomes a concern it's easy enough to revisit this task at a later date.
Wrapping Up:
While I can't really tell the difference in operation, I feel better knowing the spindle bearings have new wicks delivering oil. Being manufactured in 1974, this South Bend is considered a late model and yet it's still 40 years old and the wicks were dirty and worn out. With the proper tools, it's not that big a job and unless you know the date when the lathe was serviced I highly recommend you just pull the spindle and get it over with.
The next lathe maintenance project will probably be the QCGB, but I have a few other projects I want to complete first.
The first and most import job on the repair list is pulling the spindle and replacing the spindle oil wicks. A lubricated spindle is a happy spindle and obviously this is the last part of the lathe you want to ruin.
For reference, I recommend the book "A Guide to Renovating the South Bend Lathe". The same supplier also sells a nice die-cut wick kit. Also check-out this video from forum member Halligan142 for more information on removing the spindle:

Here you can see that the take-up collar was removed and the puller was installed to remove the spindle. The book would have you knock the spindle loose with a hammer, but like Halligan142 a spindle puller was used. Why not, since it was already assembled? The spindle puller is just a length of 5/8" all-thread, with appropriate nuts and washers and a exhaust-pipe coupling to fit over the spindle and press against the bearing housing.

This is some of the weird cellophane-like packing that was found when the spindle was pulled. It was only present at this bearing on the chuck side so it very well could be just junk from a turning job. In any event, I didn't replace it.

The spindle and thrust bearing cleaned-up and ready to reinstall. You can't feel those faint lines shown on the spindle.

Some parts cleaned and ready for installation. Much of this job is cleaning parts. Two spindle oil wicks are at the bottom, with the original on the left beside a new one. As you can see, the old one was well used. It's quite possible this is the original 40 year old wick, which is well over the book's recommended service life of 5 to 10 years. Probably very few SB lathes enjoy such a vigorous service schedule, however.

Since this job wasn't planned to be a total dissemble and restoration, the headstock was left in place on the bed which also saved the original South Bend Texalon belt. The oil reservoirs were cleaned as best as possible with brake cleaner, pipe cleaners and compressed air. Well used tar-like spindle oil, metal shavings and more of that cellophane were some of the junk removed from the oil passages. Make sure the oil drain holes at the bottom of both sides of the bronze bearings are clear as well as the breather holes above the Gits oilers.
If you think you are going to need to adjust the bearing clearance, now would probably be a good time to loosen-up the shim packs.

Parts cleaned and ready for the spindle installation. You can see the wire stuck into the spindle wick through the oil drain hole to keep it down for installation.

Looks like I forgot to take a picture of pressing the shaft home, but the procedure is well documented in Halligans's video, including your reaction when you forget to put the spindle through the belt.


The bearings were adjusted following the procedure outlined in the book. The recommended bearing spacing for a SB 10K lathe (Bronze shell bearings) is .0007-.0010. I'm not used to working "to the tenths" and found the procedure a bit tedious. Also, the Starrett Last Word indicator with .0005 resolution that was used was a little coarse for the job.
I ended-up shooting for "a hair over .001" and calling it good. I found keeping the indicator as close as possible to the bearings gave the most consistent results. On the far side of the spindle that meant removing the take-up collar. Yes, the spindle will move left and right when you do that.
The book warns that maintaining minimum bearing clearance is vital for adequate lubrication of the spindle, so I felt better being slightly on the open side. The spindle feels great when turned by hand, but if oil consumption becomes a concern it's easy enough to revisit this task at a later date.
Wrapping Up:
While I can't really tell the difference in operation, I feel better knowing the spindle bearings have new wicks delivering oil. Being manufactured in 1974, this South Bend is considered a late model and yet it's still 40 years old and the wicks were dirty and worn out. With the proper tools, it's not that big a job and unless you know the date when the lathe was serviced I highly recommend you just pull the spindle and get it over with.
The next lathe maintenance project will probably be the QCGB, but I have a few other projects I want to complete first.
Last edited:
