Rack for Dewalt tools

tjb

H-M Supporter - Diamond Member
H-M Lifetime Diamond Member
Joined
May 3, 2017
Messages
2,027
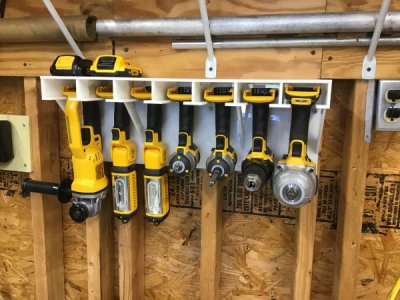
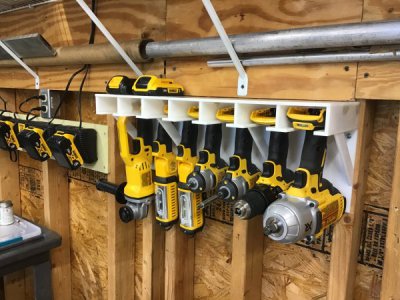
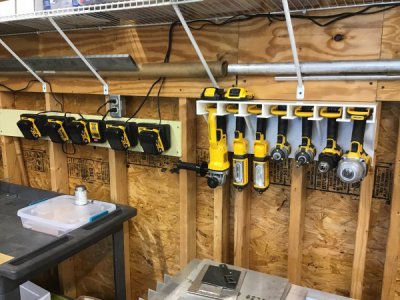
Here are some pictures of the rack I built for my Dewalt cordless tools. Kudos to jdedmon91 for the idea. I noticed in the intro on a couple of his newer videos, in the upper left corner he made some holders for his cordless tools out of PVC pipe. I started with that idea but because I had some cast acrylic on hand, I decided to modify the idea a little. The result turned out pretty nicely. Because of the weight of the 1/2" impact wrench and the angle grinder, I incorporated four gussets for support. Off to the left, you'll see the chargers mounted on a piece of Hardy board that a friend gave me. Got room for one more charger. Better go buy another tool.

Regards,
Terry

IMG_0001.JPG

IMG_0002.JPG

IMG_0003.JPG
 
Now that is what I need to do . Very nice ! :encourage:
 
That is very sexy! I have been wondering what to do with all my 20v dewalt, this would be perfect. Add a few more slots for die grinders, zip bit routers... and maybe a circular saw and that problem is solved... thanks.
 
That is very sexy! I have been wondering what to do with all my 20v dewalt, this would be perfect. Add a few more slots for die grinders, zip bit routers... and maybe a circular saw and that problem is solved... thanks.
Thanks. Actually, one of the advantages of designing it this way is how easy it would be to add more slots. Great minds think alike!

Regards,
Terry
 
I love it! Did you start with acrylic sheet or was it some kind of channel? Is that just glued up?
Robert
 
I love it! Did you start with acrylic sheet or was it some kind of channel? Is that just glued up?
Robert
Thanks, Robert.

I started with 1/4" cast acrylic sheet and glued it up. I had very good success on a previous project and had quite a bit left over, so I thought I'd give this a shot. The back piece is 8" tall; the top is 6" deep (easily big enough for spare batteries or even chargers), and the spacers are 2"-ish (just enough to allow for an easy slide of the tool bases) spaced 3" apart. The slot openings themselves are 1 5/8" - 1 3/4" (don't remember which I settled on). The whole rack is just under 22". The most challenging piece was the slotted support running under the tools. You can't tell from the photos, but that piece, which holds all seven tools, is a single unit - joined together at the back by 1/2" of stock. I originally thought to make individual pieces glued up separately, but I realized I could almost as easily mill it as a single unit. The only complication was that due to the shape, I couldn't use my 6" vise. I set up a fence on the mill table and took measurements for one slot - beginning to end. At the end, I reset my DRO to zero and did the next, etc., etc. The serpentine shape made it a much simpler matter to glue up - and it's sturdier. The gussets are essentially eyeballed. The front edge is 6" - give or take, but they're all identical. I milled a 45 on one side of each, then clamped all four together and milled the other 45; re-clamped all four uniformly in my vise and finished the 6" side; flipped it and did the same on the other side. I learned from RJSakowski that the bonding agent is not really a 'glue' in the traditional sense. It actually has a chemical reaction with the acrylic and acts more as a 'weld' than a glue. Based on my other projects, it seems to be an amazingly strong bond. As a side note, if you plan on building something similar, keep in mind that 1/4" cast acrylic is not necessarily exactly 0.250". I'm not sure if this is correct in all cases, but the high quality product I used is actually labeled 0.220" - even though it's advertised as 1/4". When you have eight pieces in the equation, the cumulative error can be significant. This is my only experience with buying cast acrylic, so measurements may vary among manufacturers.

This was actually a pretty fun and easy project. I'm sure most of us routinely deal with the issue of not having enough space to keep all our toys, er, tools, and if there's a square inch of wall space available, it makes sense to utilize it.

Regards,
Terry
 
That is impressive! I normally don't consider plastics as a structural material for shop-made projects, but this is niiice! Too bad it's not for Bosch tools...
 
I have some rectangular aluminum tube 2" x 6" ...hmmmm

By the way, I personally would not charge Li batteries on or around a wood surface. For my ebike batteries they recommend only charging outdoors or in an ammo container or oven. I may build a dedicated charging station that is fireproof.
To wit- Samsung S7:

296660

R
 
That is impressive! I normally don't consider plastics as a structural material for shop-made projects, but this is niiice! Too bad it's not for Bosch tools...
Well, I guess you can't have everything. I agree: plastics doesn't pass a smell test as 'structural' to me either. These tools, however, are pretty light. I wouldn't even think of using plastic on my several electric power tools because they're MUCH heavier. They're Dewalt as well. Sorry.

Thanks for the response.

Regards,
Terry
 
Back
Top