Pm1340gt Gearbox Pump Oiler System

mksj

Active User
H-M Lifetime Diamond Member
Joined
Jun 12, 2014
Messages
5,055
The PM1340GT is very nicely built, works very well, and I have very few bones to pick with its features and overall quality. One area that did concern me when I was revising the front control switches, was the oiler system for the open Norton style gearbox. The current system (which is probably similar to other lathes with open gearboxes) has a single lubrication hole just above the gearbox on the right side of the lathe. When I pumped oil into the hole and checked the distribution, only the right side of the gearbox dripped oil onto the gears. So I also used a long nose oiler can from underneath the gearbox to get oil to the left side of the gearbox.

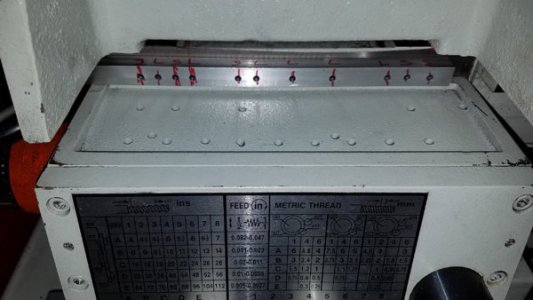
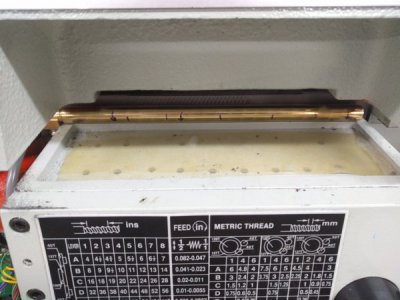
I like to tinker, so I though of various ways and schemes to get a more even oil distribution to the 15+ drip holes that are on top of the gearbox. I had thought of milling a new spacer plate that sits on top of the oil holes and drilling multiple oiler outlets, but it would have interfered with my switches and wiring. I ended up with a much simpler method, which is using hard aluminum 4mm tubing (could also use steel or copper) bent to fit underneath the cover plate as shown in the pictures. There is about a 6mm gap above the oil drip holes that are on top of the gearbox where one can route the tubing. A 4 tube oil distribution block and 4 separate tubes were routed and positioned so that the expanding oiled areas covered the whole oil trough area, as one can see by the expanding oil saturation areas in the picture. Three to four stokes from the pump was sufficient to supply oil to all the gearbox oil drip holes. It is very simple to use and very easy to give a few pumps prior to the start of machining on a regular bases. I used a fine tooth hacksaw to cut the 4mm aluminum tubing and then cleaned and drilled the tubing holes out with a small drill. I use a drip pan under the gears, but plan to make a fitted plastic catch basin. I like the ease and selection from the open type gearbox, dislike the mess and difficulty changing the gear selectors.

This oil system should also be applicable to other lathes with open gearboxes providing there is clearance to run the oil tubes. An alternative (if you have the room) would be to use 4mm tubing to pipe elbows tapped into a plate.

Patrs and approximate cost
CTA-8 Type Hand-Pull (Left) Manual Lubricators $45
CB TYPE Anti-Vibration Distributor With Nut CB-4 $8.60
(must specify CTA-8 outlet and CB-4 inlet are to be the same 4mm)

Part #: Aluminum Pipe 4mm for Lubrication System 10 feet $15
Part # PPST30 20" High Pressure Flexible Hose (500mm) for Lubrication System 4mm Bijur to connect between the pump and the distribution block (disribution block must use 4mm inlet as opposed to default which is 6mm). $10
Distribution block was mounted with 5mm x 16mm Allen cap screws, CTA-8 with 6mm x 16mm

Placement of oil tubes with oil being pumped, and cover plate on top of tubes.
PM1340GT Oiler 1.jpg


Four tube oil distribution block.
PM1340GT Oiler 2.jpg


Pump oiler and clearance
PM1340GT Oiler 3.jpg


Finished
PM1340GT Oiler 4.jpg
 
I like that solution also.

Just a thought... do the large drive gears (spindle and gearbox) under the left cover need oiling regularly... wonder if adding a tube to those gears would be worth considering???
 
No, I do not think it is needed. It would make a mess and most likely get all over the drive belt. I use a thin coat of high pressure grease on the drive gears, apply too much and it will fly off. Some people use chain lube. The oiler system works well, as I can see the gearbox gears are well coated with oil. If I were to make suggestions for others interested in this system, I would consider the following alternative.
1. Get rid of the distribution block. It works, but since the 4mm tubing has such a small bore, I did not find the individual tubes need any adjusting. The manifold block adjustment screws are all set at a 1/2 turn open from closed. You can see in the picture, all the tubes flow oil evenly.
2. Use some square stock aluminum (something like 1/2") and make an oiler manifold that fits in the back of the gearbox as shown. You can use some small neodymium magnets glued to the manifold to attach to the steel body in the back.
3. Drill 4 or 5 holes along the aluminum manifold the OD of the aluminum tubing (4mm). Cut various lengths or the 4mmm tubing insert, then and glue in with JB weld around the tube exit at the manifold. The tubing can deform when cutting it, so be sure to debur the cut end and drill the hole to clear any chips.
4. Tap the left end of the manifold to attach to the High Pressure hose to the oiler, probably some weird metric taper. You probably will need a 31" or 35" hose which goes directly to the oiler pump (PPST40 35" High Pressure Flexible Hose (900mm) for Lubrication System 4mm Bijur)
5. I might make a few, just to see how it is done.

Oiler manifold revised.jpg
 
This is an update to my original oiler manifold for my PM1340GT, the design can be applied to other Norton style gearboxes. My major concern to the stock oiler port was that no matter how much oil I pumped into the oil port, the oil never made it to the other side of the gearbox. I had to hand oil some of the gears. My initial system used a distribution manifold with adjustable valves, but I wanted to come up with a simpler and what I believe is a better design. I had previously mentioned a different manifold system for oil distribution using a distribution bar with multiple ports. I made a similar oiler manifold for another forum member a couple of weeks ago. I felt it was time to revise the pump oiler system on my 1340GT and provide some further details on what should be a relatively easy and inexpensive oiler or lubricator system to install. This updated manifold system is just another variation on what others have also made.

1. To start with I decided to use some 1/2" square aluminum stock for the manifold and cut a 8.5" length.

2. I placed the square aluminum stock in the lathe and center bored it using a 1/4" drill from either end. This requires starting with a standard drill and then using a aircraft drill to drill to a depth of ~4.5" from either end. I frequently needed to clear the chips, and use lubrication.

3. I then used a 11/32 drill and drilled to a depth of 0.7" on one end, followed by a 1/8NPT tap to a depth of ~0.5" (this will be based on the 1/8NPT elbow thread).
20170821_154127.jpg
20170821_155734.jpg


4. You need to determine how the oil manifold will connect to the lubricator pump. I am using a CTA Type Left Hand-Pull Manual Lubricators CTA-8L which uses a bijur connection port for 4 mm tubing. You must check/specify the bijur connection port as 4mm, they come in either 4mm or 6mm.
http://www.ebay.com/itm/CTA-8-Type-Hand-Pull-Left-Manual-Lubricators-Bijur-8cc-/170954048810

The tubing between the pump and the manifold is PPST30 24" or 28" High Pressure Flexible Hose (600mm) for Lubrication System 4mm Bijur (measure what you need)
http://www.ebay.com/itm/PPST30-24-H...or-Lubrication-System-4mm-Bijur-/181255874072
http://www.ebay.com/itm/PPST30-28-H...or-Lubrication-System-4mm-Bijur-/182594294203

You will need to have or make an elbow adapter that is 1/8" NPT male thread on one side and the other side is a connector for 4mm bijur tubing. ELBOW ADAPTER WPH-4 1/8 PIPE THREAD FOR 4MM OIL LINE
http://www.ebay.com/itm/ELBOW-ADAPTER-WPH-4-PIPE-THREAD-1-8-FOR-4MM-OIL-LINE-/132260046400

I ended up making my own elbow adapter, I used from salvaged parts. The elbow was a male 1/8" NPT to 1/4" compression tubing. I tapped the elbow compression tubing end to take a 1/8NPT male connector. I had a straight 1/8NPT male thread to 4mm bijur tubing connector that I threaded into the elbow.
20170821_145559.jpg
20170821_151634.jpg


An alternative is to use a pull level pump Lubricator similar to what is used on many mills. These have 1/8" NPT ports, so all you would need is a 1/8" NPT elbow to 1/8" compression tubing at the manifold, and some 1/8"tubing (copper, steel or nylon) to go from the pump to the manifold.

Chiba Hand Manual Pump 8CC One-shot Hand Oiler Bridgeport Type LT-8 CNC which has a 1/8" NPT port. Lever pull.
http://www.ebay.com/itm/Chiba-Hand-...-Oiler-Bridgeport-Type-LT-8-CNC-/201949373843

5. I marked out the oiler ports locations to be drilled for the oiler tubes. The oiler tubes segments must be small enough in internal diameter to offer some resistance to the oil flow, so I used 4 mm aluminum bijur tubing. I cut five short segments 0.8" long and six long segments 2.0" long. What works best to cut the tubing is a wire stripper that has two opposing < > cutting blade. After you cut the tubing segments, clean the holes on either end.
http://www.ebay.com/itm/Aluminum-Pipe-4mm-for-Lube-System-15-10ft-Bijur-/171010201816

6. The manifold then needs to be drilled to accept the 4mm tubing segments using a 4mm drill. Each hole is drilled 0.20" inches from the bottom of the manifold 0.3" from the top. This allows the tubes to sit a bit lower in the manifold and drain the oil more completely. Be sure to orient the manifold Left and Right as the oil connection line is on the gear end of the machine and the plug is on the chuck side. (see picture). From the Gear end side of the manifold I drilled 4mm holes at the following positions and tubing segment: 1.30" S, 1.70" L, 2.10" S, 2.50' L, 3.55" S, 4.00" L, 4.85" L, 5.80" L, 7.10" L, 7.55" S, 8.10" S. After the holes are drilled run your 1/4" aircraft drill through the manifold to clear any chips.
20170821_171835.jpg

20170821_173752.jpg


7. I used metal epoxy to attach the tubing segments to the manifold, I have done this in the past and never had any leakage or issues. You must insert a 1/4 rod or tubing through the center of the manifold so the tubing segments are all set to the proper depth. Clean all the segments and manifold with acetone or Lacquer thinner. Insert the 4mm tubing short and long segments as noted above, make sure they are fully seated. I put tape on the either side of the manifold so the epoxy would not run down the sides of the manifold when gluing the segments in. Mix up the metal epoxy and apply around each tube as shown.

After the glue is set, remove the 1/4" tube/rod, check that all the tubes are clear by blowing air through each or running them with a guide wire. Machine a small end cap plug. I used the 1/2" square stock and machined a press fit 0.25" diameter plug, depth of 0.1" overall with of 0.2". The plug must be kept as short as possible. Glue the plug in using a very small amount of the epoxy.
20170822_075343.jpg

20170822_080756.jpg


8. Using a 1/16" drill, drill an additional oil port on the plug end 0.15" from the bottom and 0.2" in from the manifold plug end (see picture below). This is a key for one of the bearing oiler ports. Clear the tubing of any chips, dry fit the manifold to the machine, bending the aluminum piping as needed. Attach the elbow inlet port to the other side of the manifold (see picture). Place the oil manifold in place and check the oil distribution by giving two 8cc pumps from the lubricator. You should see even flow from all the pipes, each puddle radiating out in a circle.
20170822_080744.jpg

20170822_082959.jpg


9. In order for the manifold to sit in the proper position, machine or file down about 1/4" of material on the chuck side of the oiler cover plate to allow the manifold to sit a bit closer to the chuck side. Insert the oiler cover plate and reattach the front control panel. The manifold should not need any other form of attachment as it is held in place by the oiler cover plate.
20170822_083448.jpg


10. Routing of oiler tubing to pump.
20170822_084127.jpg
20170822_084134.jpg
 
Last edited:
Looks like you and Alan had the same idea. Nice work as usual Mark.
 
Rich, actually Mark plowed this ground first and I borrowed the idea from him. I put my own particular twist on it.

Mark, interesting that I just noticed some minor differences in the number of ports to be oiled. There's a slight difference in our machines. Yours has two more holes up front:

Mark's:
Marks distributor.jpg
Alan's:
IMG_20170814_191432.jpg
 
That is interesting about the differences, I added a few more ports based on having each long pipe feeding two holes similar to Alan's. The back short pipes feed each drip hole because of the spacing. I also considered using a brass pipe like Alan did, either way works fine, depends on what you have available. The square manifold wedges in quite well so I did not need any mounting screws. I will say that the lubrication is much improved with the new manifold system, in particular two the drive bearing ports on the chuck side. Also there seems to be some variation to what is considered a right hand vs. left hand pull pump, checking on what I ordered it was a Left Hand CTA-8L pull pump, so will correct the above link. The length of the lubricator to manifold oiler line will depend on where you mount the pump and route the line. I have to thank Alan and David for getting me thinking about redoing my oiler system, I went with the KISS approach.

I will need to get some Mobil Vacuoline 1409 for the gears and the ways next.
 
Last edited:
Back
Top