PM-833TV x-axis power feed instructions

rronald

Registered
Registered
Joined
Sep 20, 2023
Messages
180
Just opened the box on the power feed and spent an hour or two on the install. I find the instructions a bit sparse.

I mounted the unit in place with two C-Clamps and this piece that is bolted to the balance of the PM vertical to horizontal adapter. It's a nice fancy machined aluminum part. After doing this the instructions say I should mark, drill, and tap two holes and then mount the unit. If I transfer punch the two bolt holes where the alignment pieces is connected to the adapter and motor unit, they seem to be in the tight spot.
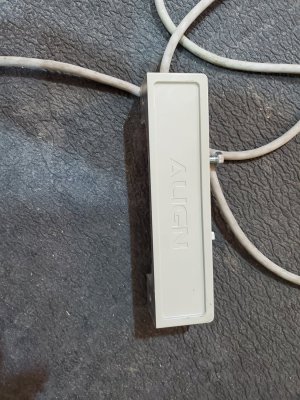
Align alginment part.jpg
But this is a bit wacky. Since the alignment piece is threaded (note the bolts visible in pic).....it can't be that I run the bolts thru the adapter and the alignment piece before threading into the table. There would be two threaded pieces in line.So it appears that the alignment piece is a throw-away that is only used for alignment. Seems like the instructions might mention this...but maybe I'm being too picky.


It would be nice if someone could confirm this before I start to drill! :anyone:
 
Maybe try emailing PM, they have a reputation here for being very responsive and supportive.
 
I would have called them, but I didn't realize that I had the question until it was past 5PM on a Friday.:(

My working theory is that the part is actually retained and used when the feed is installed on the PM-728TV. But on the 833TV, the part is only used to establish the position of the bolt holes.
  • link to 728TV feed instructions - These instructions clearly show "the adapter flange" and warn about over-tightening the screws. In this case, the feed unint essentially clamps onto the table edge and there are no instructions to drill mounting holes. These instructions look pretty good, with nicely labeled pictures. Figures 1, 2, 3, 5, and 7 show the "adapter flange". Interestingly, Figure 10 (which is labeled "Power feed controls (file photo)" must be showing a different mill since the adapter flange is missing.
  • The 833TV instructions don't have a picture of the finished install. They don't say how deep to drill and tap. They don't say to use the bolt locations connecting the flange adapter to the mount plate as the location for the holes to be drilled. And they don't say that the nicely machine flange adapter is just a template that is not used in the final assembly.
I'm about 99% sure that my theory is correct. Two M8 bolts should be plenty strong to directly connect and hold the feed unit. There are slots to allow adjustment up and down as well as in and out.

Documenting this online might help the next person who is nervous about drilling the table on a new mill.
 
My theory proved true. You can see the install of the feed motor and bracket/adapter. But the adapter flange was not used in the final assembly (seen resting on my table).
X-axisPowerFeedInstalled833TV.jpg
 
Also of note. The instructions for install the X-axis feed kit on the PM-833TV say to drill/tap the end of the table to M8x1.25.

The bolts that are provided and used in the temporary configuration (when marking the drill locations) are not M8. They are 3/8-16. They do a pretty good imatation (8mm driver fits and they are visually very close). So, the kit does not contain all the parts needed for mounting (if you follow the instructions and tap M8). When you get to the final assembly, the 3/8-16 bolts will not thread into the the M8 holes (believe me, I tried :confused:)

I generally prefer metric. And have a lot of metric bolts handy for use. So, I'm not unhappy that I drilled and tapped M8.

I don't see any reason why 3/8-16 would not be just as good for mounting the feed unit. If the instructions said to drill and 3/8-16, then the feed kit would be complete and it would contain all the needed hardware. At the very least, it would be nice to point out that the included socket screws are 3/8-16 and there are no M8 socket screws provided.
 
Back
Top