- Joined
- Feb 1, 2015
- Messages
- 9,948
When I built the stand for my G0602 lathe, I made leveling adjusters for the four legs. They were simple in design; a 1/2-13 bolt and jam nut threaded into a plate at the bottom of each leg. However, in trying to precision level the lathe, I ran into some issues.
When adjusting the height of each leg, there was a tendency of the bolt to walk across the floor. Not a problem for a workbench but when you are leveling a lathe with a sensitive level (.0005"/10"), it can be a frustrating game of Whack a Mole. The second issue deals with the fact that three points determine a a plane. Four adjustment points inevitably result in one leg not touching. Solving the second issue first, I made another leg for the tailstock end of the stand. I now can adjust the front to back level with the two left-hand adjustments and the left to right level with the added tailstock adjustment. The two original adjusters were left in place and after leveling, they were lowered to just shy of touching to act as stabilizers in the event the center of gravity would shift outside the triangle formed by the three leveling adjusters.
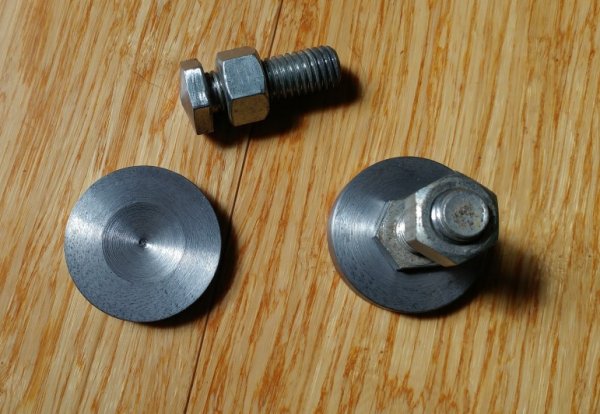
The issue of walking was solved by modifying the bolt head by cutting a shallow cone. These mated with disks which had a conical depression. A dab of grease was put in the depression on the disk and bolt was lowered into the cup. This was repeated for the other two feet. A quick check was made to make certain that the stand was positioned properly and the leveling process began.

The headstock was leveled front to back first. Two 1-2-3 blocks were placed on the headstock end of the bed and the precision level was placed across them. The process went smoothly with few iterations. The final adjustments in leveling involved just nudging the wrench slightly but the leveling was completed. Next, the level was placed on the rear way and the tailstock foot adjusted to level the lathe left to right.
Two 1-2-3 blocks were placed on the tailstock end of the bed, the precision level was placed across them, and the level checked. Shims were added under the tailstock to level the tailstock end. I noticed that adding shims would cause a slight shift headstock level so it was re-leveled and the tailstock leveling process repeated until both were level.
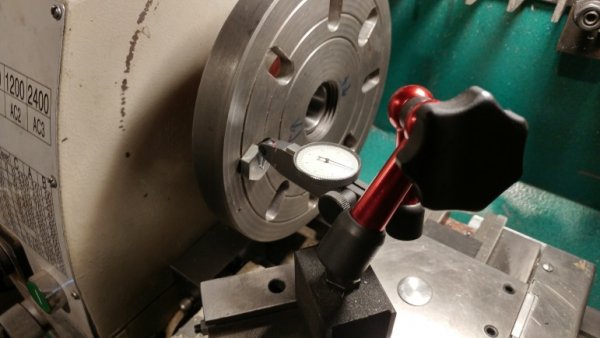
Next I mounted my faceplate with a dome headed bolt about 3.5" from the spindle axis. I placed my .0001"/div. test indicator on the compound and adjusted it so it was at maximum deflection when the bolt head was horizontal to the spindle axis and the cross feed was retracted to about 1/4" from end of travel. The carriage was locked and the indicator was zeroed. The faceplate was rotated 180º and the maximum deflection of the indicator was noted. The indicator read -.00013" which meant that the cross feed would cut a slightly concave face. I felt that this reading was close enough to not warrant any improvement.

Next, taper was checked using Rollie's Dad's Method. A 1"diameter by 12" bar was used. The test indicator was adjusted to hit the bar at a point horizontal to the spindle axis and close to the chuck. The cross slide was adjusted so the average of maximum and minimum reading was zero. The carriage was moved out about 10" and the maximum and minimum readings were made. The average was -.0075". A .010" shim was placed under the front side of the tailstock and the headstock end was re-zeroed. The average tailstock reading was reduced to -.0035". The .010 shim was removed and a .012" shim added. and the process repeated. This brought the tailstock reading to -.0017".
Moving to a .015" shim, the reading was now +.0015". Removing the .015" shim and replacing with .012" and .0015" brought the reading to -.0001" which was deemed good enough.
The lathe adjustment process wouldn't be complete without a two collar test. An aluminum bar 2.1`" in diameter and 7" long was mounted in the chick and the two collars turned, one about 1/4" from the chuck and the second 5.7" from the chuck. The difference in turned diameters was less than .0001".
When adjusting the height of each leg, there was a tendency of the bolt to walk across the floor. Not a problem for a workbench but when you are leveling a lathe with a sensitive level (.0005"/10"), it can be a frustrating game of Whack a Mole. The second issue deals with the fact that three points determine a a plane. Four adjustment points inevitably result in one leg not touching. Solving the second issue first, I made another leg for the tailstock end of the stand. I now can adjust the front to back level with the two left-hand adjustments and the left to right level with the added tailstock adjustment. The two original adjusters were left in place and after leveling, they were lowered to just shy of touching to act as stabilizers in the event the center of gravity would shift outside the triangle formed by the three leveling adjusters.
The issue of walking was solved by modifying the bolt head by cutting a shallow cone. These mated with disks which had a conical depression. A dab of grease was put in the depression on the disk and bolt was lowered into the cup. This was repeated for the other two feet. A quick check was made to make certain that the stand was positioned properly and the leveling process began.
The headstock was leveled front to back first. Two 1-2-3 blocks were placed on the headstock end of the bed and the precision level was placed across them. The process went smoothly with few iterations. The final adjustments in leveling involved just nudging the wrench slightly but the leveling was completed. Next, the level was placed on the rear way and the tailstock foot adjusted to level the lathe left to right.
Two 1-2-3 blocks were placed on the tailstock end of the bed, the precision level was placed across them, and the level checked. Shims were added under the tailstock to level the tailstock end. I noticed that adding shims would cause a slight shift headstock level so it was re-leveled and the tailstock leveling process repeated until both were level.
Next I mounted my faceplate with a dome headed bolt about 3.5" from the spindle axis. I placed my .0001"/div. test indicator on the compound and adjusted it so it was at maximum deflection when the bolt head was horizontal to the spindle axis and the cross feed was retracted to about 1/4" from end of travel. The carriage was locked and the indicator was zeroed. The faceplate was rotated 180º and the maximum deflection of the indicator was noted. The indicator read -.00013" which meant that the cross feed would cut a slightly concave face. I felt that this reading was close enough to not warrant any improvement.
Next, taper was checked using Rollie's Dad's Method. A 1"diameter by 12" bar was used. The test indicator was adjusted to hit the bar at a point horizontal to the spindle axis and close to the chuck. The cross slide was adjusted so the average of maximum and minimum reading was zero. The carriage was moved out about 10" and the maximum and minimum readings were made. The average was -.0075". A .010" shim was placed under the front side of the tailstock and the headstock end was re-zeroed. The average tailstock reading was reduced to -.0035". The .010 shim was removed and a .012" shim added. and the process repeated. This brought the tailstock reading to -.0017".
Moving to a .015" shim, the reading was now +.0015". Removing the .015" shim and replacing with .012" and .0015" brought the reading to -.0001" which was deemed good enough.
The lathe adjustment process wouldn't be complete without a two collar test. An aluminum bar 2.1`" in diameter and 7" long was mounted in the chick and the two collars turned, one about 1/4" from the chuck and the second 5.7" from the chuck. The difference in turned diameters was less than .0001".
