- Joined
- Dec 20, 2012
- Messages
- 9,422
I’ve been asked to share some information about the interchangeable tip live center that I built for my Sherline lathe so here it is.
This tool was designed and built to overcome specific deficiencies with my Sherline lathe:
My live center (LC) is now over 15 years old and I’m happy to report that it still holds zero run out with the short tip and very close to zero run out with the extended tip. It has a built in extension so I can machine a part all the way down to the end without banging the cross slide into the tailstock base. Tool interference with small diameters is no longer a problem. What’s more, I was able to index the LC in my tailstock ram in such a way that it eliminates all horizontal and vertical misalignment with the headstock so no more tapered parts for me. Since all Sherline lathes probably have the same deficiencies, this is a tool that most Sherline owners might want to consider making.
I’ve pondered how best to present this project to you and I’ve decided to take a “step-by-step” approach because this one requires a bit more fussiness than most. “Fussiness” is a technical machinist term that refers to the degree of tension in the butt muscles as you make a cut, and the term applies here because every single part we make has to be accurate if the assembled whole is to be concentric with the centerline of the tool. We are going to be turning and boring to a precise dimension (not to tolerances) on two critical pieces, and you have to hit those dimensions or start the pieces all over again. All other parts must be held and worked on accurately and for the sake of those new to the Sherline lathe, it might be useful to see at least one way to deal with this fussiness thing.
It is also possible to use this information to make a live center for a larger lathe. You just have to choose a larger bearing and adjust the dimensions of the parts but the work flow and work methods should be the same.
Okay, let me give you some background information first.
General Information
Bearing: I used a Nachi 5200-2RS (current model is the Nachi 5200-2NSL) bearing. This is a double-row, fully sealed and permanently lubricated Angular Contact bearing with dimensions of 10mm (0.3937”) ID X 30 mm (1.1811”) OD X 14.3mm (0.5630”) wide. It has a dynamic load rating in excess of a ton, can take speeds above 4,000 RPM easily and is widely available for very reasonable prices, under $40.00 in a recent price check. As with all quality bearings the dimensions of the Nachi 5200-2RS are precise and can be used to calculate fits, although I would carefully measure yours if you build this.
A double-row AC bearing is simply two separate AC bearings mounted back to back and preloaded into a single bearing housing so no further preloading is necessary – very nice! If you adapt this to a larger lathe, use a double-row AC bearing or you will have to figure out how to preload your LC. Even Royal uses a double-row AC bearing.
Fits: The only thing that holds the entire LC together is the fit of the bearing into its housing and on the arbor. We are press fitting both races and this situation impacts on fits. The balls of an AC bearing are in constant contact with their races so internal bearing clearances are very, very tight. When you press both races the risk of impairing this internal bearing clearance goes way up; get your fits too tight and the bearings will brinell (irreversibly dent) the races and the bearing will fail prematurely. Too loose and things move. Consequently, the ideal fit with both races pressed is called a Line-to-Line fit, meaning that the ID of the bearing housing and the OD of the arbor are the same dimensions as the OD and ID of the bearing. This fit does not compromise internal bearing clearances and it allows a tight enough fit so that everything stays together.
I used this Line-to-Line fit on my LC and also left the rear of the bearing exposed, for two reasons. First, it gives the bearing a tiny bit of room for thermal expansion if needed and second, it allows us to press the bearing out of the housing if new tips are needed or if the bearing fails and needs replacement.
This Line-to-Line fit requirement means your parts are an exact fit to the outer and inner dimensions of your bearing. You might get away with +0.0000/-0.0001” on either the housing or the arbor but not both; dead on for both would be preferable. If you cannot turn and bore with precise control then practice until you can or you’ll just end up wasting material. In a pro shop or factory, they would precision grind these dimensions but most of us don’t have that luxury; we have to cut it.
If it makes you feel any better, it took over 10 years before I could build this tool. I had to teach myself about lathe tool grinding, tool geometry, boring tools and boring tool geometry first. Then I had to design and build a rear mounted parting tool so I could work with control. It took a lot of time and work to get to the point where I could make this tool but it was worth the effort.
Design concepts and material discussion:
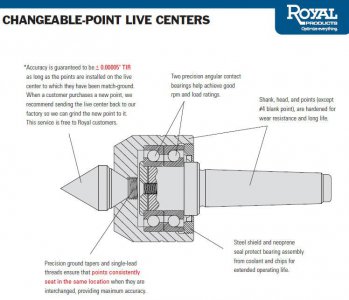
The graphic above is a Royal changeable tip live center and ours is almost identically constructed except that ours is not sealed in back.
Note how the tips are attached. These tips incorporate a 60° tapered shank ending in a threaded section that screws into a matching female socket in the bearing housing of the LC. Once locked into place the tips cannot move but they release easily when needed. The design is rigid, simple, accurate, repeatable and ingenious. The standard 60° and extended tips described here are all I needed. I already have a separate bull nose center and have never needed an inverted cone but tips of any configuration can be made.
Please note that for accuracy, the tips must be shaped while mounted in the bearing housing in order to control run out. Forget a separate shaping mandrel – it doesn’t work. Don’t forget to drill the Tommy bar holes in the body and tips before you shape them or you may not get the tips off.
Hardening and tempering these tips is not required. However, tips so treated resist marring and deformity and will maintain their accuracy longer; I chose to harden and temper them (to amber). I used 5/8” OD, O-1 tool steel for these tips. O-1 machines very well and hardens and tempers easily in the home shop. After over 15 years of regular use, my tips still look brand new and have remained accurate.
The steel used for the arbor and bearing housing is 1144 “Stressproof” steel. Easily machined when rigidly supported, it has good tensile strength and finishes to a nice satin finish. It is also partially hardened and has proven to stand up to its intended use quite well. I used 1.5” OD stock for the housing and ¾” for the arbor. I suggest you buy extra stock unless you are a boring and turning wizard.
If you use an aftermarket quick change tool post on a Sherline lathe, the shank of the LC must be long enough so a work piece can be machined to its end without the carriage running into the base of the tailstock. Toward this end, my LC has a 1.5” longer arbor but I found that 1” would have been more than adequate. The discussion below presumes your extension will be 1” long.
Cost:
The prorated cost for this entire project at the time it was built was about $25.00. Yup, that’s not a misprint. Check the cost of a Royal Changeable Tip Live Center set sometime.
Necessary Stuff
In terms of equipment, be sure you have:
I’ve shared this article with a few others and most of them have urged me to include the following:
Building Notes:
NOTE: the dimensions cited below reflect the dimensions of my bearing. If yours differs, please make the appropriate change to suit yours.
Make the arbor:
We are not using a live center to support the work. We want the arbor to be straight with parallel sides; as long as the headstock is aligned with the ways our arbor will be straight and accurate. Working this way leaves us with just under 2” of stock hanging out of the typical 4JC chuck, which is a tiny bit over the maximum that should be hanging out unsupported so you will need to take lighter cuts using this method. An alternative work holding device is an accurate ER-32 chuck that has been tested to be true up close to the spindle. If you have one you trust, use it for its greater support.
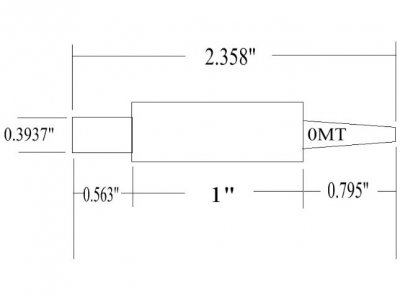
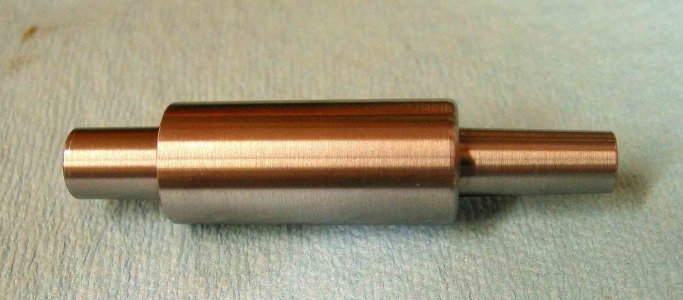
Cut 1144 steel ¾” OD stock to 2.500” long or a little bit more so you have enough to grab securely with the chuck jaws; carefully zero this in your 4JC. Face the end you will work on first and take a 0.010” skim cut in stages on the OD until you are near the chuck. This is just to remove that dark surface finish. The actual OD is not critical; just go for a nice finish. You are sticking it this far out so that when you flip the work, you have a clean and accurate surface to grab on to that has a consistent OD so you can dial it in.
Using a parting tool, cut a groove 0.563” from the end. You need to measure the OD of your work piece and calculate the depth of the groove so it is few thou deeper than the final 0.3937” OD. Then turn the end down incrementally to 0.3937” OD to form the arbor that fits into the inner bearing race; be very careful to hit this OD dead on and strive for a good finish. The shallow groove left after the arbor is formed is intended to allow the bearing’s inner race to fit flush to the shoulder. Lightly chamfer the ends of the tip and shoulder of the arbor.
Flip the arbor, pad the jaws to protect your finish and re-zero in the 4JC. Face the end to a finished length of 2.358”. You may wish to measure your 0MT at its widest point and cut a groove to this depth with the cutoff tool, 0.795” from the end. Turn down to this diameter before angling the headstock. When cutting your 0MT, you simply turn until your cuts match the OD you just turned and you’re done.
Replace your 4JC with another 4 jaw chuck holding your 0MT sample and zero in the sample carefully, then use your indicator to angle the headstock … you do know how to do this, right? If not, sing out. Remember that the Sherline lathe uses the face of the spindle just behind the threads as a register; be sure it and the chuck is absolutely clean before installing another chuck.
Once the headstock is oriented properly, switch chucks and cut your 0MT. Again, take light cuts and strive for accuracy. Compare measurements with your sample to be sure your dimensions are accurate before breaking down. Chamfer.
Once the arbor is done, carefully realign the headstock to the ways. Test cuts, right?
The arbor is done.
Make the bearing housing: drawing is a cut-away for clarity.
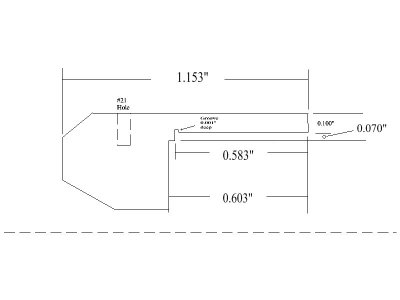
Let’s take a short break here. We’re about to bore the bearing bore so we need to be clear on what we’re doing. You first need to drill a bigger hole so you can get a decent sized boring bar in there. The Sherline lathe can usually only drill a 3/8” diameter hole before the chuck wants to break loose and spin in the Morse taper. Well, maybe ½” if you’re careful but that 0MT is not that big or strong so you’ll have to drill as big as you can and then bore from there. Be sure the tip of your drill does not go deeper than the final depth of the final bore. Once the boring bar gets in there we’ll cut the bottom flat so just get the tip of your drill down to or very close to the bottom dimension.
Now a word about boring bars. You can use a really good inserted carbide bar, a good solid carbide bar like those from Micro 100 or even a good cobalt bar like those from Borite, Bokum and other good makers. It doesn’t matter which you use provided you know how to cut with it. By that I mean you know exactly how the bar will cut for a given depth of cut that you dial in. I suggest you not assume you know this information without confirming it in practice cuts. I apologize if I’m overstating the obvious but the bearing bore is a critical dimension and you will have ONE chance at cutting it. If you miss it, you have to start over again or be willing to use Loctite to glue your bearing in place. If you glue it, I guarantee you will lose some accuracy. It is best to cut it right in the first place so do whatever you have to do to control your boring bar.
I used a Circle Machine QCMI-375-6-5R solid carbide bar and a CCBI-250-4-5R solid carbide bar to cut my bore. The larger 3/8” diameter bar used a 0.007” nose radius and was used to rough the bore. The smaller ¼” diameter bar used a 0.002” nose radius to make two final finishing passes. I knew exactly how each bar cuts because of hundreds of practice and working cuts in the past, which is why I was able to hit the bore dead on the first time. This doesn’t make me a super-machinist; it makes me a practiced one. Before boring this project, take the time to be absolutely sure that you can predict the cuts your bar will make. Whew! Talk about beating a horse to death!
I also want to emphasize the importance of a carriage stop. The way I cut a flat bottom in a precision bore is to touch off the tip of the boring bar on the outside of the work piece, then move the bar off to the side and dial in my final depth of cut, minus ~ 0.010”, and set my stop. Then I go in and rough out the bottom of the bore and get it flat. It has that coned bottom from the drill, right? You’re trying to flatten out that cone. You are not trying to make the bore larger yet so use a boring bar that will fit in the hole and just get the bottom flat. Once the bottom is flat, I come back out and re-set the carriage stop to the actual final depth and then go back in and cut off that 0.010” of material to make the bottom flat and dimensionally accurate. Then you can proceed to bore out the housing. The reason for doing it this way is so that the bar only has to cut the side wall on each boring pass. You do not want to also have to cut a lot of material on the bottom as well because that greatly increases tangential cutting forces and thereby affects the accuracy of the bar. Once you make the bottom flat in the beginning, it takes very little for your bar to keep it flat as you bore. At the very end, it takes almost no effort for the bar to clean up the entire bottom of the bore as you feed it toward the center.
As you bore, the housing will heat up. That means the material will expand and that affects your readings. When you get within one or preferably two roughing passes away from your finish passes, I suggest you stop and allow the metal to cool to ambient temperature. I usually shoot some compressed air in the bore (protect your eyes if you do this) to clear it out, then let it sit until cool. Then you can take your measurements and decide on your depths of cut to bring you to the point where you can make your final finishing passes to come in on size.
Talking about measurements, at these tolerances even a bit of cutting oil left in the bore makes a difference in your readings. Please take the time to clean the bore completely before taking a reading. I use a paper towel to wipe it clean, then another with alcohol to remove any oil, then a final one to make sure it is dry. Then I stick my telescoping gauge (with clean tips) in there and then take it to my clean micrometer to read it. I am not as anal as I seem; I am lazy and do not want to bore a piece more than once. If you doubt this makes a difference, try closing the jaws of your dial caliper and note the reading. Then wipe the jaws clean and look again. Oil and dirt makes a difference in our accuracy at very tight tolerances so we have to be meticulous in our work.
Okay, let’s move on.
I used a Nachi 5200-2RS bearing. One guy I shared this with made me aware that the only equivalent Nachi bearing he could find is the Nachi 5200-2NSL. There seems to be a difference between these two bearings. Mine had a projecting inner race and his did not. The directions below are for my bearing but if yours doesn’t have a projecting inner race then good, less work. Just bore the bearing bore in one go. Also, his bearing had rounded shoulders so a groove at the bottom of the bore was not necessary. If you get the more modern version, the 2NSL, just go to step iv below and skip step v. Butt squeezing time!
Bore the bearing bore.
Make the tips:
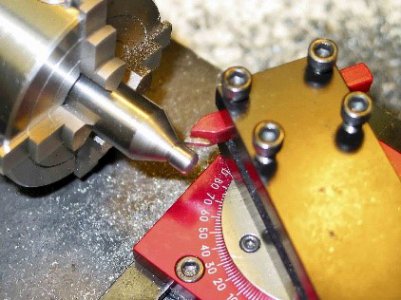
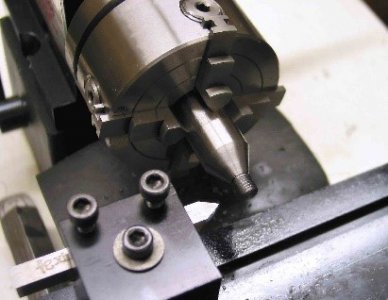
Harden and temper your tips if desired. After hardening, especially if using Boric Acid to reduce oxidation, there is a residue that must be removed before tempering. Make a mandrel with a female ¼-28 thread at the end and chuck it in the drill press. DO NOT sand this stuff off the shank or tip tapers as this can significantly alter their geometry. Instead, use a new dry green Scotchbrite pad backed by a flat object, followed by #000 steel wool with oil and the stuff comes right off. You can polish with compound if desired, and then clean the tips with lacquer thinner to remove all oil and temper the tips to amber.
If you ever need to make new tips you can press the bearing housing off by threading in a ¼-28 threaded bolt through the front of the housing to push the arbor out. You MUST use the housing when shaping new tips.
Once all the parts were made, I used a round graver to gently round all edges. This involved just whisper-thin cuts to finish all edges. If you don’t own gravers then a fine file or sanding will work.
Assemble the LC
Make pressing adapters to fit the inner and outer race diameters.
Clean the bearing races, arbor and inner bearing bore with lacquer thinner. Cleanliness is important here. Just before installation, put a light coat of hydraulic oil on the arbor and inner bearing housing.
Press the arbor into the inner race while supporting the inner race with your adapter and then press the bearing into the housing with the outer adapter. This order allows the involved race to be fully supported as pressure is applied so that brinelling of the race surfaces is avoided.
DONE!
Testing the LC
This section is not important. I’m including it simply to show how I evaluated the LC. Please skip it if it doesn’t interest you.
My Sherline lathe was over 15 years old when this LC was made. In that time the tailstock had worn and had about 0.003” horizontal offset and about 0.001” vertical offset from the headstock according to my test bar. I had the notion that maybe I could minimize this offset by indexing the Morse Taper of the new LC in the socket of the tailstock ram. This notion came about after noticing that the Sherline adjustable LC never stayed zeroed if it was removed and replaced in the tailstock. It changed every time, which fueled my dislike for the contraption but it did raise the idea that the MT could be indexed. In any case, by turning the new LC arbor in the socket I was indeed able to find a position where there was zero runout with my test bar, meaning the headstock and LC/tailstock combination was aligned. This position was marked. The LC was removed and replaced multiple times to test the accuracy of this mark; all attempts showed zero run out on my test bar. At that point a witness line was scribed on the LC and the tailstock ram. All subsequent testing was done with the LC indexed at this mark. Indeed, the only way I could test as below was because indexing the LC eliminated all misalignment with the headstock so that any tapers in the test pieces would theoretically be due to the LC itself.
Once I finished indexing the LC, I checked static run out on the LC itself with my dial indicator by measuring run out on both tips while turning the bearing housing by hand and got zero for both tips as expected. This is how Royal tests their centers. Then I decided to do test cuts because this is how the LC would be used.
Everything you do with the Sherline tailstock can affect run out, especially with the old style tailstock that I owned. The degree to which the ram locking screw or the main feed screw is tightened, or even how hard you push the LC into the end of the stock all have an impact on accuracy. Over the years I have developed my own feel for all these things and think I am being fairly consistent. However, if there was ever an instance of stacking tolerances this is it. With that in mind, the test results that follow are as accurate as I could make them.
Prior to testing I tried to remove as many variables as possible so the results could be attributed to the LC. Before beginning this project I confirmed the lathe was level; this level state was rechecked and found to be good. The headstock was verified to be zeroed with the ways with test cuts (no LC used) before LC testing was conducted.
A 4-1/2” long piece of ½” OD precision ground mild steel was deeply buried and faced in a fairly accurate Beall ER-32 chuck (~0.0001” TIR) and a new #1 center drill was used to produce an accurate center. The rod was then removed to the 4JC where ~3-1/2” of the rod stuck out and was carefully zeroed. The LC in the tailstock was moved up for test cuts and remained in place for a series of three cuts. After those cuts, the tailstock was then moved in order to change tips but the LC was not moved in the tailstock ram.
With a freshly honed HSS cutter taking full-length 0.003” deep cuts to minimize deflection, cuts were made the full length of the 3-1/2” bar. The standard 60 degree point showed 0.0000” TIR on this bar for each of three successive cuts and the OD was the same, all the way down the bar.
Testing the extended tip after each of the three test cuts was problematic because I couldn’t directly measure it. The finest reading DI I owned at the time, a Mitutoyo 2776, only goes to 0.0005”. When testing the extended tip the reading is just barely off of zero, perhaps 10% on the way to the first tic on the dial (so about 0.00005” TIR, maybe?). However, the rules say you shouldn’t interpolate readings so I can only tell you the extended tip is somewhere between 0.0000” and 0.0005” TIR but is very close to zero. The TIR readings were consistent from cut to cut, which I interpret as indicating the TIR value is real. Given that the actual run out is about half the TIR the extended tip has an accuracy between 0.0000” and 0.00025”. Unless there is some error in my methodology this LC appears to be pretty accurate when indexed as noted.
For the sake of comparison, my OEM LC has 0.0008” TIR at best when tested this way.
Switching to a 10” long piece of 3/4” OD 12L14 that was zeroed in my 4JC, the same series of cuts was made and the TIR results were the same (0.0000 TIR) with the standard tip. I did not test with the extended tip on this larger stock because in real use I would not use that tip on stock of this size.
I then tested cuts with my 15 year old 3JC using another 1/2'” piece of steel and got zero run out with the standard tip! Run out increased to about 20% of the way between 0.0000 and 0.0005” TIR with the extended tip or double the TIR that was seen when the 4JC was used. These results surprised me but illustrated the impact a LC has on concentricity, even if the chuck is not all that accurate. Or does that mean that my old reliable 3JC is better than I thought?
After all the testing both tips showed no visible wear or marks. As expected, the tips fit the mount precisely and locked solidly when they were changed so Royal got their design right!
Conclusion
The test results indicate that this new LC is pretty accurate. More importantly, my test bar and also the lack of a measurable taper with test cuts using the standard 60° tip demonstrated that the LC, at least, is now aligned both horizontally and vertically with the spindle. This suggests that the “indexing the new MT in the old socket” maneuver had a significant impact on the results.
While every effort was made to assure accuracy in machining and testing, I think the bearing has a lot to do with the test results and I would suggest buying a quality bearing for your project. The one used here is Japanese and I think it is good enough to recommend it to you.
As for the run out of the extended tip, it may be some distortion from heat treating the longer piece or displacement from the pressure of being seated in the work piece. Regardless, the error is acceptable to me.
The new LC functioned flawlessly during testing and has remained accurate and trouble-free in use since then. It is quiet, smooth, but does warm up slightly in use. Changing tips takes only a few seconds. The standard tip is, well, a standard tip, while the extended tip allows turning to very small diameters with no cutter or tool holder interference. The whole affair is cool looking, too, in an industrial spaceship sort of way. The neat thing is that if a special tip is ever needed I can just pop the housing off and make one to precisely suit the job.
To say I am pleased with this tool is a vast understatement. Again, as with all the best tool projects the true value lies not in the tool but in the lessons learned and the skills honed. Give this one a try and you’ll see what I mean. If you do, try that “indexing the new LC in the old tailstock” maneuver thing – it might just work!
Mikey
December 2019
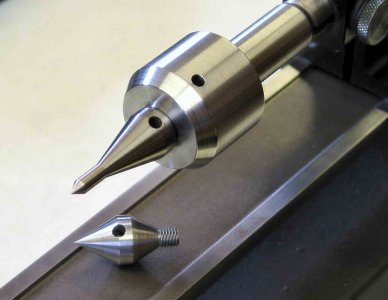
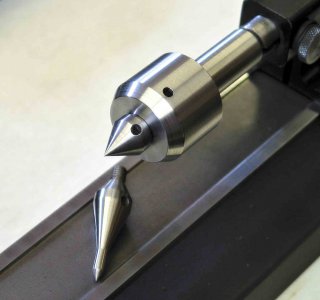
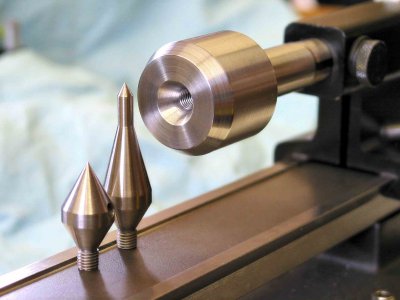
Changing tips is quick and easy.
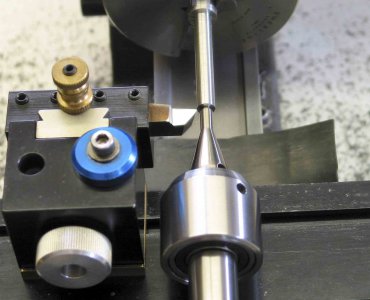
As you can see, cutter and tool holder clearance with small diameters is no longer an issue.
This tool was designed and built to overcome specific deficiencies with my Sherline lathe:
- The OEM ball bearing live center had 0.0008” TIR, which is not acceptable for precision work.
- The OEM live center’s huge tip got in the way of machining small diameter work and nobody makes an extended tip center for the Sherline lathe.
- When using an aftermarket QCTP that protrudes beyond the left side of the cross slide, it is difficult to machine a work piece from the tailstock end because the cross slide can run into the base of the tailstock. To combat this, Sherline offers an extension shaft for their live center. This works but it also magnifies the already not-so-good run out of the OEM live center and worsens any existing misalignment with the headstock.
- The Sherline tailstock is totally non-adjustable so there is no inherent mechanism for aligning it with the headstock. Tapers are therefore unavoidable on longer work pieces. This is a BIG deal that is made worse if you also have to use their live center extension because it really increases stacking tolerances. The optional adjustable live center Sherline offers is marginally useful in my opinion; way too cumbersome to adjust every single time you mount it.
My live center (LC) is now over 15 years old and I’m happy to report that it still holds zero run out with the short tip and very close to zero run out with the extended tip. It has a built in extension so I can machine a part all the way down to the end without banging the cross slide into the tailstock base. Tool interference with small diameters is no longer a problem. What’s more, I was able to index the LC in my tailstock ram in such a way that it eliminates all horizontal and vertical misalignment with the headstock so no more tapered parts for me. Since all Sherline lathes probably have the same deficiencies, this is a tool that most Sherline owners might want to consider making.
I’ve pondered how best to present this project to you and I’ve decided to take a “step-by-step” approach because this one requires a bit more fussiness than most. “Fussiness” is a technical machinist term that refers to the degree of tension in the butt muscles as you make a cut, and the term applies here because every single part we make has to be accurate if the assembled whole is to be concentric with the centerline of the tool. We are going to be turning and boring to a precise dimension (not to tolerances) on two critical pieces, and you have to hit those dimensions or start the pieces all over again. All other parts must be held and worked on accurately and for the sake of those new to the Sherline lathe, it might be useful to see at least one way to deal with this fussiness thing.
It is also possible to use this information to make a live center for a larger lathe. You just have to choose a larger bearing and adjust the dimensions of the parts but the work flow and work methods should be the same.
Okay, let me give you some background information first.
General Information
Bearing: I used a Nachi 5200-2RS (current model is the Nachi 5200-2NSL) bearing. This is a double-row, fully sealed and permanently lubricated Angular Contact bearing with dimensions of 10mm (0.3937”) ID X 30 mm (1.1811”) OD X 14.3mm (0.5630”) wide. It has a dynamic load rating in excess of a ton, can take speeds above 4,000 RPM easily and is widely available for very reasonable prices, under $40.00 in a recent price check. As with all quality bearings the dimensions of the Nachi 5200-2RS are precise and can be used to calculate fits, although I would carefully measure yours if you build this.
A double-row AC bearing is simply two separate AC bearings mounted back to back and preloaded into a single bearing housing so no further preloading is necessary – very nice! If you adapt this to a larger lathe, use a double-row AC bearing or you will have to figure out how to preload your LC. Even Royal uses a double-row AC bearing.
Fits: The only thing that holds the entire LC together is the fit of the bearing into its housing and on the arbor. We are press fitting both races and this situation impacts on fits. The balls of an AC bearing are in constant contact with their races so internal bearing clearances are very, very tight. When you press both races the risk of impairing this internal bearing clearance goes way up; get your fits too tight and the bearings will brinell (irreversibly dent) the races and the bearing will fail prematurely. Too loose and things move. Consequently, the ideal fit with both races pressed is called a Line-to-Line fit, meaning that the ID of the bearing housing and the OD of the arbor are the same dimensions as the OD and ID of the bearing. This fit does not compromise internal bearing clearances and it allows a tight enough fit so that everything stays together.
I used this Line-to-Line fit on my LC and also left the rear of the bearing exposed, for two reasons. First, it gives the bearing a tiny bit of room for thermal expansion if needed and second, it allows us to press the bearing out of the housing if new tips are needed or if the bearing fails and needs replacement.
This Line-to-Line fit requirement means your parts are an exact fit to the outer and inner dimensions of your bearing. You might get away with +0.0000/-0.0001” on either the housing or the arbor but not both; dead on for both would be preferable. If you cannot turn and bore with precise control then practice until you can or you’ll just end up wasting material. In a pro shop or factory, they would precision grind these dimensions but most of us don’t have that luxury; we have to cut it.
If it makes you feel any better, it took over 10 years before I could build this tool. I had to teach myself about lathe tool grinding, tool geometry, boring tools and boring tool geometry first. Then I had to design and build a rear mounted parting tool so I could work with control. It took a lot of time and work to get to the point where I could make this tool but it was worth the effort.
Design concepts and material discussion:

The graphic above is a Royal changeable tip live center and ours is almost identically constructed except that ours is not sealed in back.
Note how the tips are attached. These tips incorporate a 60° tapered shank ending in a threaded section that screws into a matching female socket in the bearing housing of the LC. Once locked into place the tips cannot move but they release easily when needed. The design is rigid, simple, accurate, repeatable and ingenious. The standard 60° and extended tips described here are all I needed. I already have a separate bull nose center and have never needed an inverted cone but tips of any configuration can be made.
Please note that for accuracy, the tips must be shaped while mounted in the bearing housing in order to control run out. Forget a separate shaping mandrel – it doesn’t work. Don’t forget to drill the Tommy bar holes in the body and tips before you shape them or you may not get the tips off.
Hardening and tempering these tips is not required. However, tips so treated resist marring and deformity and will maintain their accuracy longer; I chose to harden and temper them (to amber). I used 5/8” OD, O-1 tool steel for these tips. O-1 machines very well and hardens and tempers easily in the home shop. After over 15 years of regular use, my tips still look brand new and have remained accurate.
The steel used for the arbor and bearing housing is 1144 “Stressproof” steel. Easily machined when rigidly supported, it has good tensile strength and finishes to a nice satin finish. It is also partially hardened and has proven to stand up to its intended use quite well. I used 1.5” OD stock for the housing and ¾” for the arbor. I suggest you buy extra stock unless you are a boring and turning wizard.
If you use an aftermarket quick change tool post on a Sherline lathe, the shank of the LC must be long enough so a work piece can be machined to its end without the carriage running into the base of the tailstock. Toward this end, my LC has a 1.5” longer arbor but I found that 1” would have been more than adequate. The discussion below presumes your extension will be 1” long.
Cost:
The prorated cost for this entire project at the time it was built was about $25.00. Yup, that’s not a misprint. Check the cost of a Royal Changeable Tip Live Center set sometime.
Necessary Stuff
In terms of equipment, be sure you have:
- A 4Jaw independent chuck. Having more than one is even better. I own two for the Sherline; it makes it easier to set up for and cut Morse tapers and I used both for this project.
- A reliable dial indicator that repeats accurately and a way to attach it to the carriage that holds the tip on the spindle centerline. I suggest at least a 0.0005” indicator (but a 0.0001” indicator will be better). In addition to dialing in your chuck and checking run out you can use it to dial in a precise depth of cut that you may very well need.
- A Sherline compound slide for cutting tapers on the tips. Adjust your gibs for zero play.
- Really sharp lathe tools with a geometry you trust. You will be turning the arbor to a precise dimension and your tools need to enable you to do that. For this project, I ground a new HSS Square tool with a geometry appropriate for medium carbon steel; nose radius was ~1/64”. I honed my tool with diamond stones, then polished it with a Fine India stone, followed by a Translucent Arkansas stone to make sure it was razor sharp. This tool will accurately take a tenth off the OD in 1144 steel. At these tolerance levels, I personally would not even attempt it with inserted carbide tools.
- Boring bars with a positive lead at the tip; you are boring a blind hole so a zero lead tool will not work as well. I suggest you practice with the bar you’ll use so you know exactly how it likes to cut. I used carbide inserted tip tools because I know them well. Cobalt bars and solid carbide bars will also work just fine but try to use positive lead bars if you can. If I was going to use a solid boring bar, I would find a decent positive lead Micro 100 bar that is big enough to accurately go deep enough. I would not use those cheap Chinese brazed carbide bars; they don’t cut anywhere accurately enough, even if you sharpen them, and the steel shanks are of highly variable quality.
- A carriage stop is going to be really useful when boring and turning to precision depths. If you don’t own a stop, make one. Sherline also sells hardened rods that pass through the headstock and it functions as a stop.
- A sharp 60 degree single-flute countersink of at least ½-5/8” diameter to cut a socket in the face of the bearing housing for your tips. Although I already own countersinks in various sizes, I bought a new 5/8” MA Ford countersink just for this project; in my opinion, they are the best you can buy. The accuracy of your tips depends on an accurate taper so think real hard before using a used and possibly worn tool here.
- A sharp ¼-28 tap. Also be sure to have a sharp #1 wire size drill to make the hole for this tap. I used and recommend a piloted tap driver to thread the hole in the bearing housing for the tips; the tap must go in straight. Mine is a Walton; they made the best ones but they are no longer made new. Chinese copies are available. If you buy one, test it to make sure it drives your taps straight.
- Sherline screw cutting attachment. A die might work but you won’t be able to tailor the fit of the threads on your tips nearly as well or as straight; it is best to screw cut the threads on your tips and go for a precision fit with no play or slop. Clearly, you must tap the bearing housing first, then cut the threads on the tips to fit the threads in the housing. Use an accurately ground 60° HSS threading tool for this. I suggest 15° relief angles on both sides to greatly reduce burrs. In addition, it cuts with lower cutting forces so I feel it reduces deflection. Use a very tiny flat at the tip, maybe 1/64” across.
- A tenths-reading 0-1” & 1-2” micrometer. I highly recommend you use a Micrometer Stand to hold your mic; you only get one chance to hit the bore (per work piece) and a good stand will help to assure your readings are accurate.
- A tenths-reading bore gage. No, I’m joking. Telescoping gauges are fine for this project. Be sure you know how to use them.
- A sample 0MT tailstock taper to duplicate. You will use this to orient your headstock to turn your Morse taper on the arbor so use the newest, best-fitting one you have and work precisely. I used my live center extension as a model taper because it was almost new.
- An arbor or hydraulic press for assembly. Even a vise will work; just don’t use a hammer. You will need to make pressing adapters to fit the race involved during installation.
- For Sherline users, a leveled lathe with an accurately aligned headstock. What I mean here is that your lathe should be able to cut a taper-free work piece over a 4” length that is supported only at the chuck end; this assures that the headstock is aligned with the ways. Chuck a piece of ½ - ¾” OD 12L14 or something similar in your 3 jaw chuck; since this is a first operation turning, the chuck doesn’t matter. Using a sharp HSS turning tool, take a 0.010” deep roughing cut to remove the skin, then a 0.003” sizing cut, then a 0.001 - 0.002” deep finishing cut and go for a good finish. Then measure the OD; it should read the same all the way down the bar. If it does not, loosen the screw in front of the headstock and make an adjustment, then repeat the cuts until the headstock is aligned correctly. Note that you will be turning the headstock later on to cut the Morse taper on the tail of the arbor. Afterwards, when you realign the headstock for straight turning, you must go through this test cutting process again to be sure your headstock is aligned properly. Tedious, yes, but necessary. It helps to make witness marks on the headstock and the base so that when they are aligned, you are close and just need to fine tune the headstock position.
- For Sherline users, you will be using a parting tool to part, demarcate and cut to depth on various parts. A Sherline lathe does not part well from the front and this is especially true in tool steel and semi-hardened steel. I highly recommend you make or obtain a rear mounted parting tool holder and use sharp P-type blades. Here is the one I made. I used a P1-N blade for this project; mic the width of your tool so you know how to make allowances when you use it.
I’ve shared this article with a few others and most of them have urged me to include the following:
- We are going to be working to tolerances we usually don’t work to. This takes an uncompromising mindset, a decent skill set, good tools and patience. You can do this. You just have to learn to work carefully.
- Keep in mind that at these tolerance levels, even the temperature of the part when you take your measurements makes a difference. When you get close to your final dimensions cool the part, then measure, then cut.
- When I say to zero a part in the 4 jaw chuck I mean ZERO, not close to zero. Everything we make is held in a chuck; if a single part is not accurately dialed in, the whole tool will be off. Always deburr a part before chucking it. Unless the part is accurately turned, faced and deburred, do not butt the end up against the chuck face when locking it in your chuck. Sorry, I know this is just good practice but a lot of new guys are not aware of this sort of thing.
- When indexing your compound attachment to cut your tapers, use a magnifier to align your marks and then check it with an angle block if you can.
Building Notes:
NOTE: the dimensions cited below reflect the dimensions of my bearing. If yours differs, please make the appropriate change to suit yours.
Make the arbor:
We are not using a live center to support the work. We want the arbor to be straight with parallel sides; as long as the headstock is aligned with the ways our arbor will be straight and accurate. Working this way leaves us with just under 2” of stock hanging out of the typical 4JC chuck, which is a tiny bit over the maximum that should be hanging out unsupported so you will need to take lighter cuts using this method. An alternative work holding device is an accurate ER-32 chuck that has been tested to be true up close to the spindle. If you have one you trust, use it for its greater support.

Cut 1144 steel ¾” OD stock to 2.500” long or a little bit more so you have enough to grab securely with the chuck jaws; carefully zero this in your 4JC. Face the end you will work on first and take a 0.010” skim cut in stages on the OD until you are near the chuck. This is just to remove that dark surface finish. The actual OD is not critical; just go for a nice finish. You are sticking it this far out so that when you flip the work, you have a clean and accurate surface to grab on to that has a consistent OD so you can dial it in.
Using a parting tool, cut a groove 0.563” from the end. You need to measure the OD of your work piece and calculate the depth of the groove so it is few thou deeper than the final 0.3937” OD. Then turn the end down incrementally to 0.3937” OD to form the arbor that fits into the inner bearing race; be very careful to hit this OD dead on and strive for a good finish. The shallow groove left after the arbor is formed is intended to allow the bearing’s inner race to fit flush to the shoulder. Lightly chamfer the ends of the tip and shoulder of the arbor.
Flip the arbor, pad the jaws to protect your finish and re-zero in the 4JC. Face the end to a finished length of 2.358”. You may wish to measure your 0MT at its widest point and cut a groove to this depth with the cutoff tool, 0.795” from the end. Turn down to this diameter before angling the headstock. When cutting your 0MT, you simply turn until your cuts match the OD you just turned and you’re done.
Replace your 4JC with another 4 jaw chuck holding your 0MT sample and zero in the sample carefully, then use your indicator to angle the headstock … you do know how to do this, right? If not, sing out. Remember that the Sherline lathe uses the face of the spindle just behind the threads as a register; be sure it and the chuck is absolutely clean before installing another chuck.
Once the headstock is oriented properly, switch chucks and cut your 0MT. Again, take light cuts and strive for accuracy. Compare measurements with your sample to be sure your dimensions are accurate before breaking down. Chamfer.
Once the arbor is done, carefully realign the headstock to the ways. Test cuts, right?
The arbor is done.

Make the bearing housing: drawing is a cut-away for clarity.

- Cut your stock of 1.5”OD 1144 to ~2” long.
- Zero in the 4JC, face and turn to 1.380” OD and cut off at ~1.165” long. Be sure to deburr and lightly chamfer edges when needed so you can chuck a work piece up accurately.
- Rotate in the 4JC and very carefully re-zero, protecting the finished piece from the jaws with an aluminum or brass shim. Face to a final length of 1.153”.
- Use a sharp center or spotting drill to spot the center and drill a through hole with a sharp #1 drill without using a pilot drill. A small pilot drill will bend in harder materials and the main drill will follow that bend so go straight to the main drill to improve accuracy. Use cutting oil and keep the drill cutting continuously but try not to rush the drill – this hole needs to be straight and clean; it will be threaded ¼-28 later.
Let’s take a short break here. We’re about to bore the bearing bore so we need to be clear on what we’re doing. You first need to drill a bigger hole so you can get a decent sized boring bar in there. The Sherline lathe can usually only drill a 3/8” diameter hole before the chuck wants to break loose and spin in the Morse taper. Well, maybe ½” if you’re careful but that 0MT is not that big or strong so you’ll have to drill as big as you can and then bore from there. Be sure the tip of your drill does not go deeper than the final depth of the final bore. Once the boring bar gets in there we’ll cut the bottom flat so just get the tip of your drill down to or very close to the bottom dimension.
Now a word about boring bars. You can use a really good inserted carbide bar, a good solid carbide bar like those from Micro 100 or even a good cobalt bar like those from Borite, Bokum and other good makers. It doesn’t matter which you use provided you know how to cut with it. By that I mean you know exactly how the bar will cut for a given depth of cut that you dial in. I suggest you not assume you know this information without confirming it in practice cuts. I apologize if I’m overstating the obvious but the bearing bore is a critical dimension and you will have ONE chance at cutting it. If you miss it, you have to start over again or be willing to use Loctite to glue your bearing in place. If you glue it, I guarantee you will lose some accuracy. It is best to cut it right in the first place so do whatever you have to do to control your boring bar.
I used a Circle Machine QCMI-375-6-5R solid carbide bar and a CCBI-250-4-5R solid carbide bar to cut my bore. The larger 3/8” diameter bar used a 0.007” nose radius and was used to rough the bore. The smaller ¼” diameter bar used a 0.002” nose radius to make two final finishing passes. I knew exactly how each bar cuts because of hundreds of practice and working cuts in the past, which is why I was able to hit the bore dead on the first time. This doesn’t make me a super-machinist; it makes me a practiced one. Before boring this project, take the time to be absolutely sure that you can predict the cuts your bar will make. Whew! Talk about beating a horse to death!
I also want to emphasize the importance of a carriage stop. The way I cut a flat bottom in a precision bore is to touch off the tip of the boring bar on the outside of the work piece, then move the bar off to the side and dial in my final depth of cut, minus ~ 0.010”, and set my stop. Then I go in and rough out the bottom of the bore and get it flat. It has that coned bottom from the drill, right? You’re trying to flatten out that cone. You are not trying to make the bore larger yet so use a boring bar that will fit in the hole and just get the bottom flat. Once the bottom is flat, I come back out and re-set the carriage stop to the actual final depth and then go back in and cut off that 0.010” of material to make the bottom flat and dimensionally accurate. Then you can proceed to bore out the housing. The reason for doing it this way is so that the bar only has to cut the side wall on each boring pass. You do not want to also have to cut a lot of material on the bottom as well because that greatly increases tangential cutting forces and thereby affects the accuracy of the bar. Once you make the bottom flat in the beginning, it takes very little for your bar to keep it flat as you bore. At the very end, it takes almost no effort for the bar to clean up the entire bottom of the bore as you feed it toward the center.
As you bore, the housing will heat up. That means the material will expand and that affects your readings. When you get within one or preferably two roughing passes away from your finish passes, I suggest you stop and allow the metal to cool to ambient temperature. I usually shoot some compressed air in the bore (protect your eyes if you do this) to clear it out, then let it sit until cool. Then you can take your measurements and decide on your depths of cut to bring you to the point where you can make your final finishing passes to come in on size.
Talking about measurements, at these tolerances even a bit of cutting oil left in the bore makes a difference in your readings. Please take the time to clean the bore completely before taking a reading. I use a paper towel to wipe it clean, then another with alcohol to remove any oil, then a final one to make sure it is dry. Then I stick my telescoping gauge (with clean tips) in there and then take it to my clean micrometer to read it. I am not as anal as I seem; I am lazy and do not want to bore a piece more than once. If you doubt this makes a difference, try closing the jaws of your dial caliper and note the reading. Then wipe the jaws clean and look again. Oil and dirt makes a difference in our accuracy at very tight tolerances so we have to be meticulous in our work.
Okay, let’s move on.
I used a Nachi 5200-2RS bearing. One guy I shared this with made me aware that the only equivalent Nachi bearing he could find is the Nachi 5200-2NSL. There seems to be a difference between these two bearings. Mine had a projecting inner race and his did not. The directions below are for my bearing but if yours doesn’t have a projecting inner race then good, less work. Just bore the bearing bore in one go. Also, his bearing had rounded shoulders so a groove at the bottom of the bore was not necessary. If you get the more modern version, the 2NSL, just go to step iv below and skip step v. Butt squeezing time!
Bore the bearing bore.
- The bore is done in two stages. The inner bore is 0.020” deeper than the outer bore simply to provide clearance for the inner race once the bearing is pressed into place.
- The bearing bore will fit the bearing and has a 0.001” deep groove at its base to allow the edge of the outer race of the bearing to fully seat in the bore.
- Cut the inner bore to an ID of 1.011” X 0.603” deep. This cut is not critical but try for accuracy, just for practice.
- Cut the bearing bore to an ID of 1.1811 X 0.583” deep. This cut should be accurate. Boring to the above dimensions will give a wall thickness just under 0.100” when completed. While this is arbitrary it is thick enough to support the bearing under load and prevent distortion when the housing is used as a mandrel for shaping tips. Be sure to chamfer the center hole and inner/outer edges of the housing before unloading it from the chuck.
- Using a grooving tool, cut a shallow groove 0.001” deep at the inner end of the outer bore to allow the bearing to fully seat when pressed in. If your bearing has a radiused edge (most bearings do) you may be able to forego the groove.
- Turn the piece around, pad it and carefully re-zero in the 4JC. Cut the 60 degree taper in the center with a sharp countersink, 0.250” deep. The single-flute type countersink works well here; run it at about 200 rpm or whatever works for you. You may want to switch the belt to the higher torque pulley setting. Use lots of cutting fluid and feed heavy enough to keep the cutter cutting constantly to avoid chatter. Use lighter feed pressure while going for a nice finish at the end.
- Tap the center hole for a ¼-28 thread with a sharp tap. Use a piloted tap driver in your tailstock for this operation so it goes in dead straight.
- Shape the outer face of the housing as desired. A 60 degree angle was used here to bevel the face ~1/4” wide but here’s your chance to individualize the tool. I used the compound slide and a sharp HSS tool to cut this chamfer on the housing.
- Drill a Tommy Bar hole 0.375” deep with a #21 drill, 0.350” from the front of the housing. This hole is sized to fit the Sherline T-bar.
Make the tips:


- Cut two pieces of 5/8” OD O-1 stock 1-5/16” long and 2” long for the standard and extended tips, respectively.
- Face the ends and take a skim cut to clean up the outer surface.
- Cut a groove to the minimum diameter (0.2064” Dminor – 0.002” more for the thread relief = 0.2062”) for a ¼-28 thread, 0.250” from the end. Turn this end down to between 0.250” to 0.2435” OD; this OD is intended to enable a class 3A thread.
- Cut a 60 degree taper from the thread relief groove towards the chuck until it runs out at the outside. Brazed carbide tools work well for this but hone a tiny nose radius on it first. O-1 steel likes to rough slow and finish fast (max speed with very light finish cuts produces a near mirror finish in O-1). Use cutting oil.
- Once both blanks are prepped I suggest you zero each one in your 4 jaw chuck and screw cut the threads for a good fit in the housing. ¼-28, remember?
- Screw the blanks into the bearing housing and mark the blanks for the T-bar holes. Try to align them with the housing T-bar hole. Drill a #21 hole 0.375” deep, with the center of the hole about 0.125” beyond the end of the shank taper.
- Carefully zero the bearing housing in the 4JC, protecting it with your shims, then screw in and shape the tips. DO NOT take the housing out of the chuck for any reason until both/all tips are completed.
- Cut the shorter blank to a 60 degree taper. For the extended tip, turn the end down to 0.250” OD X 0.625” long, and cut a 60 degree taper at the tip. Reset the compound to 15 degrees and incrementally cut down to the end of the small diameter to reproduce the shape shown here. If you want a different shape, go for it.
Harden and temper your tips if desired. After hardening, especially if using Boric Acid to reduce oxidation, there is a residue that must be removed before tempering. Make a mandrel with a female ¼-28 thread at the end and chuck it in the drill press. DO NOT sand this stuff off the shank or tip tapers as this can significantly alter their geometry. Instead, use a new dry green Scotchbrite pad backed by a flat object, followed by #000 steel wool with oil and the stuff comes right off. You can polish with compound if desired, and then clean the tips with lacquer thinner to remove all oil and temper the tips to amber.
If you ever need to make new tips you can press the bearing housing off by threading in a ¼-28 threaded bolt through the front of the housing to push the arbor out. You MUST use the housing when shaping new tips.
Once all the parts were made, I used a round graver to gently round all edges. This involved just whisper-thin cuts to finish all edges. If you don’t own gravers then a fine file or sanding will work.
Assemble the LC
Make pressing adapters to fit the inner and outer race diameters.
Clean the bearing races, arbor and inner bearing bore with lacquer thinner. Cleanliness is important here. Just before installation, put a light coat of hydraulic oil on the arbor and inner bearing housing.
Press the arbor into the inner race while supporting the inner race with your adapter and then press the bearing into the housing with the outer adapter. This order allows the involved race to be fully supported as pressure is applied so that brinelling of the race surfaces is avoided.
DONE!
Testing the LC
This section is not important. I’m including it simply to show how I evaluated the LC. Please skip it if it doesn’t interest you.
My Sherline lathe was over 15 years old when this LC was made. In that time the tailstock had worn and had about 0.003” horizontal offset and about 0.001” vertical offset from the headstock according to my test bar. I had the notion that maybe I could minimize this offset by indexing the Morse Taper of the new LC in the socket of the tailstock ram. This notion came about after noticing that the Sherline adjustable LC never stayed zeroed if it was removed and replaced in the tailstock. It changed every time, which fueled my dislike for the contraption but it did raise the idea that the MT could be indexed. In any case, by turning the new LC arbor in the socket I was indeed able to find a position where there was zero runout with my test bar, meaning the headstock and LC/tailstock combination was aligned. This position was marked. The LC was removed and replaced multiple times to test the accuracy of this mark; all attempts showed zero run out on my test bar. At that point a witness line was scribed on the LC and the tailstock ram. All subsequent testing was done with the LC indexed at this mark. Indeed, the only way I could test as below was because indexing the LC eliminated all misalignment with the headstock so that any tapers in the test pieces would theoretically be due to the LC itself.
Once I finished indexing the LC, I checked static run out on the LC itself with my dial indicator by measuring run out on both tips while turning the bearing housing by hand and got zero for both tips as expected. This is how Royal tests their centers. Then I decided to do test cuts because this is how the LC would be used.
Everything you do with the Sherline tailstock can affect run out, especially with the old style tailstock that I owned. The degree to which the ram locking screw or the main feed screw is tightened, or even how hard you push the LC into the end of the stock all have an impact on accuracy. Over the years I have developed my own feel for all these things and think I am being fairly consistent. However, if there was ever an instance of stacking tolerances this is it. With that in mind, the test results that follow are as accurate as I could make them.
Prior to testing I tried to remove as many variables as possible so the results could be attributed to the LC. Before beginning this project I confirmed the lathe was level; this level state was rechecked and found to be good. The headstock was verified to be zeroed with the ways with test cuts (no LC used) before LC testing was conducted.
A 4-1/2” long piece of ½” OD precision ground mild steel was deeply buried and faced in a fairly accurate Beall ER-32 chuck (~0.0001” TIR) and a new #1 center drill was used to produce an accurate center. The rod was then removed to the 4JC where ~3-1/2” of the rod stuck out and was carefully zeroed. The LC in the tailstock was moved up for test cuts and remained in place for a series of three cuts. After those cuts, the tailstock was then moved in order to change tips but the LC was not moved in the tailstock ram.
With a freshly honed HSS cutter taking full-length 0.003” deep cuts to minimize deflection, cuts were made the full length of the 3-1/2” bar. The standard 60 degree point showed 0.0000” TIR on this bar for each of three successive cuts and the OD was the same, all the way down the bar.
Testing the extended tip after each of the three test cuts was problematic because I couldn’t directly measure it. The finest reading DI I owned at the time, a Mitutoyo 2776, only goes to 0.0005”. When testing the extended tip the reading is just barely off of zero, perhaps 10% on the way to the first tic on the dial (so about 0.00005” TIR, maybe?). However, the rules say you shouldn’t interpolate readings so I can only tell you the extended tip is somewhere between 0.0000” and 0.0005” TIR but is very close to zero. The TIR readings were consistent from cut to cut, which I interpret as indicating the TIR value is real. Given that the actual run out is about half the TIR the extended tip has an accuracy between 0.0000” and 0.00025”. Unless there is some error in my methodology this LC appears to be pretty accurate when indexed as noted.
For the sake of comparison, my OEM LC has 0.0008” TIR at best when tested this way.
Switching to a 10” long piece of 3/4” OD 12L14 that was zeroed in my 4JC, the same series of cuts was made and the TIR results were the same (0.0000 TIR) with the standard tip. I did not test with the extended tip on this larger stock because in real use I would not use that tip on stock of this size.
I then tested cuts with my 15 year old 3JC using another 1/2'” piece of steel and got zero run out with the standard tip! Run out increased to about 20% of the way between 0.0000 and 0.0005” TIR with the extended tip or double the TIR that was seen when the 4JC was used. These results surprised me but illustrated the impact a LC has on concentricity, even if the chuck is not all that accurate. Or does that mean that my old reliable 3JC is better than I thought?
After all the testing both tips showed no visible wear or marks. As expected, the tips fit the mount precisely and locked solidly when they were changed so Royal got their design right!
Conclusion
The test results indicate that this new LC is pretty accurate. More importantly, my test bar and also the lack of a measurable taper with test cuts using the standard 60° tip demonstrated that the LC, at least, is now aligned both horizontally and vertically with the spindle. This suggests that the “indexing the new MT in the old socket” maneuver had a significant impact on the results.
While every effort was made to assure accuracy in machining and testing, I think the bearing has a lot to do with the test results and I would suggest buying a quality bearing for your project. The one used here is Japanese and I think it is good enough to recommend it to you.
As for the run out of the extended tip, it may be some distortion from heat treating the longer piece or displacement from the pressure of being seated in the work piece. Regardless, the error is acceptable to me.
The new LC functioned flawlessly during testing and has remained accurate and trouble-free in use since then. It is quiet, smooth, but does warm up slightly in use. Changing tips takes only a few seconds. The standard tip is, well, a standard tip, while the extended tip allows turning to very small diameters with no cutter or tool holder interference. The whole affair is cool looking, too, in an industrial spaceship sort of way. The neat thing is that if a special tip is ever needed I can just pop the housing off and make one to precisely suit the job.
To say I am pleased with this tool is a vast understatement. Again, as with all the best tool projects the true value lies not in the tool but in the lessons learned and the skills honed. Give this one a try and you’ll see what I mean. If you do, try that “indexing the new LC in the old tailstock” maneuver thing – it might just work!
Mikey
December 2019


Changing tips is quick and easy.

As you can see, cutter and tool holder clearance with small diameters is no longer an issue.

