- Joined
- Oct 6, 2010
- Messages
- 699
Just completed a project for a friend where I repurposed some parts from an old orphaned power hacksaw to provide a 4x6 bandsaw with a better set of legs.
The friend had recently bought an older 4x6 bandsaw. It was built in Taiwan in contrast to the reportedly "cheap" mainland China versions now sold by HF and everyone else. My friend always tries to purchase made in USA but cost can prevent or delay this effort and he needed a saw now. He was happy with the quality of the saw except for the sheet metal stand.
I have included the required photos showing the progress below and tried to describe the thought process that I used or misused in some cases.
Photo #1 shows the donor power hacksaw as I received it, rusted beyond repair.
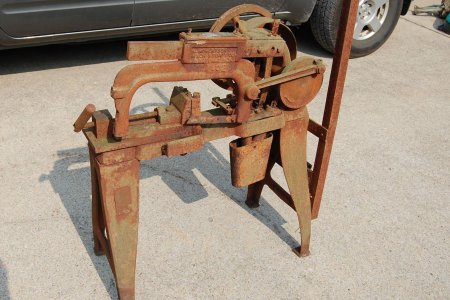
Photo #2 shows the remains of the donor hacksaw laying in the leaves waiting to donate more materials to other projects.
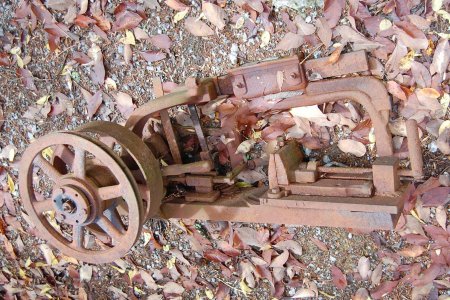
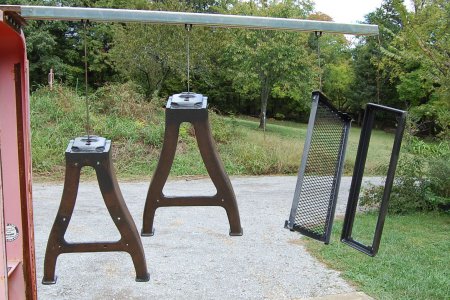
Photo #3 shows the two cast iron legs and the two additional parts fabricated to replace the sheet metal legs. The parts were hanging on the paint rack after the areas that would be hidden once assemblied had been painted. I belived all the machining operations were complete at this point....I was wrong!
I had intended to assembly all the parts after the preliminary paint dried and spray-paint the final assembly. The final assembly was where a big problem showed up. Hopefully others will learn from my mistakes. I know I did.
Up to this point only the two legs and the table top had been bolted together and everything was okay. Things had already started to go wrong but I just did not know it yet.
The problem was when the final assembly of the top, legs and shelf were bolted together it resuted in a bad twist so that one of the four feet no longer touched the floor. The leg castings were only attached to the original power hacksaw at the top with one bolt for each leg and had an unmachined boss that projected up into the cavity of the original hacksaw base. I had fabricated a new angle iron frame to serve as a mounting table for the 4x6 bandsaw base. This frame fit over these same unmachine bosses and rested on four machined pads around the upper cast bosses of each leg. The angle iron table had been welded flat/square and was bolted to the legs using 4 flat head socket screws. The twist had not been there when only the new fabricated table top was bolted in place on the legs.
Backing up a bit to where I first started to go wrong and a little about the flawed thought processes that got me there. The first mistake was when I had violated the KISS (Keep It Simple Stupid) rule and had decided it would be nice to have a lower shelf for storage and to add strength to the saw assembly. There were no machined areas on the inside vertical surfaces of the leg castings. I had noticed that the legs were not flat in that area so I took a measurement between the leg castings assembled with the new angle iron top table. This measurement was taken at the closest point which was near the vertical center axis of the legs. Figured I would make the shelf a little short and use washers to make up the difference in fit to the cast surfaces. I had then cut two pieces of angle that would just fit inside the leg castings at the level of the lower horizontal brace of each leg. There was a cast boss/ledge inside the legs at that level so the angle iron was notched to fit over these. Two hole locations were laid out on each end angle and drilled for mounting. The mounting holes in the angle iron shelf pieces were transfered to the leg castings and drilled to match. Two angle iron pieces for the other two sides of the shelf were cut and the four pieces clamped to the welding table for final welding and addition of the expanded metal shelf material. I did not see a need to perform a final assembly test of the shelf before the painting of the hidden areas so that step was skipped....a mistake! I also had failed to determine if the leg castings were symetrical about the vertcial axis....a mistake!
This gets us back to after the hidden areas of the parts were painted and allowed to dry. When I put the prepainted shelf in place for the final assembly it did not fit well at all. It set cocked and the end pieces hit the inside of the leg castings hard at opposite corners. When the shelf retaining bolts were tightened it put a twist in the stand assembly causing one of the four feet to lift off the floor. Taking the shelf retaining bolts out and taking a look I figured out that the leg castings were not symetrical about the vertical axis. Among other things one leg casting was forward and one was toward the rear when assemblied to the table top. In the original application this was not a problem as the legs only had to fit the hacksaw base at the top and sit flat on the floor at the bottom. The original application had no ties or a shelf at or near the bottom to cause a problem. In other words the machined pads on top only had to be parallel to the bottom of the four feet in order to work okay.
The lucky thing about all this was the front and rear pieces of the shelf connecting the two end pieces had been located away from the shelf corners in order to fit a smaller than planned piece of expanded metal that I had found at the scrap yard. This allowed the end pieces to be cut shorter for more coner clearance. This allowed the shelf to sit between the legs a little cocked without binding at the corners. The shelf retaing bolts were reinstalled loose with self locking nuts so as not to twist the assembly. The shelf sat fairly flat on the cast bosses and there is no danger of it falling out. Final assembly completed and paint was applied.
Photo #4 - Final painted assembly
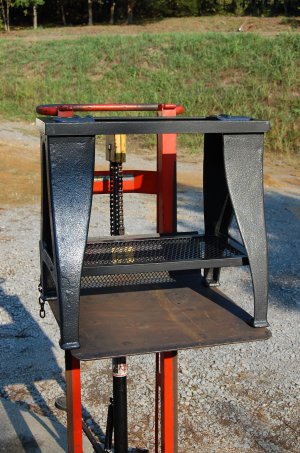
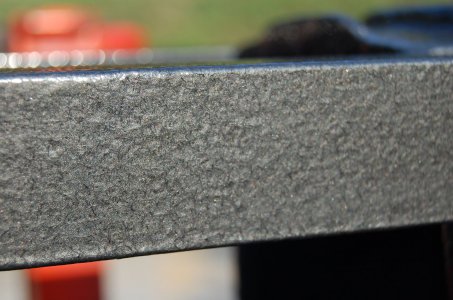
The paint used was a Rustoleum Hammered product in the Black color http://www.rustoleum.com/CBGProduct.asp?pid=159. I first learned of this paint in a post by Old Iron (Paul) when he posted photos of his drill press restore. http://www.hobby-machinist.com/showthread.php/8478-Reconditioning-The-Champion-Forge-Camel-Back-Drill-Press I liked what I saw in his photos and decided to give it a try on the saw stand. The prelinimary painting of the hidden areas was done by brush and looked so good I felt it was not worth the effort to get the paint gun out and have to clean it later so the final paint was done by brush also. The last two photos 5 & 6 show close ups of the hand brushed paint. The Hammer finish paint kind of blends the smooth angle iron surfaces and cast surfaces together.
Photo #5 - A closer look at table top and cast leg joint area
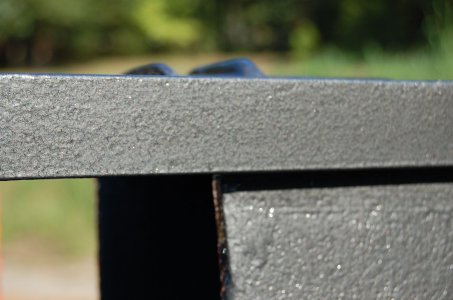
Photo #6 - An even closer look at the table top angle iron showing the "Hammered" (textured) finish.
Lessons and Things I Learned:
1. How to Tap Blind Holes in Cast Iron. For more info see: http://www.hobby-machinist.com/showthread.php/8645-Tapping-Blind-Hole-into-Cast-Iron-Question
2. Neat ideas are not always as "Simple" as they seem.
3. Don't take anything for granted when using re-purposed parts and check all dimensions and fit-up before adding neat features.
4. Check final fit-up before going to paint.
5. Learned about a new project paint.
I dropped the saw stand off with it's new owner today and he was eager to get it installed under his new-old 4x6 bandsaw as soon as he gets wheels under it. He is a beliver in wheels in his crowded shop. Even his Bridgeport has wheels.
Benny
The Orphanage Never Closes


The friend had recently bought an older 4x6 bandsaw. It was built in Taiwan in contrast to the reportedly "cheap" mainland China versions now sold by HF and everyone else. My friend always tries to purchase made in USA but cost can prevent or delay this effort and he needed a saw now. He was happy with the quality of the saw except for the sheet metal stand.
I have included the required photos showing the progress below and tried to describe the thought process that I used or misused in some cases.
Photo #1 shows the donor power hacksaw as I received it, rusted beyond repair.

Photo #2 shows the remains of the donor hacksaw laying in the leaves waiting to donate more materials to other projects.

Photo #3 shows the two cast iron legs and the two additional parts fabricated to replace the sheet metal legs. The parts were hanging on the paint rack after the areas that would be hidden once assemblied had been painted. I belived all the machining operations were complete at this point....I was wrong!

I had intended to assembly all the parts after the preliminary paint dried and spray-paint the final assembly. The final assembly was where a big problem showed up. Hopefully others will learn from my mistakes. I know I did.
Up to this point only the two legs and the table top had been bolted together and everything was okay. Things had already started to go wrong but I just did not know it yet.
The problem was when the final assembly of the top, legs and shelf were bolted together it resuted in a bad twist so that one of the four feet no longer touched the floor. The leg castings were only attached to the original power hacksaw at the top with one bolt for each leg and had an unmachined boss that projected up into the cavity of the original hacksaw base. I had fabricated a new angle iron frame to serve as a mounting table for the 4x6 bandsaw base. This frame fit over these same unmachine bosses and rested on four machined pads around the upper cast bosses of each leg. The angle iron table had been welded flat/square and was bolted to the legs using 4 flat head socket screws. The twist had not been there when only the new fabricated table top was bolted in place on the legs.
Backing up a bit to where I first started to go wrong and a little about the flawed thought processes that got me there. The first mistake was when I had violated the KISS (Keep It Simple Stupid) rule and had decided it would be nice to have a lower shelf for storage and to add strength to the saw assembly. There were no machined areas on the inside vertical surfaces of the leg castings. I had noticed that the legs were not flat in that area so I took a measurement between the leg castings assembled with the new angle iron top table. This measurement was taken at the closest point which was near the vertical center axis of the legs. Figured I would make the shelf a little short and use washers to make up the difference in fit to the cast surfaces. I had then cut two pieces of angle that would just fit inside the leg castings at the level of the lower horizontal brace of each leg. There was a cast boss/ledge inside the legs at that level so the angle iron was notched to fit over these. Two hole locations were laid out on each end angle and drilled for mounting. The mounting holes in the angle iron shelf pieces were transfered to the leg castings and drilled to match. Two angle iron pieces for the other two sides of the shelf were cut and the four pieces clamped to the welding table for final welding and addition of the expanded metal shelf material. I did not see a need to perform a final assembly test of the shelf before the painting of the hidden areas so that step was skipped....a mistake! I also had failed to determine if the leg castings were symetrical about the vertcial axis....a mistake!
This gets us back to after the hidden areas of the parts were painted and allowed to dry. When I put the prepainted shelf in place for the final assembly it did not fit well at all. It set cocked and the end pieces hit the inside of the leg castings hard at opposite corners. When the shelf retaining bolts were tightened it put a twist in the stand assembly causing one of the four feet to lift off the floor. Taking the shelf retaining bolts out and taking a look I figured out that the leg castings were not symetrical about the vertical axis. Among other things one leg casting was forward and one was toward the rear when assemblied to the table top. In the original application this was not a problem as the legs only had to fit the hacksaw base at the top and sit flat on the floor at the bottom. The original application had no ties or a shelf at or near the bottom to cause a problem. In other words the machined pads on top only had to be parallel to the bottom of the four feet in order to work okay.
The lucky thing about all this was the front and rear pieces of the shelf connecting the two end pieces had been located away from the shelf corners in order to fit a smaller than planned piece of expanded metal that I had found at the scrap yard. This allowed the end pieces to be cut shorter for more coner clearance. This allowed the shelf to sit between the legs a little cocked without binding at the corners. The shelf retaing bolts were reinstalled loose with self locking nuts so as not to twist the assembly. The shelf sat fairly flat on the cast bosses and there is no danger of it falling out. Final assembly completed and paint was applied.
Photo #4 - Final painted assembly

The paint used was a Rustoleum Hammered product in the Black color http://www.rustoleum.com/CBGProduct.asp?pid=159. I first learned of this paint in a post by Old Iron (Paul) when he posted photos of his drill press restore. http://www.hobby-machinist.com/showthread.php/8478-Reconditioning-The-Champion-Forge-Camel-Back-Drill-Press I liked what I saw in his photos and decided to give it a try on the saw stand. The prelinimary painting of the hidden areas was done by brush and looked so good I felt it was not worth the effort to get the paint gun out and have to clean it later so the final paint was done by brush also. The last two photos 5 & 6 show close ups of the hand brushed paint. The Hammer finish paint kind of blends the smooth angle iron surfaces and cast surfaces together.
Photo #5 - A closer look at table top and cast leg joint area

Photo #6 - An even closer look at the table top angle iron showing the "Hammered" (textured) finish.

Lessons and Things I Learned:
1. How to Tap Blind Holes in Cast Iron. For more info see: http://www.hobby-machinist.com/showthread.php/8645-Tapping-Blind-Hole-into-Cast-Iron-Question
2. Neat ideas are not always as "Simple" as they seem.
3. Don't take anything for granted when using re-purposed parts and check all dimensions and fit-up before adding neat features.
4. Check final fit-up before going to paint.
5. Learned about a new project paint.
I dropped the saw stand off with it's new owner today and he was eager to get it installed under his new-old 4x6 bandsaw as soon as he gets wheels under it. He is a beliver in wheels in his crowded shop. Even his Bridgeport has wheels.
Benny
The Orphanage Never Closes


