New Build in Beta - Small Bug fixes and Support for Height Setters

ycroosh

Active User
H-M Supporter - Commercial Member
Joined
Apr 4, 2013
Messages
884
Hi folks,
I just pushed another small build to beta. It has two changes:
1. Tool edit dialog "sync" button (in milling machine mode) now correctly adds the offset.
2. "Set Z Reference" dialog now supports electronic tool setters. Simply press the "Auto" button, and when the probe is triggered, the app will set the offset.

Set Z Offset.png


Regards
Yuriy
 
This is really awesome. I think this is pretty much exactly what Z-probing needs to be.

Using the top surface of the fixed jaw of my vise as a reference surface, I used my touch probe to set my Z-zero on a 0.500" gauge block, using the new "Auto" function. Then, I swapped in my 3/8" end mill, and used a half-inch pin (a broken end mill shank) to set the tool at the same 0.500" by slowly raising it until the pin just fit under. Then, in the Tool Library, I added the tool, and hit the "Synchronize" button, and BAM. Offset captured correctly.

Swapping tools and using the pin to set the height of each, I was able to add 8 tools to the library in 10 minutes. That's awesome.

I tested it by "Auto" probing on a 0.100" gauge block on the reference surface, and entering 0.100 for the "Desired Z Value". Swapped in the 3/8" end mill, selected it from the drop-down in the Tool Height Compensation dialog. I removed the gauge block, and touched the end mill to the reference surface. Z readout was 0.000".

The only difference between using this new function with a tool height setter, and a touch probe... The touch probe doesn't need a height value, as it's the master tool that all others are referenced from. The new "Set Z Reference" dialog requires a setter height, and I simply entered 0.00000000001 (effectively zero).

I know you've got the center button in the "Indicate Workpiece" dialog reserved for the magic wand auto-probing function in the Plus version, but I feel like that would be the perfect spot for a Z probe button. Add in a field to enter the desired Z value, relocate the magic want button, and you've nailed it.

Seriously, this has me super excited. Great work, Yuriy.
 
This is really awesome. I think this is pretty much exactly what Z-probing needs to be.

Using the top surface of the fixed jaw of my vise as a reference surface, I used my touch probe to set my Z-zero on a 0.500" gauge block, using the new "Auto" function. Then, I swapped in my 3/8" end mill, and used a half-inch pin (a broken end mill shank) to set the tool at the same 0.500" by slowly raising it until the pin just fit under. Then, in the Tool Library, I added the tool, and hit the "Synchronize" button, and BAM. Offset captured correctly.

Swapping tools and using the pin to set the height of each, I was able to add 8 tools to the library in 10 minutes. That's awesome.
Interestingly, I get two sorts of feedback for the tool offset library. It's either great, or completely useless. I wish I understood the different workflows better.

I tested it by "Auto" probing on a 0.100" gauge block on the reference surface, and entering 0.100 for the "Desired Z Value". Swapped in the 3/8" end mill, selected it from the drop-down in the Tool Height Compensation dialog. I removed the gauge block, and touched the end mill to the reference surface. Z readout was 0.000".

The only difference between using this new function with a tool height setter, and a touch probe... The touch probe doesn't need a height value, as it's the master tool that all others are referenced from. The new "Set Z Reference" dialog requires a setter height, and I simply entered 0.00000000001 (effectively zero).
An actual "0" should work too, I think. It just needs something that is a number.

I know you've got the center button in the "Indicate Workpiece" dialog reserved for the magic wand auto-probing function in the Plus version, but I feel like that would be the perfect spot for a Z probe button. Add in a field to enter the desired Z value, relocate the magic want button, and you've nailed it.

Seriously, this has me super excited. Great work, Yuriy.
Thank you
 
Interestingly, I get two sorts of feedback for the tool offset library. It's either great, or completely useless. I wish I understood the different workflows better.
At the most basic, I think the ideal work flow is: probe the workpiece in X, Y, and Z; select a tool from the library (which then applies all the offsets), and start machining.

I think giving the library a dedicated button in the function strip would be a more intuitive way. Tap the button, select a tool, select XY position in relation to workpiece, app applies offsets.

I realize that that's my method, and may not work for everyone, but I feel like that's a good start. I can make a video of it, if that would be helpful.

An actual "0" should work too, I think. It just needs something that is a number.
Could it default to 0? As it stands now, it's a greyed-out "0.000", which prompts the user to enter a value when the probe triggers. It seems to occasionally hold the number when I enter it, but not always.

Thank you
You're welcome. This is an awesome thing you've made.
 
Last edited:
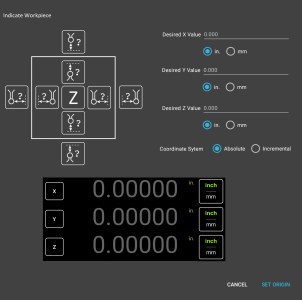
Ok, so... Spent some time in MSPaint, and cobbled together something I think would be a couple of good dialogs for indicating a workpiece, and selecting a tool.

Probe Dialog.png


I realize it's a bit... Busy. But I feel like this would be a more intuitive layout for probe direction/position.

Having the ability to probe the outside of one surface, and the inside of another along the same axis, would be super useful to locate a feature on a step.

Also, being able to specify desired values in each axis would be useful, if one is used to "working to zero".

Plus, I've often run into situations where having a real-time readout of position, while probing, would be helpful. For example, on a workpiece with a rounded end, it would be useful to find center in the Y axis, so that I knew that I was finding the true end of the part in the X axis.

I also cobbled together a "Tool Library" dialog, which I think would be accessed by a dedicated button on the function strip:

Tool Lib.png


Having these two dialogs on the function strip, would be the proverbial "cat's ass".

Again, this is a good start to what **I** feel would be an intuitive UI for probing and the tool library. I welcome any and all constructive criticism (and, obviously, Yuriy has final say in the UI design, as this is well and truly his baby).

EDIT: Also, regarding the tool library, it would be useful to have a "drill bit" option, which would essentially set the tool diameter to Zero. Drilling a hole is typically reliant on the center of the hole, rather than the radius... I know that I could just clear the tool radius offset, but it would be faster and more intuitive to just be able to select the tool, and have the offset automatically returned to spindle center.
 

Attachments

  • Probe Dialog.png
    Probe Dialog.png
    707.8 KB · Views: 39
Last edited:
Back
Top