New 3 jaw chuck with massive runout

MTodd

Registered
Registered
Joined
May 7, 2017
Messages
9
Hi all. I'm a total newbie but I finally got my lathe up and running after a full restoration. I finally had the money to get a new Shars 6" 3 Jaw chuck with a backing plate for it. The chuck advertises 0.003" TIR. I turned down the backing plate as it was threaded on the spindle and verified with my indicator that it runs completely true on both the face and on the edge of the registration. After bolting the chuck to the backing plate, I can verify the face of the chuck runs true but I've got 0.014" run out with a piece of 3/4" O1 stock chucked up.

I tried unbolting the chuck and rotating it around the backing plate to all three mounting positions. Each mounting position has the same 0.014" run out. I tried loosening the bolts and tapping the chuck with a rubber mallet but the run out is still 0.011".

Would it be acceptable to turn 0.005" off the registration on the backing plate and then place a suitable shim on one side (or multiple places)? Would this correct the run out and actually be a workable, long term solution? Or would I just ruin the backing plate. I don't have the capabilities to grind the jaws but I would like to get this chuck to be at the 0.003" TIR as advertised without having to deal with an attempt at returning the chuck and having Shars tell me that I didn't turn the backing plate to the correct dimensions and refuse to fix the issue.

Included for your enjoyment: 1944/5 Craftsman Lathe powder coated in mint turquoise with black accents. As a side note, the lathe was given to me by my old neighbor when he went out of business. Hadn't been used in probably 25 years and was rusty as could be. It has/had a few parts missing so I'm trying to get it tooled up and in as good as working condition as I can get it.
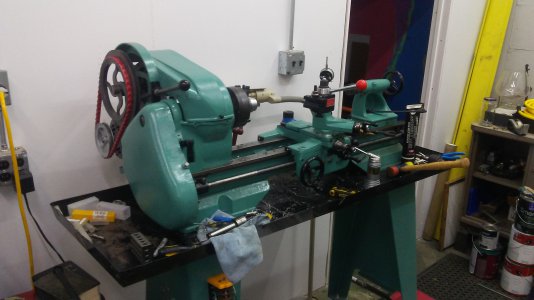
0115210932.jpg

Thanks in advance for your help with ideas on how to get the chuck to be more concentric.
 
Before you do anything else, lock a piece of something and turn it down a bit so the diameter is consistent. Try for a decent finish. Then mount an indicator and check run out again without removing it from the chuck. It should be zero TIR. If that is so then your 3 jaw is working exactly as it should.

A 3 jaw is meant for first operations work, meaning it will turn a work piece accurately the first time you turn it. If you dismount the turned piece and try to remount it or try to mount another already turned piece then the chuck will run out big time. This is just how scroll chucks work. If you must turn an already turned work piece or one that is accurately ground, use a 4 jaw or collet chuck.

Anyway, try this suggestion and report back.
 
Last edited:
Before you do anything else, lock a piece of something and turn it down a bit so the diameter is consistent. Try for a decent finish. Then mount an indicator and check run out again without removing it from the chuck. It should be zero TIR. If that is so then your 3 jaw is working exactly as it should.

A 3 jaw is meant for first operations work, meaning it will turn a work piece accurately the first time you turn it. If you dismount the turned piece or try to mount another already turned piece then the chuck will run out big time. This is just how scroll chucks work. If you must turn an already turned work piece or one that is accurately ground, use a 4 jaw or collet chuck.

Anyway, try this suggestion and report back.
I've turned down some stock and get 0 run out. I understand that if I need to partially turn down a piece of stock and then rechuck to turn down the other end that I should use my 4-jaw. The main issue is that I have to turn too much off a piece of stock before it runs true. If I need to turn something to .490", I'd have to buy 5/8" stock and chew 0.135" off versus being able to use 1/2" stock.

While I won't be making high precision parts with this lathe, the added cost of wasted material and added time of additional passes or changing to the 4 jaw chuck is of concern to me. The 3 jaw chuck will be used (if I can get the run out down to a more acceptable number) to make 95% of what I plan on using this lathe for.

Thank you for the reply.
 
The run out should be less given everything you have done and the chuck should meet spec. It sounds like the chuck jaws may not be ground concentrically or scroll is off, you could also have some axial skew either because jaws are not ground properly or head-stock alignment. I would chuck up some round bar, put a dial indicator on you cross slide and adjust it so the +/- swing aganist the round rod is the same at the chuck and then check it going down the bar. If it stays relatively the same then the chuck/jaws is off center, if it increases in one direction then you have skew. Can also have a combination of both. Also check the run out with different diameter round stock and mark on the chuck the high and low spot with some tape. If it repeats in the same place with different diameter stock then the jaws are off center assuming the back plate and body are concentric.

Since most stock is slightly oversized, I still think it is reasonable to get your 3J to have a TIR of under 0.003" to optimize use of stock.

Two options, return the chuck, or increase the registration step and use the tap method until it is centered and then tighten the mounting bolts.
 
I've turned down some stock and get 0 run out. I understand that if I need to partially turn down a piece of stock and then rechuck to turn down the other end that I should use my 4-jaw. The main issue is that I have to turn too much off a piece of stock before it runs true. If I need to turn something to .490", I'd have to buy 5/8" stock and chew 0.135" off versus being able to use 1/2" stock.

There is nothing wrong with your chuck. It works as a 3 jaw should. If the work piece must have a consistent diameter all the way down the part then you have to either start with a longer work piece in the 3 jaw or use a 4 jaw on a shorter piece. That is just the way it is.
 
Where in Houston are you located? I live on the West side of town, about a mile north of I-10 and 1/4 mile SE of the intersection of BW8 and Hammerly Blvd.

I am afraid that your only viable solution if the problem is actually the chuck is going to be to return it to Shars. Mikey is correct that you can't normally expect to get 0.000" runout with a solid-body 3-Jaw chuck. But if they advertise 0.003 Max, then 0.014" is definitely excessive. But first there are some more checks that you should make.

First, confirm that each jaw is in its correct slot. Both the slots and the jaws should be numbered from 1 to 3.

Then set up a dial indicator and measure the runout of the spindle register. While you are at it, measure the runout of the 3MT taper, although that has nothing to do with the chuck runout.

Mount a dog driver plate (often incorrectly called a drive plate) on the spindle. Mount a dead center in the spindle and a live center in the tailstock ram. Install a dog on a precision test bar and mount the bar between centers. Check its runout at three or four places and if not 0.000" rotate it relative to the spindle and adjust for minimum. Match-mark spindle or drive plate and bar. Then either video tape it or photograph it. Remove the back plate from the chuck, dismount the test bar, and mount it in the chuck. Finally, re-mount the bar and chuck between centers and indicate the register area on the rear of the chuck. Assuming that the bar has no runout and the back plate was perfectly made, you should get 0.014" runout on the chuck register. Photograph this for the record and send the chuck and the photographs all back to Shars.

I would suggest that you spend the extra bucks and buy a Buck-style chuck with 2-piece jaws.
 
Last edited:
Agreed that .014'' runout is a bit too much even for a budget scroll chuck.
If you have the back plate proven true and to dimension, with the chuck mounted properly, check runout on the outside circumference of the chuck. Run out on the body of the chuck would indicate to me that the chuck is defective.

If run out is low on both the face and outside of the chuck but you still have a lot of run out in the work being held then the next thing to do is disassemble the chuck completely and inspect the parts.
Remove any burrs and make sure its clean. We can not rely on the manufacturer of a budget chuck to use the same care as we do. Anyway we must prove our assumption that the guts of the chuck are clean before moving on.
 
Last edited:
Would it be acceptable to turn 0.005" off the registration on the backing plate and then place a suitable shim on one side (or multiple places)? Would this correct the run out and actually be a workable, long term solution?
Yes it would although you would not need to shim it. Once there is enough clearance in the index to tap the chuck into position for the work being held, then properly torqued bolts are enough to hold the chuck where you set it.

BTW nice job on the lathe, looks like you had fun, welcome to the forum.
 
Great looking lathe, well done!

I'm with @Tozguy on this.
I would not accept 14 thou run-out.
....and I would not be surprised if you found some manufacturing debris inside the chuck.

-brino
 
I would check to see if the chuck jaws are in the correct position. Next, I would try rotation the jaws in the chuck; moving jaw 1 to position 2, jaw 2 to position 3, and jaw 3 to position 1and recheck runout. Rotate once more and check runout. This should not make a significant difference but it may make some improvement.

I would call Shars and describe your concern. A chuck advertised as .003" TIR max shouldn't have .014" TIR. Before calling, you should document all you have done. Rather than stating zero runout for the back plate, give a number; i.e. less than .0005" for example. Give numbers for your runout measurements, including the distance from the chuck.

I would check radial and axial runout on the back plate and remove the backplate and remeasure. If there was an issue with the back plate and its mating with the spindle, you should see it then.

I would also mark a chuck jaw and the test pin with a reference mark. When you measure the TIR make a mark on the pin at the point of maximum reading. Rotate the pin 180º and repeat. If the maximum reading mark rotates with the pin. it is the pin that is at fault. If the mark remains at the same orientation relative to the reference mark on the chuck jaw, it is the chuck that is at fault.

All this will indicate to Shars that you have a legitimate issue and they will be more likely to work with you to correct the situation.
 
Back
Top