- Joined
- Oct 30, 2019
- Messages
- 225
Hi team,
This past weekend I was out at a persistent yard sale type of place near home, and found a compressor between two of the owner's outbuildings, near some of the decor/items they were selling. I asked the owner if he was selling it - he said he wasn't, but he would sell it for $400. He said the story we've all heard before -- last he knew it ran, it had been sitting for 4-5 years, he stopped using it because he didn't need one so big.
I asked him if I could go get my truck and some tools, and if he could move it closer to his breaker panel so I could test it. He said sure, he had a forklift and it was sitting on a pallet. He mentioned he had an open 30a breaker but I'd need to bring some wire.
I popped home after we were done browsing, grabbed various hand tools and borrowed the 10/4 cable from my generator cordset, and headed back.
Unfortunately after 15 minutes, I found the following:
- He had an equally large compressor in his shop near the breaker panel....
- Cloudy oil full of water
- After removing the belt, the compressor would not make a full turn by hand (suspected rust in one of the cylinders)
- In the junction box, the wire nuts were melted right off the junctions...
- and the tank had at least 14 inches of water in it (water came out the plumbing that was near the bottom of the tank, and the drain cock was mostly clogged)
My prognosis was that it may have had a bad capacitor, failed to start, and sat drawing locked-rotor current long enough to burn something up in the motor.
I told him with all this, I wasn't going to try putting power on it, it would damage the compressor or burn up what is left of the motor. I offered him $50, because I could spend more time on it at home, and worst case make a smoker out of the tank.
He agreed, since it had been sitting and I showed him evidence of all these issues (including one of the capacitors being substantially out of spec)
We loaded it up, I got it home, and spent the next few days dabbling with it. There were of course 4 main things to figure out, in roughly this order:
- Can the compressor be repaired?
- Will the motor run?
- Can the tank safely hold pressure?
- Can the compressor build sufficient pressure?
Loaded up in the trailer - dropped in with his forklift (I also bought a few tools he had in his barn-o-crap for sale, an older set of 18" bolt cutters, vise grips, and small Krauter lineman pliers)
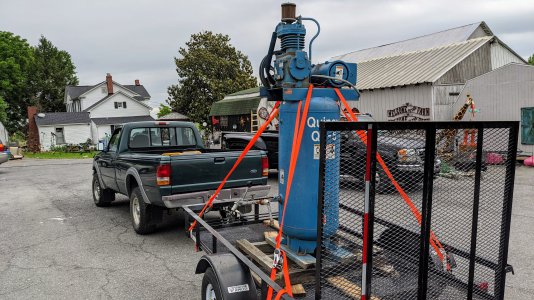
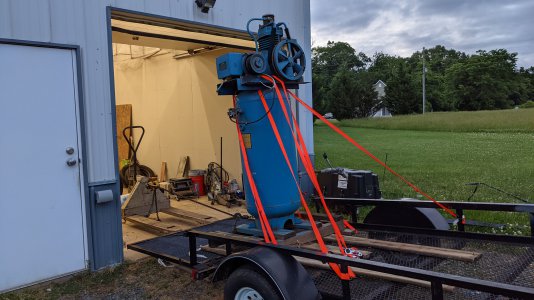
Once home, I was going to leave it on the trailer for a few days until I had my chain hoist set up to lift it off the trailer. However, we ended up picking up some free used lumber from someone locally and needed the trailer for that. So I used a manual winch to slide the compressor out of the trailer and onto my pallet jack - the tailgate of the trailer was resting on a pallet to keep the incline shallower, and I raised the pallet forks up to meet the compressor's pallet sliding out. Doing this myself, I used ratchet straps to limit the possible travel at a single point in time, in case the compressor started to tip towards me. Slow and steady, but limited personal risk...
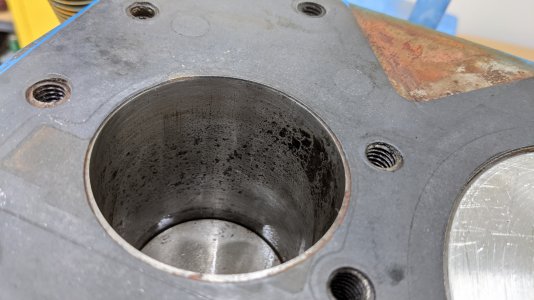
I was eager to get my answer about the compressor, and sure enough, the 2nd-stage bore was rusted and limited rotation of the crank
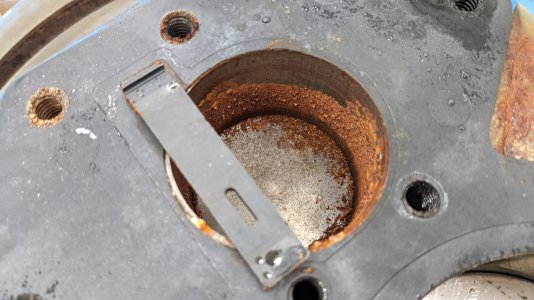
I let that sit with some rags soaked in evaporust. While that was sitting I turned my attention to the motor.
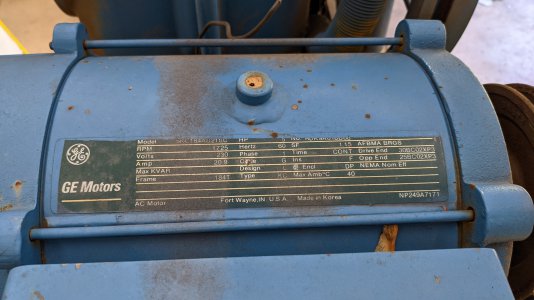
Here are the melted wire nuts. I was optimistic when I realized that the conductors leading to the windings themselves did not feel brittle as if they had been overheated. The feed wire coming in was 8ga aluminum -- I started to wonder if their under-sized wire nut was leading to a poor connection and arcing/overheating, at least once the motor aged? Maybe the motor is ok....
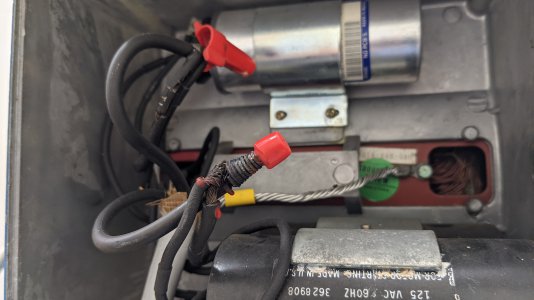
I tested the windings, and found what seemed like reasonable resistances. I believe it was approximately 1.8 ohms and 3.2 ohms -- seems reasonable for a start winding and main winding? The 2 older capacitors tested within spec, but the newer metal one at the top was out of spec though not completely open or shorted.
Good enough to try giving it a run. But wait a minute.... the compressor needs to rotate CCW. The motor, when I received it, was wired for CW rotation. Odd, another indicator the previous owner may not have taken proper care when making changes or repairs to this over time. Maybe this got shelved due to some misunderstanding or concern and not catastrophic failure?
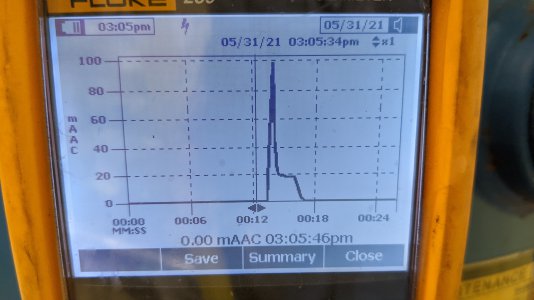
Testing the motor with the belt off, and I had to bypass the pressure switch which is in need of TLC or replacement -- 100a inrush, 19a no load. A bit high for a motor rated at 21 FLA, but it runs -- and perhaps either the centrifugal switch is stuck or the capacitor being out of spec is causing inefficiency; both warrant further investigation later.
So the motor is healthy enough, let's look back to the compressor.
After evporust rag treatment (which I was too impatient for), I hit it with a stainless steel brush and then a small engine cylinder hone with some penetrating oil as lubricant. I stopped a couple times to freshen up/unclog the stones on a coarse diamond stone. This turned out reasonably. I went over it 5-10 times with light oil and a rag, turning the compressor by hand to try and get as much rust and stone debris out of the cylinder and rings. If this runs well and I can get a gasket set for this compressor, I'll pull it apart and give it a proper cleaning further in the future.
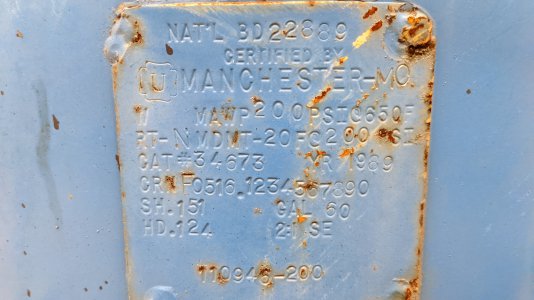
So now the tank. Rated for 200 psi MAWP (the compressor was rated for 175 psi cut-out when it was new), I am skeptical of trusting a pressure vessel this large inherently. I wanted to use Keith Rucker's approach -- using water and a pressure washer to DIY re-certify it. I decided I would like to take it up to 225-250psi in such a test.
Long story short, I set it up with a 3/8 pressure washer quick connect adapted onto the outlet hardware. I disconnected the tank inlet and pressure switch, replacing them with a plug and reliable gauge, respectively. Filling the tank from the pressure washer, I closed the top plug once water started coming out. At 1atm I estimate I had well under 1/2 gallon of air remaining in the system. At 200+ PSI, this was a level of stored energy I was ok with albeit still leery of.
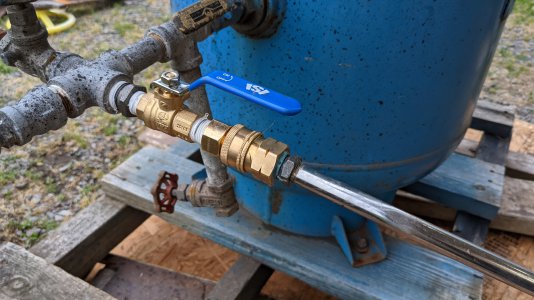
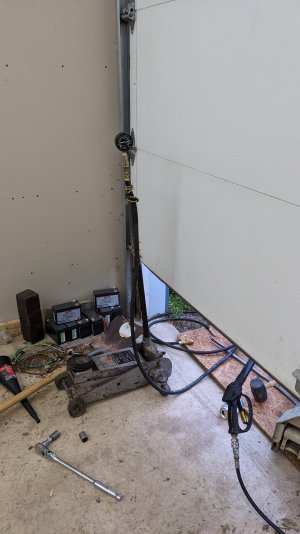
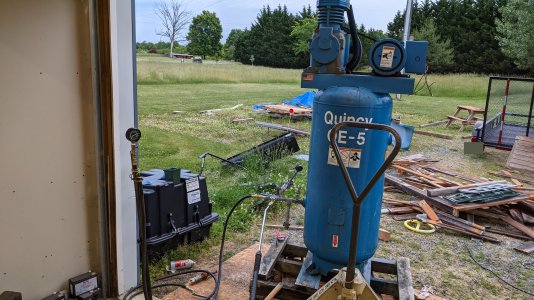
The compressor was moved just outside the garage for the test, so I ran a 3/8 hose to a compression tester gauge just inside the door. I built ~40 psi of pressure and confirmed that the two gauges agreed, to avoid any bad readings/assumptions about the state o the system.
With earplugs, a face shield, a heavy shop apron, and a garage door as protection - I built pressure to ~240 psi and let it hold for 20 minutes before relieving pressure and draining the tank
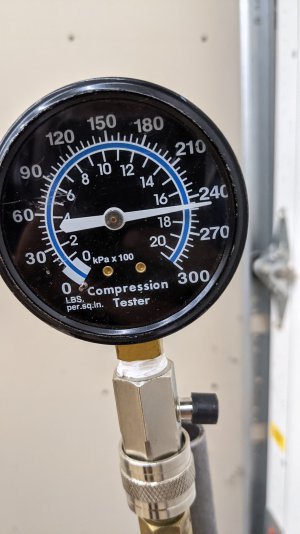
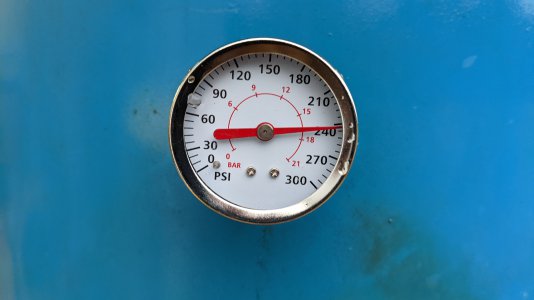
OK! All major components are showing promise.
The last step is to test the system -- can the compressor build respectable pressure?
As the water was draining out of the tank, I started reattaching the compressor to the tank and running power from the breaker panel back to the motor.
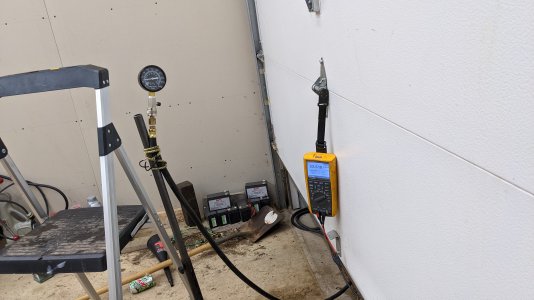
Assuming the same position behind the garage door, but this time with the multimeter showing the current as load built (so I could cut it off if it became unhealthy), I began running the compressor. There was one false start where the safety valve or the unloader valve on the pressure switch (which I had reattached) started leaking around 100psi, so I removed them again and plugged that orifice temporarily instead. Resuming my position in the garage, behind a structural element next to the garage door -- just in case...
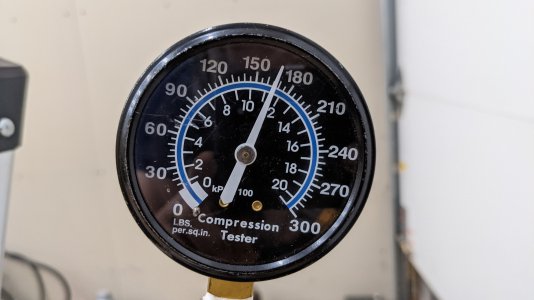
Built pressure steadily to 160psi -- and it held, as it should after the 240psi water test.
I bled off some pressure and ran the compressor more, with the dipstick removed from the crankcase. I did not feel any significant blowby coming out - just a pulse due to the asymmetric piston sizes between the separate stages.
So at this point I should have a working compressor, which I'll probably run 125/150 psi instead of the original 175 psi that it was rated for in 1989.
Remaining steps:
- A couple oil changes to eliminate the moisture from the crankcase
- New belt and filter, then reinstall guards (Which I do have, but were removed during inspection at the seller's place)
- The motor drew more current than I'd like under load, up to 28-29 amps. I will get a new capacitor for the one I am skeptical of, and see if I can find specs for the windings in this motor. The motor bearings feel/sound fine.
- Pressure switch is missing its cover and needs cleaning+adjustment after being exposed to the elements. I will probably replace it instead
- One or both safety valves may need to be replaced. I may do this anyway, since I'd install 175 psi safety valves (it probably came with 200, and after being exposed to the elements for years I'm not sure I want to trust them).
- I have talked to a Quincy dealer about parts availability and am seeing if I can get a gasket set so that I can tear this down for full cleaning of the 2nd stage cylinder+rings without worrying about damaging the gaskets. However, this is expensive and may not be readily available -- so we'll see.
- I would like to time how long it takes to build from 0 to 50psi and see if it gets better over the coming weeks (rings conforming to the 2nd stage cylinder after honing), or worse (I left behind grit/debris that is damaging the cylinder), but this difference may be too little to measure.
- When I get ready to plumb this into the shop, I'll pull the previous owner's output plumbing off and stick a borescope in to see what the inside of the tank looks like. Hopefully we'll see surface rust and no major flaking or structural risk.
Thanks for reading, I am open to any constructive criticism and welcome any insight/knowledge!
This past weekend I was out at a persistent yard sale type of place near home, and found a compressor between two of the owner's outbuildings, near some of the decor/items they were selling. I asked the owner if he was selling it - he said he wasn't, but he would sell it for $400. He said the story we've all heard before -- last he knew it ran, it had been sitting for 4-5 years, he stopped using it because he didn't need one so big.
I asked him if I could go get my truck and some tools, and if he could move it closer to his breaker panel so I could test it. He said sure, he had a forklift and it was sitting on a pallet. He mentioned he had an open 30a breaker but I'd need to bring some wire.
I popped home after we were done browsing, grabbed various hand tools and borrowed the 10/4 cable from my generator cordset, and headed back.
Unfortunately after 15 minutes, I found the following:
- He had an equally large compressor in his shop near the breaker panel....
- Cloudy oil full of water
- After removing the belt, the compressor would not make a full turn by hand (suspected rust in one of the cylinders)
- In the junction box, the wire nuts were melted right off the junctions...
- and the tank had at least 14 inches of water in it (water came out the plumbing that was near the bottom of the tank, and the drain cock was mostly clogged)
My prognosis was that it may have had a bad capacitor, failed to start, and sat drawing locked-rotor current long enough to burn something up in the motor.
I told him with all this, I wasn't going to try putting power on it, it would damage the compressor or burn up what is left of the motor. I offered him $50, because I could spend more time on it at home, and worst case make a smoker out of the tank.
He agreed, since it had been sitting and I showed him evidence of all these issues (including one of the capacitors being substantially out of spec)
We loaded it up, I got it home, and spent the next few days dabbling with it. There were of course 4 main things to figure out, in roughly this order:
- Can the compressor be repaired?
- Will the motor run?
- Can the tank safely hold pressure?
- Can the compressor build sufficient pressure?
Loaded up in the trailer - dropped in with his forklift (I also bought a few tools he had in his barn-o-crap for sale, an older set of 18" bolt cutters, vise grips, and small Krauter lineman pliers)

Once home, I was going to leave it on the trailer for a few days until I had my chain hoist set up to lift it off the trailer. However, we ended up picking up some free used lumber from someone locally and needed the trailer for that. So I used a manual winch to slide the compressor out of the trailer and onto my pallet jack - the tailgate of the trailer was resting on a pallet to keep the incline shallower, and I raised the pallet forks up to meet the compressor's pallet sliding out. Doing this myself, I used ratchet straps to limit the possible travel at a single point in time, in case the compressor started to tip towards me. Slow and steady, but limited personal risk...

I was eager to get my answer about the compressor, and sure enough, the 2nd-stage bore was rusted and limited rotation of the crank

I let that sit with some rags soaked in evaporust. While that was sitting I turned my attention to the motor.

Here are the melted wire nuts. I was optimistic when I realized that the conductors leading to the windings themselves did not feel brittle as if they had been overheated. The feed wire coming in was 8ga aluminum -- I started to wonder if their under-sized wire nut was leading to a poor connection and arcing/overheating, at least once the motor aged? Maybe the motor is ok....

I tested the windings, and found what seemed like reasonable resistances. I believe it was approximately 1.8 ohms and 3.2 ohms -- seems reasonable for a start winding and main winding? The 2 older capacitors tested within spec, but the newer metal one at the top was out of spec though not completely open or shorted.
Good enough to try giving it a run. But wait a minute.... the compressor needs to rotate CCW. The motor, when I received it, was wired for CW rotation. Odd, another indicator the previous owner may not have taken proper care when making changes or repairs to this over time. Maybe this got shelved due to some misunderstanding or concern and not catastrophic failure?
Testing the motor with the belt off, and I had to bypass the pressure switch which is in need of TLC or replacement -- 100a inrush, 19a no load. A bit high for a motor rated at 21 FLA, but it runs -- and perhaps either the centrifugal switch is stuck or the capacitor being out of spec is causing inefficiency; both warrant further investigation later.

So the motor is healthy enough, let's look back to the compressor.
After evporust rag treatment (which I was too impatient for), I hit it with a stainless steel brush and then a small engine cylinder hone with some penetrating oil as lubricant. I stopped a couple times to freshen up/unclog the stones on a coarse diamond stone. This turned out reasonably. I went over it 5-10 times with light oil and a rag, turning the compressor by hand to try and get as much rust and stone debris out of the cylinder and rings. If this runs well and I can get a gasket set for this compressor, I'll pull it apart and give it a proper cleaning further in the future.

So now the tank. Rated for 200 psi MAWP (the compressor was rated for 175 psi cut-out when it was new), I am skeptical of trusting a pressure vessel this large inherently. I wanted to use Keith Rucker's approach -- using water and a pressure washer to DIY re-certify it. I decided I would like to take it up to 225-250psi in such a test.

Long story short, I set it up with a 3/8 pressure washer quick connect adapted onto the outlet hardware. I disconnected the tank inlet and pressure switch, replacing them with a plug and reliable gauge, respectively. Filling the tank from the pressure washer, I closed the top plug once water started coming out. At 1atm I estimate I had well under 1/2 gallon of air remaining in the system. At 200+ PSI, this was a level of stored energy I was ok with albeit still leery of.

The compressor was moved just outside the garage for the test, so I ran a 3/8 hose to a compression tester gauge just inside the door. I built ~40 psi of pressure and confirmed that the two gauges agreed, to avoid any bad readings/assumptions about the state o the system.
With earplugs, a face shield, a heavy shop apron, and a garage door as protection - I built pressure to ~240 psi and let it hold for 20 minutes before relieving pressure and draining the tank


OK! All major components are showing promise.
The last step is to test the system -- can the compressor build respectable pressure?
As the water was draining out of the tank, I started reattaching the compressor to the tank and running power from the breaker panel back to the motor.
Assuming the same position behind the garage door, but this time with the multimeter showing the current as load built (so I could cut it off if it became unhealthy), I began running the compressor. There was one false start where the safety valve or the unloader valve on the pressure switch (which I had reattached) started leaking around 100psi, so I removed them again and plugged that orifice temporarily instead. Resuming my position in the garage, behind a structural element next to the garage door -- just in case...

Built pressure steadily to 160psi -- and it held, as it should after the 240psi water test.

I bled off some pressure and ran the compressor more, with the dipstick removed from the crankcase. I did not feel any significant blowby coming out - just a pulse due to the asymmetric piston sizes between the separate stages.
So at this point I should have a working compressor, which I'll probably run 125/150 psi instead of the original 175 psi that it was rated for in 1989.
Remaining steps:
- A couple oil changes to eliminate the moisture from the crankcase
- New belt and filter, then reinstall guards (Which I do have, but were removed during inspection at the seller's place)
- The motor drew more current than I'd like under load, up to 28-29 amps. I will get a new capacitor for the one I am skeptical of, and see if I can find specs for the windings in this motor. The motor bearings feel/sound fine.
- Pressure switch is missing its cover and needs cleaning+adjustment after being exposed to the elements. I will probably replace it instead
- One or both safety valves may need to be replaced. I may do this anyway, since I'd install 175 psi safety valves (it probably came with 200, and after being exposed to the elements for years I'm not sure I want to trust them).
- I have talked to a Quincy dealer about parts availability and am seeing if I can get a gasket set so that I can tear this down for full cleaning of the 2nd stage cylinder+rings without worrying about damaging the gaskets. However, this is expensive and may not be readily available -- so we'll see.
- I would like to time how long it takes to build from 0 to 50psi and see if it gets better over the coming weeks (rings conforming to the 2nd stage cylinder after honing), or worse (I left behind grit/debris that is damaging the cylinder), but this difference may be too little to measure.
- When I get ready to plumb this into the shop, I'll pull the previous owner's output plumbing off and stick a borescope in to see what the inside of the tank looks like. Hopefully we'll see surface rust and no major flaking or structural risk.
Thanks for reading, I am open to any constructive criticism and welcome any insight/knowledge!
Last edited:
