Need To Rivet Handles. No Clue On Hand Riveting.

countryguy

Active User
Registered
Joined
May 7, 2014
Messages
776
Hi all. We're about to put on some handles onto the kids axe project. Oak for now, but we have hickory and resin pours lined up also. We have qty-3 1/4" holes up the handle to put in a rivet set.

Can we just put in solid rivets and hammer them down w/ a rivet set of some type? I see Copper, steel and Stainless steel types (link below of what we're thinking). I'm not sure we could hammer down stainless or steel rivets. Or can we?
http://rivetsonline.com/1-4-solid-rivets-non-aluminum.html

If you know of something that puts the head on rivets I'm interested to learn any new terms or vendors out there.
I had no clue there were so many types of rivets! WOW!~
 
Last edited:
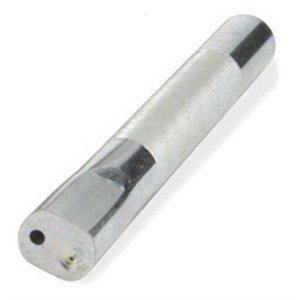
Rivet setters aren't real exspensive . But they work well I use them doing leather , the copper rivets or brass ones peen over pretty well with the setter and a ball pein hammer aluminum will too. Steel ones should be a little more pounding but if you take your time they will outlast most any other holding devise. Plan on using an anvil or heavy piece of steel or iron to pound on . Don't even try using wood or anything that bounces. Match the setter to the size rivet you pick !
 
When setting rivets, use lighter blows as heavy blows tend to bend the rivet shank or split the oak. I made my own sets.I had to replace about a hundred rivets on an aluminum boat once and made my own sets. I had a helper outside buck up the back side of the rivet while I formed the head on the inside. It must have worked because that was thirty years ago and it still doesn't leak.

If this is decorative as well as functional (as opposed to something like a shovel handle), I would use copper, brass, or stainless. Copper or brass will definitely be easier than stainless but stainless is not impossible.
 
If I understand from your earlier posts, these will be wood slabs on the side of a metal handle, right? Same as knife handles, of which I have done many. You should use an adhesive under the wood, a relatively thin 30 minute epoxy, for example. The combination of epoxy and rivit is much stronger than either alone. Plain pins work well too when epoxied in place.

When using solid stock for rivits in wood handles, flaring any but the very ends WILL split the wood in short order. Don't ask how I know...

There is no need to use solid dome head rivits unless you just have a bunch for free. Cut soft round rod stock for the size holes you have drilled. The fit should be slightly tight as the wood will spring back a tiny bit. Tap into place. With "rivit" in position and backed solidly you can:

A) Lightly tap the end with a ball peen to mushroom the head. This will leave a slight dome in your grip
B) If you cut almost exactly to length use a very sharp chisel and lightly tap into the end of the rivit. Rotate and repeat. The succession of lines from the chisel will slightly flare the end in a slow and controlled manner. This is easier to prevent split handle slabs.

Repeat either on the other side. Voila, homemade rivits.

The previously pictured headspinner for doming them also works with round stock. I personally like the hammered look over the smoothed dome look.

You can also try cutlery style rivits. Very easy to use if you have the proper countersink drill but can be done with standard drill bits if you are careful.
http://www.texasknife.com/vcom/index.php?cPath=52_36_621
 
Thanks a ton! Exactly the info we were looking for. We are so close on this project and have learned so so much from folks like yourself who share and offer help!

On the epoxy: We have some product called west epoxy? It is a two part marine adhesive it seems. The kid says everyone uses it on youtube :) I hope that will work as we have a gallon of the stuff!

On the river process: I was wondering if we should do a flat countersink of 3/16 or so and place a small washer to help keep the splitting down as the river head is mushed down into the cavity ? Then when mushroomed over, I thought it could be ground smooth and flat. I guess like a cutlery handle. I will check out the link. Thanks again. I have a lot of respect now for the quality knife makers out there! I can see why this is so popular. And a very cool stress reliever.

On the handle: any suggestions on a good handle material for axes? Wood is free and cheap. So we went with that but want to make something with the epoxy. Just not sure how.

....and tomorrow will be another day I learn something new.

Jeff and Mitch.

If I understand from your earlier posts, these will be wood slabs on the side of a metal handle, right? Same as knife handles, of which I have done many. You should use an adhesive under the wood, a relatively thin 30 minute epoxy, for example. The combination of epoxy and rivit is much stronger than either alone. Plain pins work well too when epoxied in place.

When using solid stock for rivits in wood handles, flaring any but the very ends WILL split the wood in short order. Don't ask how I know...

There is no need to use solid dome head rivits unless you just have a bunch for free. Cut soft round rod stock for the size holes you have drilled. The fit should be slightly tight as the wood will spring back a tiny bit. Tap into place. With "rivit" in position and backed solidly you can:

A) Lightly tap the end with a ball peen to mushroom the head. This will leave a slight dome in your grip
B) If you cut almost exactly to length use a very sharp chisel and lightly tap into the end of the rivit. Rotate and repeat. The succession of lines from the chisel will slightly flare the end in a slow and controlled manner. This is easier to prevent split handle slabs.

Repeat either on the other side. Voila, homemade rivits.

The previously pictured headspinner for doming them also works with round stock. I personally like the hammered look over the smoothed dome look.

You can also try cutlery style rivits. Very easy to use if you have the proper countersink drill but can be done with standard drill bits if you are careful.
http://www.texasknife.com/vcom/index.php?cPath=52_36_621
 
while not an epoxy expert by any means I use to sell the stuff and all the honcho boat builders came to buy from the store I worked in. I certainly learned more from the customers than they did from me about epoxy. Long story short West are the outfit to trust. Check out their website or call for help, they are the go to pros.

michael
 
Hi all. We're about to put on some handles onto the kids axe project. Oak for now, but we have hickory and resin pours lined up also. We have qty-3 1/4" holes up the handle to put in a rivet set.

Can we just put in solid rivets and hammer them down w/ a rivet set of some type? I see Copper, steel and Stainless steel types (link below of what we're thinking). I'm not sure we could hammer down stainless or steel rivets. Or can we?
http://rivetsonline.com/1-4-solid-rivets-non-aluminum.html

If you know of something that puts the head on rivets I'm interested to learn any new terms or vendors out there.
I had no clue there were so many types of rivets! WOW!~

No problem using steel rivets, just need some mild steel stock, common nails do fine and have head already formed on one end, just cut 1/4" longer than the thickness of the head. The trick to manual cold riveting is to use a light hammer, maybe 8oz, place the head end on a vise or steel block and use multiple light blows. Blows with a heavy hammer transmit the energy deeper and would bend the rivet inside the wood. You want to deform only the end you are hitting so light blows will do the trick. If you have a ball peen hammer use the flat face to mush the head and finish with the ball face around the edges to dome it.

Bought mild steel or 316 stainless rivets work the same way, copper is likely to be softer and and the contrast may look prettier.

If you want to get more deeply into riveting an air hammer (chisel) is useful. I have repaired many riveted aluminum boats with one. For dome head rivets this needs a bit with a hollow in the end which can be bought or reworked from one of the chisels in the set. Also needed is a SET which is a chunk of steel with a rivet sized hole in it. Insert a solid aluminum rivet in the material, hold the SET on the back side ( SET hole over the rivet) and give a short burst of air to squeeze the layers of aluminum together. You then swap sides, your helper backs up the head of the rivet with a dolly which has a hollow to fit the rivet head if they are dome rivets or is flat for flat head rivets and you finish mushing the rivet with the air hammer.
 
I learned the hard way that you need to drill the holes in the wood a little over size so the wood does not split. If you are trying to make it look pretty use a rivet set like pictured above but if you just need it done use a small ball peen and just peen it over. Ed
 
Thanks a ton! Exactly the info we were looking for. We are so close on this project and have learned so so much from folks like yourself who share and offer help!

On the epoxy: We have some product called west epoxy? It is a two part marine adhesive it seems. The kid says everyone uses it on youtube :) I hope that will work as we have a gallon of the stuff!

On the river process: I was wondering if we should do a flat countersink of 3/16 or so and place a small washer to help keep the splitting down as the river head is mushed down into the cavity ? Then when mushroomed over, I thought it could be ground smooth and flat. I guess like a cutlery handle. I will check out the link. Thanks again. I have a lot of respect now for the quality knife makers out there! I can see why this is so popular. And a very cool stress reliever.

On the handle: any suggestions on a good handle material for axes? Wood is free and cheap. So we went with that but want to make something with the epoxy. Just not sure how.

....and tomorrow will be another day I learn something new.

Jeff and Mitch.

My grandfather always preferred hickory for his handles. Used a draw knife to finish shaping them. Oak is good too. With our boy scout troop I noticed more nylon handles due to inexperienced users. I hope you will post some photos of your finished project.
 
Back
Top