Need some input on repair of a hole in a part I cannot mount on a machine.

TORQUIN

Registered
Registered
Joined
Mar 19, 2015
Messages
154
I have a 4' National brake and one of the holes for the bottom "hinge", the part you swing up to bend the metal, is elongated. I am trying to figure out how I can fix it with accuracy with hand tools. I figure this is important to get right because this "hinge", for lack of a better word, needs to be at the same height as the mounting location of the clamp for the metal, so that the bend is tight. As it stands, when assembled, the hinge part sits .125" lower on the right side than the left.
I am thinking of a bushing, but how to get the hole concentric and in the correct location with hand tools? I be willing to weld on the hole also, as National brakes are made of steel, but still face the problem of getting the finished hole in the correct location.
Please see pics.
2020-12-04 07.39.30-33.jpg2020-12-04 07.40.11-33.jpg

Thanks,
Chris
 
Try drilling out the existing to a larger size. Weld in a round solid bar to completely fill. Drill a new hole on proper center. Al
 
Hi Chris,

First, how can you get accurate measurements of the existing hole on the good side to transfer over to this side?

You might turn the end of an aluminum bar to a tight fit of the good side and make a centre mark on it with the tailstock centre while still in the lathe.
Then use a pair of double-point "divider" calipers to measure from that centre to some other reference point on the good side.
Then use the calipers to transfer the measurement to the bad side once the hole is filled.

Two such reference points are required. Scribe an arc from both and where they cross is the new hole centre.
I would also use a drill guide when re-drilling the hole to help get it square and located.

-brino


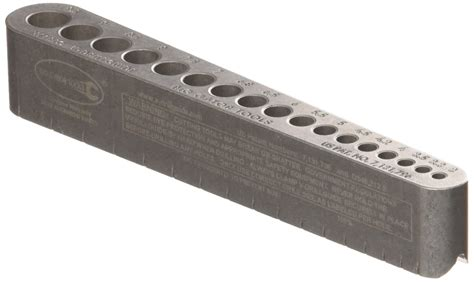
EDIT: clamp down a drill guide like this one from Big-Gator tools:
1607091760840.png
 

Attachments

  • 1607091573213.png
    1607091573213.png
    104.2 KB · Views: 6
Last edited:
Someone else suggested I hang it off the front/back of my Bridgeport table and swing the head around to get over the hole. This has merit if I can figure a way to clamp it to the table safely/securely. Then run a bar from the opposite hole to my chuck and locate it that way. I need to verify that the other hole is not worn significantly, though.
Another thought I had is to make the hole larger and elongated, and put in an adjustment screw from the bottom, then location matters less. Still thinking about the feasibility of this option.
More shots of the unit. The hole in question is on the left, in the first picture. It holds the part that swings up and bends the metal.
2020-01-08 10.13.1533.jpg2020-01-08 10.14.1733.jpg

Chris
 
What is the parent material? If it is cast iron, I would be loathe to weld it. That's a large hole to drill by hand. The true center will be close to the center of the less worn area from 8 to 2 o'clock in the bottom photo. I would consider filing the worn area with braze and hand filing to close to a fit. That would be good enough for a brake. You could ream the hole if you wanted.
 
I had a similar situation with worn journals on a cement mixer frame. What I did was essentially line boring using a shop made boring bar and some temporary bushings to guide the bar. I made the bar from a length of bar stock with a hole drilled in and a piece of HSS lathe tool bit brazed in and ground to size and shape. I drove the bar with a 1/2" hand drill. The drill was an ancient one given to me by my father in law and would twist your arm off if it jammed so it was up to the task. When one side was bored, I made a new guide bushing for it and bored the other side.
 
Looks like steel to me so you certainly could weld it. I like the adjustment screw idea- why not better than stock while you are fixing it?
A very heavy duty unit you got there, weighs in I bet
-Mark
 
This may seem extreme, but I think being steel, I would cut off the ears with the holes, rehab the holes on the mill as a pair to insure they are the same, then attach them to the bending plate and align the whole mechanism as a unit on the machine, and tack, and carefully weld back in place. Mike
 
Outside the box...

Can you make a bushing?

Hard part is determining center, drilling easy.

Drilling is with the biggest drill motor you can find or your mill in back gear.

You can make a guide from scrap whatever you have handy.

Figure out how to clamp the guide plate to part first.

Option for alignment
Center drill hole in end of shaft to allow a short rod to be inserted to make the shaft a center punch.

Assemble the guide on part and get it aligned.

Now drill mark to 1/4 inch.

Use a made for steel hole saw to drill using the 1/4pilot through the guide and remove the plug.

Now guide keeps hole saw in place to drill a round hole in part.

Now make bushing that fits hole and shaft.

If alignment failed then make another bushing and offset center with 4 jaw.

Sent from my SAMSUNG-SM-G930A using Tapatalk
 
the way I would attack that is by turning a hard bushing. I would use a mag drill and an annular cutter to drill out the hole. I have a small mag drill that is handy for such things. i suspect you could rent one? Any regular drill will walk to some new center point of what ever it likes.
 
Back
Top