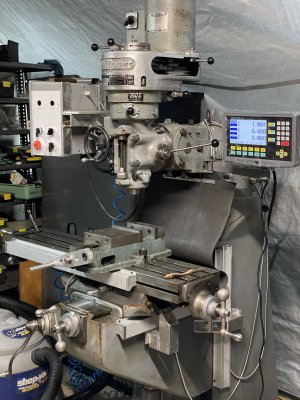
Nothing particularly new here, but I always enjoy seeing multiple approaches for inspiration when I'm preparing a project of my own. I have a Bridgeport clone and decided to put an inexpensive DRO on it. I believe Shenzhen Siton Tech. has been recommended here, and that's where I purchased an HS800-3. Came with 3 glass scales and the readout for $270 delivered. I selected scales of 620 mm, 450 mm, and 320 mm, all in 5 µm resolution.
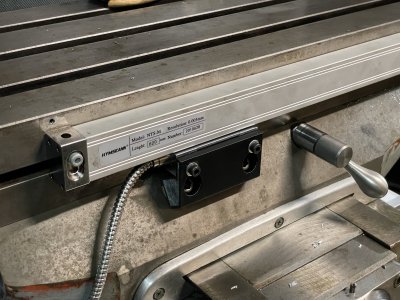
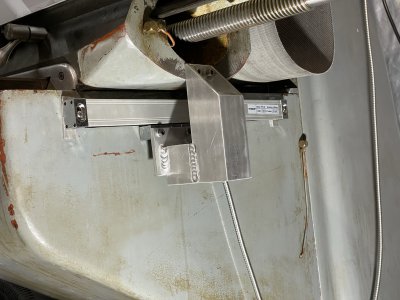
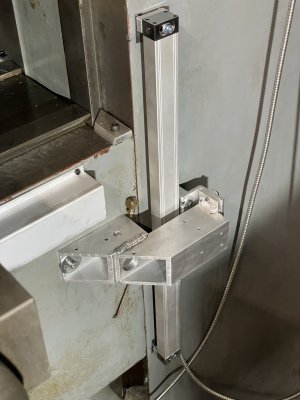
I have a bunch of aluminum square tube that I got for free, so I used that to make the y and z brackets. I 3-d printed a mount for the x-axis read head, using the travel stop holes in the saddle.
X-axis:

You can see that I extended the lock so that the handle clears the scale shield.
Y-axis:

Z-axis:

The z-axis scale took a little fussing to accommodate the machine casting, which wasn't flat or aligned with the knee surface.
overall, with shields in place:

I know most people mount the x-axis scale on the rear of the table, but I didn't want to give up the y-axis travel and figured I could be careful enough not to damage the scale. Plus, that let me use existing holes in the saddle for the read-head mount. It also avoided having to sort out how to leave room for the way cover back there.
I had to mangle the z-axis shield a bit to clear the read head, since the scale for that axis is spaced away from the surface more than the others. But it worked out okay in the end.
I may consider buying a 4-axis readout and another scale for the quill in the future, and moving this readout to my mill. But for now I'm super happy to have a DRO. When I learned to machine (a little bit) in college, there were only a couple Bridgeports that had DROs and it was always a treat to use them. Mostly we were directed away from them or not allowed to use the DRO so that we'd learn how to use dials. So this is especially gratifying. I haven't yet checked it for accuracy but I did use the centering function to make the standoffs for the z-axis scale and it was a pleasure.
Thanks,
Jason
I have a bunch of aluminum square tube that I got for free, so I used that to make the y and z brackets. I 3-d printed a mount for the x-axis read head, using the travel stop holes in the saddle.
X-axis:

You can see that I extended the lock so that the handle clears the scale shield.
Y-axis:

Z-axis:

The z-axis scale took a little fussing to accommodate the machine casting, which wasn't flat or aligned with the knee surface.
overall, with shields in place:

I know most people mount the x-axis scale on the rear of the table, but I didn't want to give up the y-axis travel and figured I could be careful enough not to damage the scale. Plus, that let me use existing holes in the saddle for the read-head mount. It also avoided having to sort out how to leave room for the way cover back there.
I had to mangle the z-axis shield a bit to clear the read head, since the scale for that axis is spaced away from the surface more than the others. But it worked out okay in the end.
I may consider buying a 4-axis readout and another scale for the quill in the future, and moving this readout to my mill. But for now I'm super happy to have a DRO. When I learned to machine (a little bit) in college, there were only a couple Bridgeports that had DROs and it was always a treat to use them. Mostly we were directed away from them or not allowed to use the DRO so that we'd learn how to use dials. So this is especially gratifying. I haven't yet checked it for accuracy but I did use the centering function to make the standoffs for the z-axis scale and it was a pleasure.
Thanks,
Jason
