- Joined
- Oct 31, 2014
- Messages
- 444
This isn't really a Project of the Day, it's more a Project of the last 5 Months that I'm finally getting around to writing a journal entry.
Back in December my 'significant other' bought a new business to supplant her copy/print shop - and I subsequently found myself knee deep in making rubber stamps.
As a bit of background, we made rubber stamps about a million years ago, setting hot type slugs on a Linotype machine (Rube Goldberg would be proud), pressing the type into uncured Bakelite and then heat curing it, then pressing unvulcanized rubber into the Bakelite and then heat curing the rubber and finally mounting the cured rubber with raised type onto wood mounts. A long and labor intensive process.
The company she bought had slightly newer technology, exposing photo-sensitive polymer to UV light through a film negative and then washing away the un-cured polymer to make the 'stamp die'. Somewhat more efficient but still very labor intensive and process control was a nightmare.
The latest wrinkle in stamp production is CNC laser burning sheet rubber (or polymer) to make the stamp dies in one step with minimal operator interaction. We knew this going into the business in the first place but suitable laser engravers are $10K and up and making a bad choice would not create domestic harmony.
So, knowing nothing about lasers we bought a 'learner' cheapie system off one of the Asian eBay sellers of what is known as a 'generic K-40 laser engraver'. 40 watt claimed power, 5" x 8" workspace or so. Big enough to learn on. These things are listed eBay for $300 to $2,000 depending on the sophistication of the purchaser and the greed of the seller. As near as I could tell they are all identical, the only perceptible difference being a 'red case' or a 'blue case'.
Picking a cheap one and ordering it was the easy part - find the price from a seller with not terrible feedback, place the order and then wait for the shipment to arrive.
In due course (about 45 days) a giant box arrived with what looked like the pictured laser enclosed. Offloading it to the workshop to play with it was the next step.
So, hook up the laser box, connect the water cooling unit (an aquarium pump) plug it in and turn it on. You could hear a couple of stepper motors whirring inside as the lens carriage searched for the 'home position' limit switches.
Well, uh, why is the motor still whirring? A quick look into the guts revealed the X-Axis belt was lying in the bottom of the unit having pulled loose from its connection to the lens carriage somewhere between Hunan Province and Oregon. Grrr.
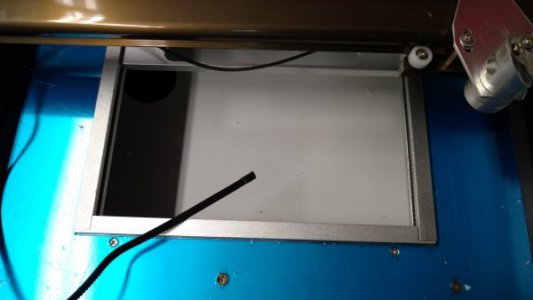
Contacting the seller about the problem was the usual Chinese Fire Drill: "Send us a picture." Done. "Send us a video." Done "Send us a video of you singing the finale of The Mikado in Mandarin" (???) All steps designed to delay feedback and get past the warranty. (Warranty??? Ha Ha Ha!)
So, since this was planned as a learning experience, I dove into the machine. It was obviously made of partially recycled tin cans and floor sweepings. My initial reluctance to take it apart was quickly replaced with an exercise in critiquing curious construction techniques. If there was a way to make something cheaply and poorly, these people had found it. Many parts looked hand-made, and not in a good way - but more on that later.
As a production economy move the cog belt driving the mirror/lens carriage was about 2 cogs short of the actual required length to work - apparently held in place by a tiny drop of superglue that gave up the ghost in transit. And taking the carriage apart was made even more challenging by not having any way to access the screws holding it together.
I 3D-printed a longer clamp for the cog belt so it had a chance of actually remaining connected to the carriage - and re-jiggered the end pulley so it was slightly more adjustable for tension -
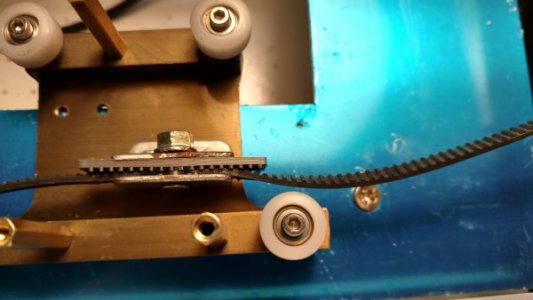
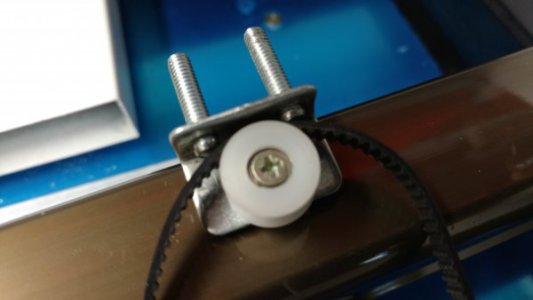
And of course getting to the belt clamp by working around the pillars that the carriage was mounted with was another challenge; you can almost but not quite get a screwdriver or nutdriver into the approximate vicinity. Three hands would almost be enough.
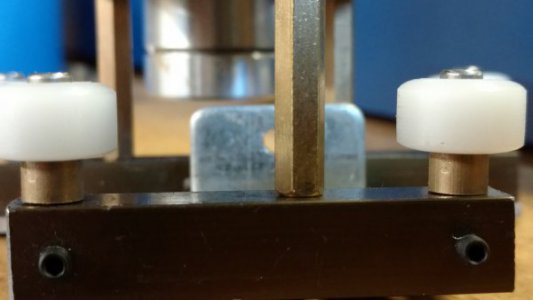
Put it back together, powered it up and lo and behold - the motors whirred and the carriage found it's home!
The unit came with a bootlegged copy of Corel Draw and some of the crappiest CNC driver software available. Although the label was in Chinese I am sure the brand was "Dumpster Software" and even that organization would not claim authorship except under extreme duress. They require and supply a 'dongle' to get the software to talk to the laser unit - what a joke - as if anyone would want to pirate this bit of excrement!
These laser engravers work by having a laser tube mounted at the back of the machine, then one mirror at a 45 to get the beam into the work area, another 45 mirror on the Y-Axis carriage to send the beam to the lens carriage that moves along the X-Axis - and this carriage holds another 45 mirror and the lens so the beam is directed downward to the work piece.
Theoretically these machines come pre-aligned to put laser energy into a small space and burn up whatever is there. Since I had removed / replaced / removed / replaced all the parts the factory alignment couldn't be verified - but hundreds of YouTube videos testify to the lack of factory alignment - so the next step was aligning the mirrors to get laser energy somewhere near where it would do some cutting. The videos were a great help.
Since these are CO2 lasers and emit infrared energy it doesn't look like they're doing anything when you push the 'test' button. And I didn't really expect it to actually work so I was quite surprised when I put a piece of notebook paper into where the beam should be, pressed the button and a hole magically burned itself into the paper. Note to self: Do not look into laser with remaining eye. (Just kidding, but good advice nonetheless)
After an hour or so of diligent futzing I got the mirrors aligned pretty well - at least well enough to burn holes in cardboard - which I considered a success.
However, it was short lived for my purposes. These lasers have a fixed focus lens and no way to move the workpiece into the focal plane. We would definitely need a Z-Axis unit for fine detail in rubber stamp production. The supplied lens mount was a semi-triangular piece of tin-can sheet metal with a couple of holes in it. To get a tiny bit of Z-Axis movement in this unit I made a new lens holder that would adjustably clamp the mirror/lens unit and allow a tiny bit of vertical movement. Worked like a charm and allowed a lot of experimentation and education on laser engraving.
So, after working on and off on this POS for several months and getting it functioning well enough to figure out what actual engraver specs we needed - I listed the K-40 on our local craigslist and found a buyer who wanted a project and was happy to have a semi-working K-40. Apparently these rarely work and my modifications were a 'plus' to the buyer.
We purchased a very nice TroTec Laser (made in Austria) and we're happily turning out stamps with it. The K-40 is a dim memory. Hallelujah!
I'm sorry I didn't take more pictures of the process. But it was definitely educational.
Back in December my 'significant other' bought a new business to supplant her copy/print shop - and I subsequently found myself knee deep in making rubber stamps.
As a bit of background, we made rubber stamps about a million years ago, setting hot type slugs on a Linotype machine (Rube Goldberg would be proud), pressing the type into uncured Bakelite and then heat curing it, then pressing unvulcanized rubber into the Bakelite and then heat curing the rubber and finally mounting the cured rubber with raised type onto wood mounts. A long and labor intensive process.
The company she bought had slightly newer technology, exposing photo-sensitive polymer to UV light through a film negative and then washing away the un-cured polymer to make the 'stamp die'. Somewhat more efficient but still very labor intensive and process control was a nightmare.
The latest wrinkle in stamp production is CNC laser burning sheet rubber (or polymer) to make the stamp dies in one step with minimal operator interaction. We knew this going into the business in the first place but suitable laser engravers are $10K and up and making a bad choice would not create domestic harmony.
So, knowing nothing about lasers we bought a 'learner' cheapie system off one of the Asian eBay sellers of what is known as a 'generic K-40 laser engraver'. 40 watt claimed power, 5" x 8" workspace or so. Big enough to learn on. These things are listed eBay for $300 to $2,000 depending on the sophistication of the purchaser and the greed of the seller. As near as I could tell they are all identical, the only perceptible difference being a 'red case' or a 'blue case'.
Picking a cheap one and ordering it was the easy part - find the price from a seller with not terrible feedback, place the order and then wait for the shipment to arrive.
In due course (about 45 days) a giant box arrived with what looked like the pictured laser enclosed. Offloading it to the workshop to play with it was the next step.
So, hook up the laser box, connect the water cooling unit (an aquarium pump) plug it in and turn it on. You could hear a couple of stepper motors whirring inside as the lens carriage searched for the 'home position' limit switches.
Well, uh, why is the motor still whirring? A quick look into the guts revealed the X-Axis belt was lying in the bottom of the unit having pulled loose from its connection to the lens carriage somewhere between Hunan Province and Oregon. Grrr.

Contacting the seller about the problem was the usual Chinese Fire Drill: "Send us a picture." Done. "Send us a video." Done "Send us a video of you singing the finale of The Mikado in Mandarin" (???) All steps designed to delay feedback and get past the warranty. (Warranty??? Ha Ha Ha!)
So, since this was planned as a learning experience, I dove into the machine. It was obviously made of partially recycled tin cans and floor sweepings. My initial reluctance to take it apart was quickly replaced with an exercise in critiquing curious construction techniques. If there was a way to make something cheaply and poorly, these people had found it. Many parts looked hand-made, and not in a good way - but more on that later.
As a production economy move the cog belt driving the mirror/lens carriage was about 2 cogs short of the actual required length to work - apparently held in place by a tiny drop of superglue that gave up the ghost in transit. And taking the carriage apart was made even more challenging by not having any way to access the screws holding it together.
I 3D-printed a longer clamp for the cog belt so it had a chance of actually remaining connected to the carriage - and re-jiggered the end pulley so it was slightly more adjustable for tension -


And of course getting to the belt clamp by working around the pillars that the carriage was mounted with was another challenge; you can almost but not quite get a screwdriver or nutdriver into the approximate vicinity. Three hands would almost be enough.

Put it back together, powered it up and lo and behold - the motors whirred and the carriage found it's home!
The unit came with a bootlegged copy of Corel Draw and some of the crappiest CNC driver software available. Although the label was in Chinese I am sure the brand was "Dumpster Software" and even that organization would not claim authorship except under extreme duress. They require and supply a 'dongle' to get the software to talk to the laser unit - what a joke - as if anyone would want to pirate this bit of excrement!
These laser engravers work by having a laser tube mounted at the back of the machine, then one mirror at a 45 to get the beam into the work area, another 45 mirror on the Y-Axis carriage to send the beam to the lens carriage that moves along the X-Axis - and this carriage holds another 45 mirror and the lens so the beam is directed downward to the work piece.
Theoretically these machines come pre-aligned to put laser energy into a small space and burn up whatever is there. Since I had removed / replaced / removed / replaced all the parts the factory alignment couldn't be verified - but hundreds of YouTube videos testify to the lack of factory alignment - so the next step was aligning the mirrors to get laser energy somewhere near where it would do some cutting. The videos were a great help.
Since these are CO2 lasers and emit infrared energy it doesn't look like they're doing anything when you push the 'test' button. And I didn't really expect it to actually work so I was quite surprised when I put a piece of notebook paper into where the beam should be, pressed the button and a hole magically burned itself into the paper. Note to self: Do not look into laser with remaining eye. (Just kidding, but good advice nonetheless)
After an hour or so of diligent futzing I got the mirrors aligned pretty well - at least well enough to burn holes in cardboard - which I considered a success.
However, it was short lived for my purposes. These lasers have a fixed focus lens and no way to move the workpiece into the focal plane. We would definitely need a Z-Axis unit for fine detail in rubber stamp production. The supplied lens mount was a semi-triangular piece of tin-can sheet metal with a couple of holes in it. To get a tiny bit of Z-Axis movement in this unit I made a new lens holder that would adjustably clamp the mirror/lens unit and allow a tiny bit of vertical movement. Worked like a charm and allowed a lot of experimentation and education on laser engraving.

So, after working on and off on this POS for several months and getting it functioning well enough to figure out what actual engraver specs we needed - I listed the K-40 on our local craigslist and found a buyer who wanted a project and was happy to have a semi-working K-40. Apparently these rarely work and my modifications were a 'plus' to the buyer.
We purchased a very nice TroTec Laser (made in Austria) and we're happily turning out stamps with it. The K-40 is a dim memory. Hallelujah!
I'm sorry I didn't take more pictures of the process. But it was definitely educational.

