My first Lathe. craftsman 101.07403. Restoration process and progress...

Joshua

Registered
Registered
Joined
Mar 30, 2014
Messages
11
My first lathe: a craftsman 101.07403. Restoration process and progress...

Wednesday I followed a craigslist ad to a small warehouse near me. I traded an old compound bow, some shotgun shells, and $50 for a craftsman 10107403 lathe.


I've been wanting a lathe to make small custom parts for my airguns. I had planned on buying a HF 7x12. But when the opportunity to pick up this piece of american history, I couldn't pass it up. I know its not the best example of its era and I feel I understand the inherent shortcomings of this piece of equipment, but I have old tools that do right by me when I give them a bit of love and attention.

I got quite a bit of tooling, parts, and accessories. Some of which I plan to sell to fund the upgrades I want.The rest of it I think is all serviceable and will help me learn the craft.

I'm in the process of restoring it. I'm not a machinist, I have no Idea what I'm doing. And as such I've decided to video the whole disassembly process as well as the assembly process. Mostly so I can remember what goes where. But I'll probably upload it to youtube for others to laugh at.

I've found about all the basic info that others come here asking for, manuals, parts diagrams, etc...What I don't have i experience or knowledge of how this whole thing and all its doo-dads are supposed to work.

So my hope is this...I'll document as best as my feeble brain will allow, the whole process of tear down and assembly, (not cleaning and paint cuz that's boring). And in turn you guys will laugh at me when I do something stupid and maybe impart a bit of your experience to me along the way. Also, if you could help me assess what parts of value to a beginner and what parts may have value to help fund my first steps, I'd really be brimming with gratitude.

I'm a carpenter by trade, and I'm in the process of converting my old brewery into a machine room. I'm barely financially solvent, and none too bright...but I hope my experience will benefit others and maybe provoke some sympathy from those here that have "been here, done this."

I thank you for entertaining me...I'll upload some pics here in the next few hours and show you what I'm starting with and how far I've gotten in the last few days.


Thanks for welcoming me to the community in advance and I appreciate your advice and pity...

:victory:

Joshua
 
Last edited:
we all will be looking forward to your project.
there is tons of experience on this forum.
any problem can be solved with diligence and a little guidance now and again.
good luck!

mike:))
 
Last edited by a moderator:
Someone call a paramedic, this guy is beating himself up bad.
On here no one is stupid, feeble or asks dumb questions. We all love what we do and love learning. Sometimes the hard way.
I bought my Craftsman lathe about 2 years ago and with no experience in lathe work other than from high school which was some 40 yrs ago I was able to produce some neat things just playing around.
So, go rip that thing apart knowing there are people dying to help here on this forum.
Put up some shots of the lathe. We all love pictures.
lathe1.jpg

lathe1.jpg
 
Hi Joshua and welcome, with all the great help from the guys on here, I'm sure your journey from 'I have no idea' to 'I can't believe I just made that part' won't take too long and will be as enjoyable as mine has been.

Restoring one of these little lathes is a great way of getting to know them, looking forward to your videos.

Bernard
 
Right on, you guys are great already...

Uploading, downloading, syncing, updating, shutting down, booting up, restarting...Is it me or are computers beginning to have their own itineraries for what we'll getting done at any given time...

DamicoTileCo,

I believe its some pictures of your lathe that inspired me to clean this thing up...are you the one who did the repaint of the label with testors paint and a needle brush...Right on man! How did you get the bed so clean? Is that a result of surfacing or scraping? Or was that all elbow grease?


Anyway,

I spent all day sheetrocking, taping, texturing, rebuilding the doors to what will be my new metal workshop. Its not accessible from inside the house, peace and quiet, but the two exterior doors need a higher level of security before I start putting too many tools in there.

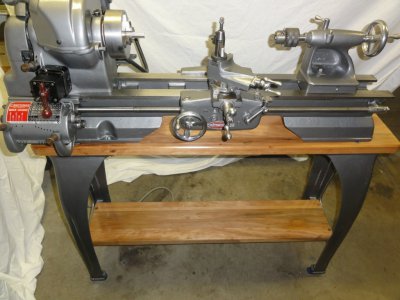
Here's the beast, freshly unloaded.
IMG_0693[1].JPG

Covered in grease and grime, but it runs...Seems like the bull gear has a bit of shimmy in it. As in I can watch the face of it wander to and fro as the lathe turns. The oil plugs on the pulley cluster and small gear to its left were used as set screws, so it took me a while to figure out how the whole back gear thing worked. I read up and realized what the issue was. But it does worry me that the previous owner didn't know that much. Getting the spindle out for inspection was a joy. Timken bearings seem fine.

In the few hours I spent going over it after I'd done some reading, I felt it was a fair candidate for being my first lathe, deserving a decent restoration. I think a steady bench, new belts (Link or V?), and a bit of fiddling should get it running well enough for me to learn a few things.


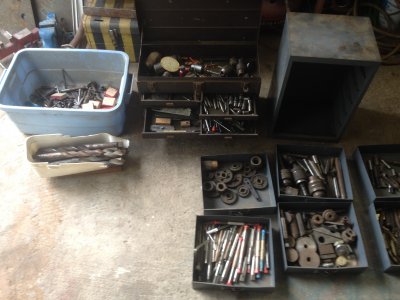
Here is some of the tooling it came with...
IMG_0694.JPG

Mostly reamers, tons of end mills, an odd assortment of chucks, a pretty trashed 3 jaw chuck, live/dead centers, some measuring tools, tons of tool blanks, A bunch of huge 4mt bits and a lot of stuff I'm clueless as to its purpose. Its all USA made stuff from the 60's/70's, a Hunger adjustable/expandable reamer set that I put on ebay. There's a palmgren 400 milling attachment base in there and the old man I got the lathe from vowed to find the vise portion. My crossed fingers are aching.

Youtube is giving me a hard time about the music playing in the background of my videos, or they dont like lou reed. Soon as I fix that issue I'll get them uploaded. The quality isn't great, so I dont think they'll really be the huge help I thought they might be. Although, after looking over the exploded parts diagram these lathes are not horribly complicated. But when I first got it off the truck, knowing nothing about lathes in general, it felt like a daunting task.

Regardless, I've disassembled the cross-slide and compound. Ive given them a good scrubbing and a coat of rustoleum x/o direct to metal oil based enamel in "machinery grey". The whacky california weather we're having dropped the temp in my garage, so the paint could have cured better I think, there are some curtains. As I type this...its snowing at 2500' ele. :nuts:

IMG_0693[1].JPG IMG_0694.JPG
 
Joshua,

The only oil plug in the headstock that looks like a set screw is the one in the spindle step pulley. All of the other set screws are set screws. If the bull gear isn't solidly locked to the spindle, its set screw is loose. When you put things back together, after you've tightened everything else, put a 0.002" or 0.003" feeler gauge between the bull gear and the pulley, push the gear to the left against the feeler, and tighten the set screw in the gear. Then make sure that the pulley turns without rubbing the gear. Atlas once sold a tool for disengaging the lock pin without getting your fingers greasy but they no longer have them. You can use a heavy screw driver but a better choice is to buy a body trim tool from an auto parts store. The one that you want looks like a wide blade screwdriver or gasket scraper with a bent tip and a slot in the tip. You may need to widen the slot a little.

While you have the spindle bearings out, read and record the dates engraved in the bearings. Your machine was built between about one day and a few months after the later of the two dates. Please send me the machine serial number (found either on the nameplate or more likely stamped into the front way at the right end in the area not touched by either the tailstock or the carriage) and the two dates.

As you have the spindle out, definitely install a new V-belt. The only advantage of a link belt over a V-belt is that you don't have to pull the spindle to install it. Otherwise, they are prone to slippage as the surface contact area between belt and pulley is much less. And they are only rated to run in one direction. Claims that link belts fixed vibration problems are probably true but misleading. The link belt was new and the V-belt was probably 50 to 60 years old, worn out, and as stiff as a board.

When you build the new bench, make it hell for stout. Carriage bolts are better than nails in the framing. Level it (but not necessarily with a precision level) and then bolt it securely to the floor. If you are going to put a drip pan under it, now is the time. Then set the lathe on the bench, level it with a precision level per the factory instructions, and bolt it to the bench. Do not put the bench on wheels. If you do, you are just asking for chatter. The Atlas bed is not as stiff as a South Bend. The factory mounting instructions take this into account.

Robert D.

Covered in grease and grime, but it runs...Seems like the bull gear has a bit of shimmy in it. As in I can watch the face of it wander to and fro as the lathe turns. The oil plugs on the pulley cluster and small gear to its left were used as set screws, so it took me a while to figure out how the whole back gear thing worked. I read up and realized what the issue was. But it does worry me that the previous owner didn't know that much. Getting the spindle out for inspection was a joy. Timken bearings seem fine.

In the few hours I spent going over it after I'd done some reading, I felt it was a fair candidate for being my first lathe, deserving a decent restoration. I think a steady bench, new belts (Link or V?), and a bit of fiddling should get it running well enough for me to learn a few things.
 
Robert,

Thanks for the info, I'll get you those numbers when I tear down the headstock. I cleaned the burrs on the spindle and reinstalled it without getting those dates. But its all coming apart within the next few days.

I thank you for the belt info, it was a question i needed answering for sure.

The bench will be a solid top over reinforced kitchen cabinets. I may weld a nice frame to support the lathe. It will ride between the two cabinets so I have leg room below. I have some trespa siding sheets left over from a job. Its a composite material that should resist oil, and make a nice countertop. Although I may employ a chip pan as well. Maybe just an aluminum driveway protector? Budget doesn't allow too many purchase's for this project yet.

I managed to get some videos uploaded and I started a channel.

search youtube for "craftsman lathe resto"

The videos are about as boring as it gets, and the angle/lighting makes them fairly useless from an informational stand point. But the music is good. Although, copyright issues may arise...

I'll do better on the others...

- - - Updated - - -

Joshua,

The only oil plug in the headstock that looks like a set screw is the one in the spindle step pulley. All of the other set screws are set screws. If the bull gear isn't solidly locked to the spindle, its set screw is loose. When you put things back together, after you've tightened everything else, put a 0.002" or 0.003" feeler gauge between the bull gear and the pulley, push the gear to the left against the feeler, and tighten the set screw in the gear. Then make sure that the pulley turns without rubbing the gear. Atlas once sold a tool for disengaging the lock pin without getting your fingers greasy but they no longer have them. You can use a heavy screw driver but a better choice is to buy a body trim tool from an auto parts store. The one that you want looks like a wide blade screwdriver or gasket scraper with a bent tip and a slot in the tip. You may need to widen the slot a little.

Well the stepped pully was tightened to the spindle so it, and the small gear to its left, wouldn't free wheel when the bull gear was dis-engaged. SO there was no back gear to speak of...when engaged it locked the whole assembly up and the belt just spun...luckily it was old and loose so no damage occured. But I didn't know that those parts were intended to spin freely, this was the first back gear I'd ever seen. But I found a guy with a similar problem who detailed it quite well...and was able to get it working as it should be. I think...
 
There is a sticky warning notice at the top of the forum on this subject (spindle pulley oil plug).

Robert D
 
DamicoTileCo,

I believe its some pictures of your lathe that inspired me to clean this thing up...are you the one who did the repaint of the label with testors paint and a needle brush...Right on man! How did you get the bed so clean? Is that a result of surfacing or scraping? Or was that all elbow grease?

I bought it this clean. It was freshly restored and painted using Grey Hammer Paint. Yours will need some elbow grease to clean it.
When I first got it home I checked every gear and they looked brand new. This guy inherited it from his dad and sold it to me. It looks like it was barely used.
But yeah, download a manual for it online and oil those pulleys thru the "set" screws.
 
Holy cow I'm up to my elbows in grease and grime! Send parts cleaner!

Seriously though, as I continue my dis-assembly, I noticed something. The seemingly bronze bushing at the countershaft have no holes for the oil to weep onto the shaft itself. Normal? There are two oil cups on each arm of the casting, but unless those bushings are permeable, I can see no way of the oil actually lubricating the countershaft.

Not to mention those bushings seem pretty worn. Where can I find replacements?
 
Back
Top