Mounting part to Rotary Table problems

DoubleHelix

Registered
Registered
Joined
Nov 7, 2014
Messages
32
I just got the rotary table and have made a knob on it in delrin that worked fine, so I just dont have much experience with workholding with it yet.

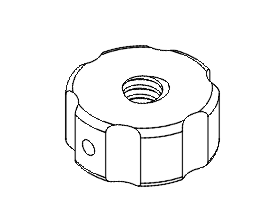
I have about 10 knobs I need to make out of 6063. I started with bandsaw cutting all of them and drill and taping the middle hole. I then mounted a section of thread in the 3 jaw chuck in the lathe and then just spun the knobs on to face and bring the OD to final size. What is left is mill work which I was planning on doing in the new rotary table. I was going to plunge the notches on the OD using a 3/8 end mill.

I was going to mount them the same way. Screw 3 jaw chuck to rotary table and clamp onto some thread to be able to quickly screw on the knobs to machine them. Obviously the end mill spins in the direction to unscrew the knobs so this doesnt work. I thought about making another small nut to screw down after the knob was on but then the chuck would just unscrew from the rotary table.

Im sure there is an easy way to do this but I am not coming up with anything.

Thanks for any help
1588812163921.png
 
What about a smaller bolt through the center hole with a washer about the size of the top? I could even see a fixture with a large threaded stud that sticks up that you thread your part onto for positioning then a smaller screw to clamp it in place.

Orrrrr, hold it in the 3 jaw and cut 3 grooves, remove it, clock it 60 degrees (chuck holding in the freshly cut grooves) and cut the other 3.
 
I had exactly this same problem a couple of months ago, and no matter how many ways I tried to switch the end mill to the other side it was still going to unscrew the part! :D

I think I finally ended up clamping my part through the centre hole of the rotary table. I was on a horizontal mill so had access to the back of the RT (ie the rotary table was standing on edge as it were) so I don’t know if you could do it easily on a vertical mill without a lot of unclamping or losing register. My part was larger diameter as well, so I had more surface area for clamping, but it worked well and I had no slip. Same size end mill also in aluminum although 6061 not 6063. I do not have the option of reversing spindle rotation as suggested above, but that would be the slickest way to get around it I think.

-frank
 
I just did a similar one. IMG_20200504_230756.jpg

Leave the bar stock long enough to chuck up on the lathe. Face, center drill, countersink, turn to diameter. With excess stock still attached,, chuck that in a 3 jaw on the rotary table. Mill your notches, then back to the lathe to part off the excess from the face of the knob. If you need a set screw, back to the mill to drill and tap. I also used a 'V' cutter to cut an indicator line across the face.
 
Another option, since you have already cut the pieces to length and done the inside work, would be to use a ball-end mill. This assumes your rotary table may be mounted both vertically and horizontally. There would be less tendency to unscrew the workpiece.
 
Completely forgot to mention this is on a Sherline lathe, mill, and rotary table. I dont havent made a vertical table to fit the rotary table to yet.

Since the Sherline's 3 jaw screws onto the rotatry table I need a way to "lock" it down so it doesnt unscrew also. Thanks for the ideas!
 
Completely forgot to mention this is on a Sherline lathe, mill, and rotary table. I dont havent made a vertical table to fit the rotary table to yet.

Since the Sherline's 3 jaw screws onto the rotatry table I need a way to "lock" it down so it doesnt unscrew also. Thanks for the ideas!

I would extend the mounting stud and use a lock nut (or two) above it The lock nut, properly tightened will resist any turning of the part caused by the cutting force.

I have a 12" Enco mill with a central 1" straight bore. I use the 4" chuck from my 6 x 18 lathe which has a 1-10 thread and made an adapter to fit the RT bore and with a 3/8-16 internal thread. To hold the adapter, I have a back plate at the rear of the RT threaded for 3/8-16 and use studs from my clamping set to mount the adapter which is previously screwed into my chuck. I then tighten the chuck as I would in the lathe.

The issues are the same as running a lathe in reverse with a screw on chuck. Tightened securely, I have only had a few instances in more than thirty years where the chuck loosened. One way of preventing loosening would be to drill detents around the perimeter of the chuck backing plate. A fixture with a pin to engage the detents and can be clamped to the RT table will prevent any rotation of the chuck.
 
Last edited:
How you're going to hold the part for second ops is always a consideration, isn't it? I have to agree that at this point, the best way to lock the part down will be nuts on top of a long center threaded shaft, perhaps with a cap that is as big as will fit inside the side cuts. The cap will give more holding power.

As for holding a chuck on the rotab, typically you tighten the chuck until one of the tommy bar holes lines up with a t-slot and you make a block with a t-bar sticking out one side and a hole in the block for a screw into a t-nut. The bottom of the block has a projection that fits in the t-slot to prevent the block from turning.
 
Back
Top