- Joined
- Jul 2, 2014
- Messages
- 7,594
Long post, warning...
Here are the pics of the Servo power feed install:
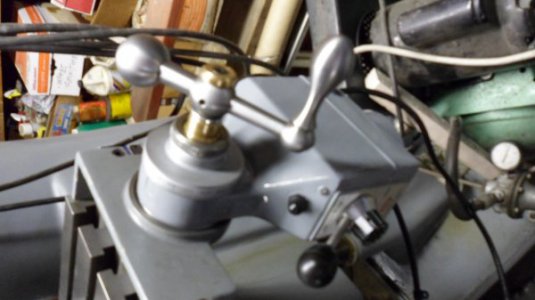
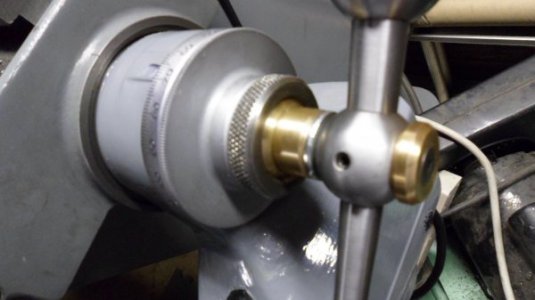
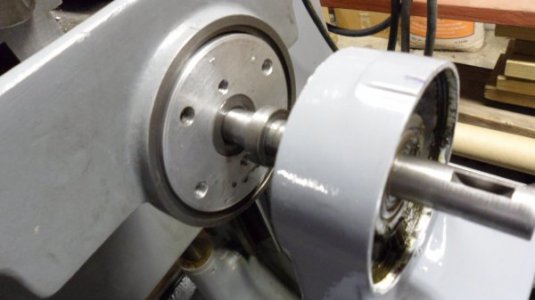
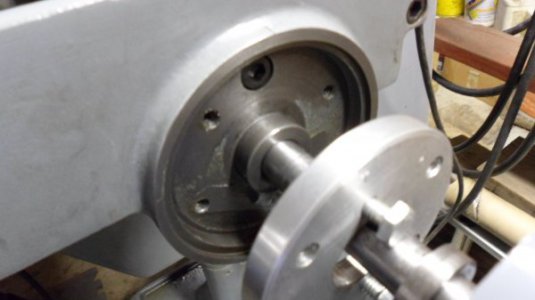
Got this old power feed for free, and decided to adapt it to my Millrite. Took it apart, cleaned it up, replaced some bearings and the switch/circuit breaker which had a broken toggle, lubed everything, and put it back together. Primed it with aluminum primer and brushed Rustoleum Smoke Gray enamel over it. I am no Rembrandt with a brush, but I think it turned out OK.
I only machined the table end cap enough to have good seating for the aluminum adapter/spacer disc. Then comes a spacer to keep the caged needle bearings from migrating toward the table. Next comes the power feed, originally off a Bridgeport mill, the bevel gear and dial, and the handle and end cap. An extension to the lead screw is required to accommodate the added power feed.
.
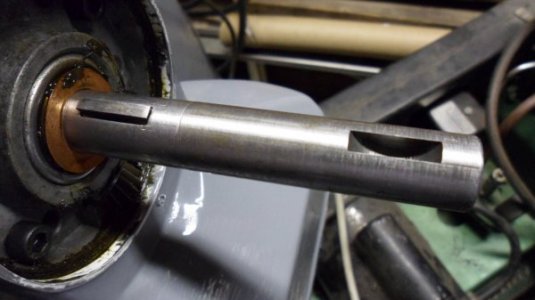
I made the 5/8" lead screw extension, 2-3/8" long, which has a male 7/16-20 thread for the lead screw and a female 1/4-20 thread for the end cap at the other end. I also added a 3/16x3/4" woodruff keyseat for the new handle position. Next I removed and drilled and tapped the lead screw 7/16-20 in the lathe as deep as possible without cutting into the original woodruff keyseat. Then I screwed the extension to the lead screw, mounted it to the mill table, cross drilled and reamed it for a taper pin, and installed the pin. The pin is barely visible in the pics at 90 degrees to the woodruff keyseat between the keyseat and the extension. Note that the keyseat and taper pin machining were done with no X lead screw in the mill, which actually worked out fine, bump the table into position and lock the table, traverse with the Y screw. The lead screw was sticking into the lathe spindle hole for these operations, not enough room for it otherwise.
I installed the lead screw with the slightly over diameter (on purpose) extension through the lathe spindle, the long loose end supported by a bronze bushing clamped in the milling vise, indicated it in the 4 jaw, and cut the shaft extension to final diameter and drilled and tapped the 1/4-20 hole in the extension for the end cap.
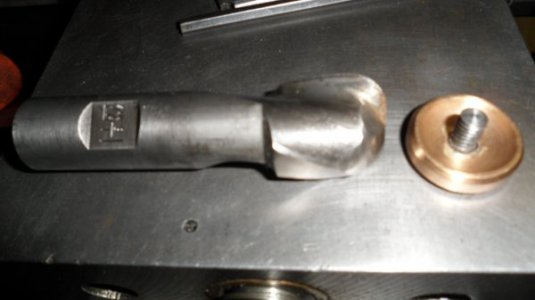
The brass end cap was a easy turning job, and I used a big old radiused end mill in a 3/4" drill chuck mounted in the tail stock as a form tool to cut the dished recess. I was amazed that it worked so well, expected some epic chatter. Next I parted it off, turned it around, chamfered, and countersunk it for the flat socket head screw. The dish fits the rounded end of the handle and stops the end thrust coming from the bevel gear.
I used the Bridgeport bevel gear and dial, which are nicer than the Millrite ones, and also allowed me to keep the Millrite dial in original condition. If desired, the mill can be returned to the original manual configuration with only the 7/16" thread in the lead screw, the machining inside the table end cap, and the four 1/4" mounting holes through the end cap. You would have to look at the mill very closely to notice it had ever been modified.
The original Millrite handle keyseat was in the correct position for driving the bevel gear, but the keyway through the bevel gear is 1/8", while the keyseat is 3/16" I made a step key to adapt it.
When I was installing the power feed I noticed that the arrows on the bezel for the control lever pointed up and down, not left and right. OK, it was set up for a knee application originally, I figured. When I got it all together, shimmed, and everything tightened down, I fired it up and it worked just great, with the "slight" problem that moving the handle left made the table go right, and vice versa. Hmmm. A little thought made me realize that it was working correctly for a knee application. So, took it all apart again, studied the wiring diagram on the web, got some advice from Ulma Doctor, tore down the power feed again, and reversed the wires that were soldered to the brush holders. The brush holders are out of sight underneath everything else in that tightly packed housing. Put it all back together again, fired it up, no magic white smoke, and the control lever and table are now working in unison. YES!
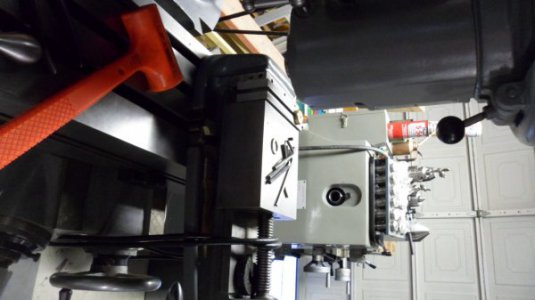
I still have one more free power feed on hand and am thinking about installing it on the Y axis.
I took it all apart again, not just for this post, but because the lead screw was getting tight when moving the table all the way to the left. The lead screw nut was not properly in line with the table end cap. I needed to be able to get to the center bolt, under everything else, to loosen it and let the end cap self center. That end cap only has a few thou movement possible, but it needs to get reset correctly if it is disturbed. All better now!
Does anyone here know how to rotate the images correctly? They look fine everywhere on my computer, but upload rotated here...
Here are the pics of the Servo power feed install:


Got this old power feed for free, and decided to adapt it to my Millrite. Took it apart, cleaned it up, replaced some bearings and the switch/circuit breaker which had a broken toggle, lubed everything, and put it back together. Primed it with aluminum primer and brushed Rustoleum Smoke Gray enamel over it. I am no Rembrandt with a brush, but I think it turned out OK.
I only machined the table end cap enough to have good seating for the aluminum adapter/spacer disc. Then comes a spacer to keep the caged needle bearings from migrating toward the table. Next comes the power feed, originally off a Bridgeport mill, the bevel gear and dial, and the handle and end cap. An extension to the lead screw is required to accommodate the added power feed.
.
I made the 5/8" lead screw extension, 2-3/8" long, which has a male 7/16-20 thread for the lead screw and a female 1/4-20 thread for the end cap at the other end. I also added a 3/16x3/4" woodruff keyseat for the new handle position. Next I removed and drilled and tapped the lead screw 7/16-20 in the lathe as deep as possible without cutting into the original woodruff keyseat. Then I screwed the extension to the lead screw, mounted it to the mill table, cross drilled and reamed it for a taper pin, and installed the pin. The pin is barely visible in the pics at 90 degrees to the woodruff keyseat between the keyseat and the extension. Note that the keyseat and taper pin machining were done with no X lead screw in the mill, which actually worked out fine, bump the table into position and lock the table, traverse with the Y screw. The lead screw was sticking into the lathe spindle hole for these operations, not enough room for it otherwise.
I installed the lead screw with the slightly over diameter (on purpose) extension through the lathe spindle, the long loose end supported by a bronze bushing clamped in the milling vise, indicated it in the 4 jaw, and cut the shaft extension to final diameter and drilled and tapped the 1/4-20 hole in the extension for the end cap.
The brass end cap was a easy turning job, and I used a big old radiused end mill in a 3/4" drill chuck mounted in the tail stock as a form tool to cut the dished recess. I was amazed that it worked so well, expected some epic chatter. Next I parted it off, turned it around, chamfered, and countersunk it for the flat socket head screw. The dish fits the rounded end of the handle and stops the end thrust coming from the bevel gear.
I used the Bridgeport bevel gear and dial, which are nicer than the Millrite ones, and also allowed me to keep the Millrite dial in original condition. If desired, the mill can be returned to the original manual configuration with only the 7/16" thread in the lead screw, the machining inside the table end cap, and the four 1/4" mounting holes through the end cap. You would have to look at the mill very closely to notice it had ever been modified.
The original Millrite handle keyseat was in the correct position for driving the bevel gear, but the keyway through the bevel gear is 1/8", while the keyseat is 3/16" I made a step key to adapt it.
When I was installing the power feed I noticed that the arrows on the bezel for the control lever pointed up and down, not left and right. OK, it was set up for a knee application originally, I figured. When I got it all together, shimmed, and everything tightened down, I fired it up and it worked just great, with the "slight" problem that moving the handle left made the table go right, and vice versa. Hmmm. A little thought made me realize that it was working correctly for a knee application. So, took it all apart again, studied the wiring diagram on the web, got some advice from Ulma Doctor, tore down the power feed again, and reversed the wires that were soldered to the brush holders. The brush holders are out of sight underneath everything else in that tightly packed housing. Put it all back together again, fired it up, no magic white smoke, and the control lever and table are now working in unison. YES!
I still have one more free power feed on hand and am thinking about installing it on the Y axis.
I took it all apart again, not just for this post, but because the lead screw was getting tight when moving the table all the way to the left. The lead screw nut was not properly in line with the table end cap. I needed to be able to get to the center bolt, under everything else, to loosen it and let the end cap self center. That end cap only has a few thou movement possible, but it needs to get reset correctly if it is disturbed. All better now!
Does anyone here know how to rotate the images correctly? They look fine everywhere on my computer, but upload rotated here...

