[How-To] Milling vise jaws, how to move them correctly, and getting them back

WobblyHand

H-M Supporter - Diamond Member
H-M Lifetime Diamond Member
Joined
Dec 18, 2019
Messages
7,428
Have a piece of metal I'd like to mill that's a little large for my vise. Looking at the vise, I see that the jaws can be removed and put on the other side of the moving jaw. (Other side of stationary jaw as well, don't need the added grip range.) Moving the jaw would allow enough travel to capture the part.

Are there any things I need to watch out for? Like needing to align the jaws in X and Z? As delivered, the jaws close together amazingly well, one can't tell where the parting line is when the jaws are closed. Is there a preferred orientation of the jaw face? Any tips or just forge ahead? When the machining is done and the jaw is moved back to its original place, how can you get similar alignment? Just tapping with a hammer until good? What are reasonable expectations for how close one can realign the jaws?

This is just a mid/low range import vise, not a Kurt or Glacern. I'm just trying to get an idea if I'll ever get the nice alignment back if I move the jaws. If there's a high probability that the alignment will be poor, I'll look into a different way of doing things. So far the vise has been ok and I'd like to keep it that way.

Sorry to clutter the forum for this extremely basic question, but thought it better to ask now rather than in a panic later. Thanks all.
 
Generally one can take the jaws off and replace them without any alignment problems that I know of. They just
butt up to the vise and align themselves. I added an aluminum jaw mounted permanently to the front so I don't
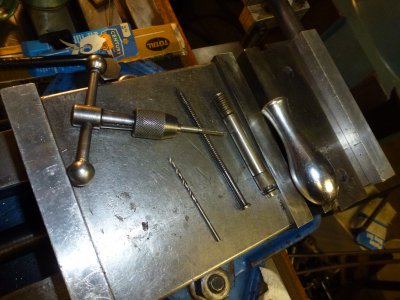
have to remove any jaws for holding bigger stuff. I actually use it quite often.P1020854.JPG
I took a photo of a repair project from this morning. I see I have aluminum jaws added both front and back for easy use.
One would not have any alignment problem with the secondary jaws mounted permanently...................can't see where one
would anyway.
 
I think the only critical point for vise jaws is the Y dimension of the fixed jaw. That is automatic when the jaw is reinstalled, of course assuming it’s cleaned, etc. The rest is cosmetics, since other references should be the vise base for Z and the work or a stop for X.
 
I wasn't sure if there were alignment features for the jaw or a preferred face. The two jaws mate so well right now, just didn't want to ruin that feature. It appears that the jaws were ground on three sides after installation. So at the moment, the alignment is perfect. My takeaway is that you both are saying is don't worry, be happy, :) and get on with it.

@cathead how thick are the aluminum jaws? Hard for me to judge from the picture. Are they just 6061, or something else?
 
Like the extra-set-of-taller-jaws-always-there idea.

For the original question, I'd say bite the bullet and get used to changing vise jaws. You'll likely need, or want, to replace them at some point anyways, so you might as well find out now if there is a burr or casting defect that interferes with jaw placement. Because, as others have noted, jaws can be replaced without too much work (just a quick check with the indicator to ensure they are true at the top and on the face).
 
I used 3/4 inch thick 6061 aluminum on mine. If you make some, be sure they stick up higher than the
original jaws for obvious reasons.
 
And then, while you are at it drill and tap a hole on both ends of the rear jaw so you can make up your own
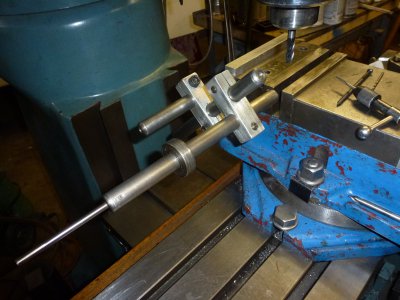
cool vise stop. That way you can have repeatability on more than one part if you need to.P1020858.JPG
This might be a little elaborate but has served me well. I may make up a simpler one as well as I sometimes remove
it for some operations. It all depends on what you are doing. The 1/4 inch diameter tip is used when I have the need for
indexing small stuff in between the jaws. (You reverse the wand so the 1/4 inch diameter is towards the chuck.)
 
The taller jaws on the outside is really clever! I suspect I'd forget about it and end up shortening them accidentally in no time though :/
 
And then, while you are at it drill and tap a hole on both ends of the rear jaw so you can make up your own
cool vise stop. That way you can have repeatability on more than one part if you need to.View attachment 341324
I like that!
How does the back rod attach to the rear aluminum jaw? Are the clamps made of aluminum?
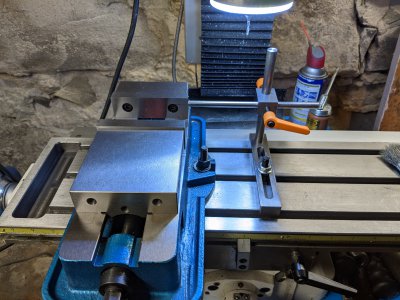
The stop I made attaches to the table. Made mine before I got a slitting saw.
PXL_20201021_151250829.jpg
If I were to do it again, I'd make the clamps with slits. Your mill stop is very nice. Have you found any limitations on your implementation?
 
I used some inch square aluminum and a slitting saw to make the grooves. The rear horizontal post
is screwed on to the rear aluminum jaw with 1/2 x 20 threads so it is removable if desired. You could
use a hack saw instead of a slitting saw but it would not look as nice. Also note in the photo that the bolts and
nuts on the vise are modified so they take the same wrench, a handy modification. One could modify the
stop if needed so I can't see much for limitations. After all, as machinists we are licensed to make changes as needed
on our own stuff.:grin: Let the chips fly!
 
Back
Top