Micro overkill X1 micro mill cnc conversion build

greenail

Registered
Registered
Joined
Aug 31, 2018
Messages
198
Been poking at this for a bit and finally have the motors mock mounted so I thought I'd share the build. This is a HF X1 mill stripped down with both X and Y replaced with HG20 rails and ballscrews. The working area is ~260mm X, 150mm Y, and 240mm Z. The Z is a KR33 bolted onto the back of the original column (the column is reversed with the dovetail on the back now). Without much shimming it is running about .1mm over 300mm in the Z and the X and Y are < .03mm. The motor mounts are a bit funky since I wanted to allow for manual control via hand wheels. The Y mount in particular is funky but I ran a FEA simulation and I think it will be ok for the loads I'm planning. My first mockup will be using wimpy GT2 belt/pulley which are rated for ~1NM and may actually be good enough depending on the microstepping settings.

The weak links will be the belts, motor mounts, ball screw support mounts and spindle. I have not yet decided how to power it or how much motor I'll need since I think the column rigidity and spindle's ball bearings will limit the entire machine but I want to do some testing to validate that. I will likely also have a 2nd spindle mount for high speed. I hope that this will be able to take light cuts in steel with small end mills. AC bearings would be a great upgrade but I'm not sure they can fit in the stock spindle housing.

I'll be running grbl on Esp32 via Bart Dring's wonderful port. I plan on making my own board with 4 axis outputs which will connect to JMC 2HSS57-N closed loop controllers running at 48V.

If anyone has any questions feel free to ask!
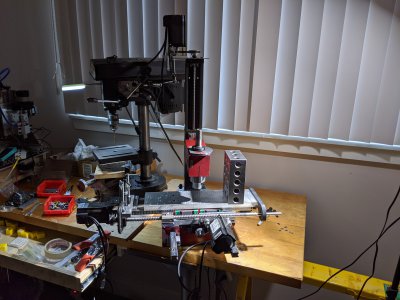
mico overkill.jpg
 
Here's a quick update.


Hope to get the limit switches finished and installed tomorrow.
 
Still lots to do, but it does cut.

This video is very boring other than the blood and crashes.


Todo:

mount limit switches
mill x hand wheel
design y handwheel bearing brace
design Z handwheel (maybe same brace can be reused)
redesign Z motor mount in something better than plastic
make htd3/5 pulleys
order belts
make X ball screw cover
finish electronics case


Wish list:

figure out how to use IHSV57 in speed control mode
quick change spindle, I ordered a high speed spindle with ATC that is the same diameter as the original spindle cartridge.
stand/dedicated table
use output from closed loop stepper for DRO
 
The worst motor mount in the world has been replaced! I added a 80x40mm c-channel extrustion block that worked out great for tensioning the motor. I also added a 15mm htd3mm belt to replace the wimpy gt2 belt I was using. The pulley reduction was decreased to 2:1 which resulted in about 2500RPM. With a 3mm cutter I can only limp along at around 200mm/m but the test cuts sound great and the c-clamps holding my motors on are not rattling like crazy as they were in previous tests, a good sign!


In the next episode I replace the crappy ball bearings in my ballscrew supports with 40 deg AC bearings and chew on some hardened t-slot nuts.

I'm not sure what to do next, i think I need to add the htd belt to the XYZ motors. I'm debating make vs buy on the pulleys. I also need to make a PCB for the DB9 cable connectors, add a probe, connect motor driver alarm signals, make a pendant with pause, start, e-stop buttons.....
 
in this episode I am experimenting with using a taper and a flat on a aluminum core that interfaces with a 3d printed htd 3m pulley for the Z axis. I've increased the reduction to 4:1 and it seems to be working ok so far. I have to say i'm pretty impressed with what the little gt2 belt could do. For anything small like a PCB mill I think gt2 is fine. The htd3 should really beef thing up though the column may be the true weak link.

 
perhaps my worst idea yet


I really wish i could figure out how to use my IHSS57 in speed control mode!
 
I moved to a new place and I think the power is much cleaner. Need to hook the scope up to the machine to see it for real but the machine seems to be running better. I also have somewhat finished all the motor mounts. The x mount is lacking a bit of rigidity and I may rework it but all the c-clamps are gone and it sounds great without the clamp bars rattling. I do think the rattling helped me tune it and I'm also glad I mocked everything up since I moved the X ball screw to the back.


Now I can re-tram the Z, do the wire management, and finish the leather ballscrew covers.
 
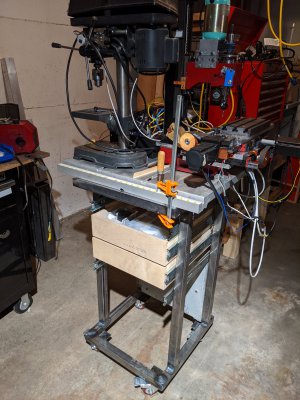
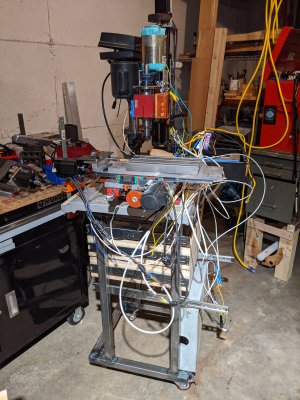
I bought a tig welder and made a stand for it that will also hold my small drill press. Some steel was harmed making this.

I also learned not to hold my filler wire in my mouth while moving stuff around. This is particularly important when your filler wire is short. I have a nice neat set of 1/16 lines burnt into my lips as a reminder.

IMG_20200311_194050.jpg

IMG_20200311_194024.jpg

Next I'm going to rework the wiring and wire management and put all the brains in the breaker panel I found for $5.
 
i mounted a sub spindle for higher RPM stuff which is an NR-40 ATC from NSK

 
Back
Top