Mechanical vs electrical edge finder

compact8

Registered
Registered
Joined
Oct 13, 2012
Messages
350
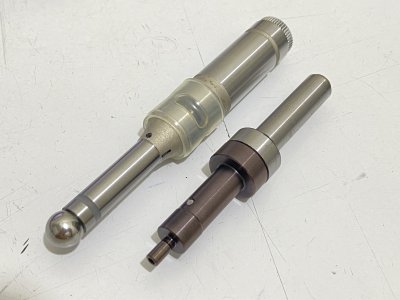
I have been using the traditional mechanical edge finder for quite some time and quite happy with it's accuracy - within 0.02 mm in the resulting dimension of the workpiece. Just recently I bought an electrical edge finder at a very good price and after testing it a bit on my milling machine, I got an error that is either the same as that of the mechincal one or three times as much ( 0.06 mm ). I have no clue on why it is so. Can anyone throw in some thoughts ?IMG_5974.jpg
 
I made an edge finder with an ABEC9 bearing (documented on this site and Doug Gray sells a kit) and noticed that you can actually detect tiny runout variations with this…with no runout the accuracy is great, the bearing spins at spindle speed until it abruptly stops dead on. With a tiny runout, you can see the bearing progressively slow as you approach the edge over the very few thousandths of runout, stopping completely when the bearing touches the edge for the entire rotation of the spindle. It’s actually impressive to observe.

So possibly the electronic tester is responding to slight variations in positioning in the spindle chuck or the collet change, since I see the shanks differ. Seems like the electronic tester would signal the first contact, which could be a bit from the center of rotation, but I have never had one and don’t know if there is any circuit stretching or shaping of the signal.
 
Last edited:
I made an edge finder with an ABEC9 bearing (documented on this site and Doug Grey sells a kit) and noticed that you can actually detect tiny runout variations with this…with no runout the accuracy is great, the bearing spins at spindle speed until it abruptly stops dead on. With a tiny runout, you can see the bearing progressively slow as you approach the edge over the very few thousandths of runout, stopping completely when the bearing touches the edge for the entire rotation of the spindle. It’s actually impressive to observe.

So possibly the electronic tester is responding to slight variations in positioning in the spindle chuck or the collet change, since I see the shanks differ. Seems like the electronic tester would signal the first contact, which could be a bit from the center of rotation, but I have never had one and don’t know if there is any circuit stretching or shaping of the signal.
Yes, just like anything else, the electrical edge finder does have a runout of 0.015 mm when checked with an indicator. This is far less than the error of 0.06 mm seen in the resulting dimension of the workpiece. Actually I have tried to eliminate the effect of the tiny runout by rotating the finder with my hand and moving the table until electrical contact is made for only half of the rotation but still I got this relatively large error on a random basis. I am wondering if there are any ways to systemetically identify the reasons.
 
Last edited:
The reason that I use the mechanical edge finder is that it's accuracy isn't affected by runout. If you are seeing a change in accuracy from one use to another, it may be that your spindle runout and the edge finder runouts are adding to gether in one case and subtracting in another. You might try witness marks on the indicator and the spindle. When you find an orientation which gives the best accuracy, make permanent marks so you always install the edge finder in that position.
 
With the different sized shafts, I presume they require different sized collets. Could different amounts of collet runout be muddying the waters?

Tom
 
I think if you check the electronic edge finders by rotating them at say 60 RPM and coming up on an edge that the the light will flick on/off because the ball/tip does not sit centered and/or recenter itself accurately. I have tried several different types and they all had issues with repeatability/accuracy and switched to a Haimer which repeats o around 0.01 mm.
 
The reason that I use the mechanical edge finder is that it's accuracy isn't affected by runout. If you are seeing a change in accuracy from one use to another, it may be that your spindle runout and the edge finder runouts are adding to gether in one case and subtracting in another. You might try witness marks on the indicator and the spindle. When you find an orientation which gives the best accuracy, make permanent marks so you always install the edge finder in that position.
If the spindle assembly turns in a reasonably true circle and tight. But could have run-out. A mechanical edge finder will find the datum center, no matter what’s going on with the spindle and or chucking. If you are working with tight tolerances. I would test the mechanical edge finder at least 3 times before proceeding. Even then it’s not a perfect science! I have found optically is the best to find reference points. Good Luck…Dave.
 
Suburban tool has an excellent presentation on edge finders. Worth a look. He points out the issue with electronic ones. Mechanical ones don't have the same issue.
 
I bought a chinese copy of the electronic edge finder shown above, but I can't bring myself to trust it. The ball shifts a little bit before closing the circuit. Maybe the quality versions are useful, but the knockoff is not. The B&S type "analog" edge finder is my preference for sure. Works quickly in metric too, .100 inch = .254 mm, no small change returned.
 
If the spindle assembly turns in a reasonably true circle and tight. But could have run-out. A mechanical edge finder will find the datum center, no matter what’s going on with the spindle and or chucking. If you are working with tight tolerances. I would test the mechanical edge finder at least 3 times before proceeding. Even then it’s not a perfect science! I have found optically is the best to find reference points. Good Luck…Dave.
I always check multiple times before calling it good. "Good" for me is repeatability to +/- .0001" over three tries.

I can achieve .0001" repeatability with my spindle mounted microscope. (300x) providing I zero out any runout first. I found that even though I have the microscope in a dedicated R8 end mill holder, the runout will vary slightly with each reinsertion. For that reason, and the fact that it is harder to set up than the edge finder, the edge finder is my first choice. The microscope works great for those circumstances where the edge finder won't work though.
 
Back
Top