Hello,
I'm trying to come up with a way to physically measure the perpendicularity of my X and Y dovetails on the saddle of my mill while it is disassembled from the rest of the machine. I am looking to verify squareness measurements that I took from the mill while it was assembled and confirm whether the X and Y dovetails were machined out of square, or if there is another source of error (ex. gibs) that I should be investigating.
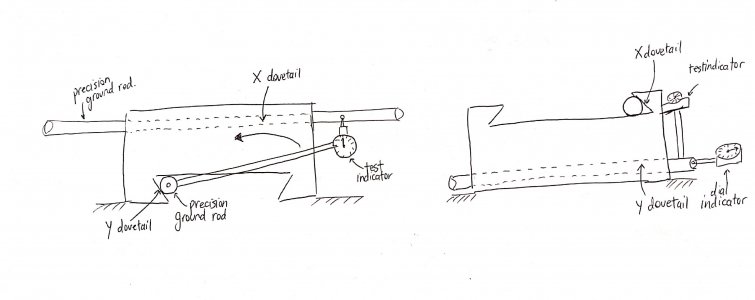
I have come up with a method using some precision ground linear rods that I have sitting around in the shop, but I am seeking some advice or a superior method. The straightness tolerance of this rod is .0005"/ft which should be sufficient as I'm attempting to measure upwards of .020"/ft. One ground rod would rest in the X-axis dovetail, and another in the Y-axis dovetail. A test indicator would be attached to the Y-axis rod and a dial indicator would be zero'd on the butt end of the Y-axis rod. The test indicator would then be swept from one end of the X-axis rod to the other while maintaining zero on the butt end dial indicator. See image below:

Maybe this question is better suited for the scraping section even though I'm not planning on scraping this saddle. Any input is appreciated.
-Adam.
I'm trying to come up with a way to physically measure the perpendicularity of my X and Y dovetails on the saddle of my mill while it is disassembled from the rest of the machine. I am looking to verify squareness measurements that I took from the mill while it was assembled and confirm whether the X and Y dovetails were machined out of square, or if there is another source of error (ex. gibs) that I should be investigating.
I have come up with a method using some precision ground linear rods that I have sitting around in the shop, but I am seeking some advice or a superior method. The straightness tolerance of this rod is .0005"/ft which should be sufficient as I'm attempting to measure upwards of .020"/ft. One ground rod would rest in the X-axis dovetail, and another in the Y-axis dovetail. A test indicator would be attached to the Y-axis rod and a dial indicator would be zero'd on the butt end of the Y-axis rod. The test indicator would then be swept from one end of the X-axis rod to the other while maintaining zero on the butt end dial indicator. See image below:

Maybe this question is better suited for the scraping section even though I'm not planning on scraping this saddle. Any input is appreciated.
-Adam.
